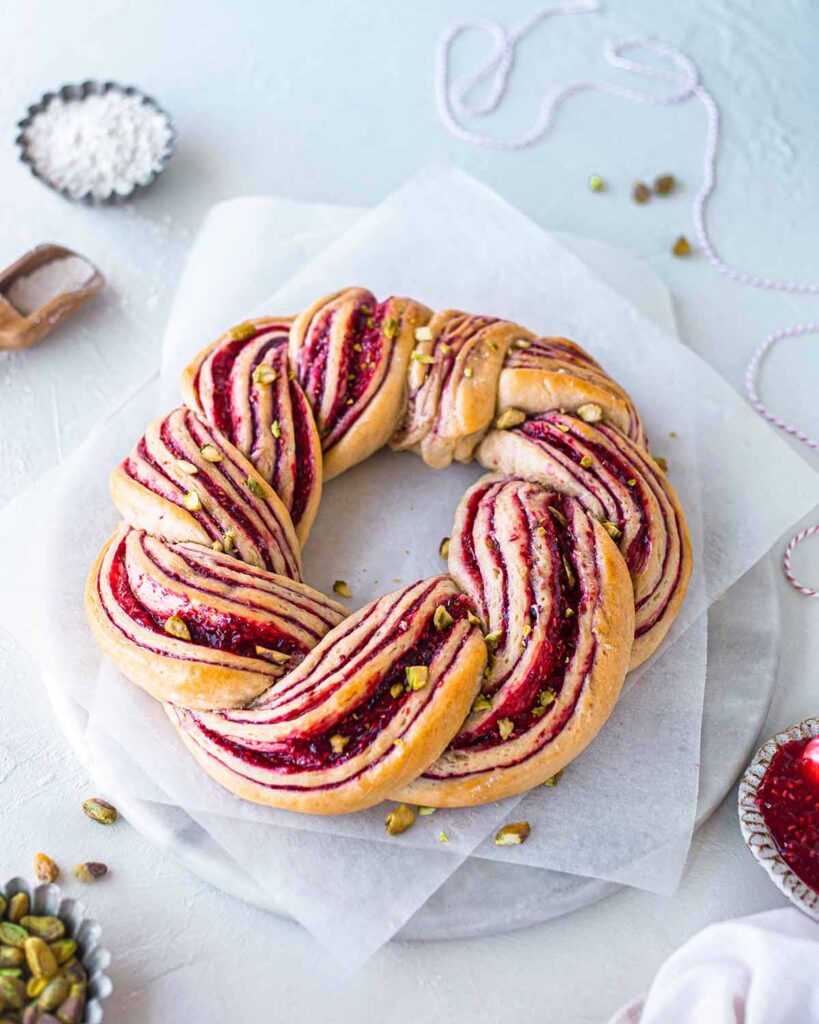
Raspberry and Pistachio Wreath Recipe
Raspberry and pistachio wreath recipe perfect for Christmas and gifting to loved ones! Easy to make, impressive and delicious.
This festive wreath recipe is adapted from my popular jam donut babka, sticky cinnamon buns and many other brioche style bread recipes on Rainbow Nourishments. Readers have successfully made these recipes over 80 times which means this wreath is *very* tried and tested! You’re in good hands here!
Ingredients you’ll need
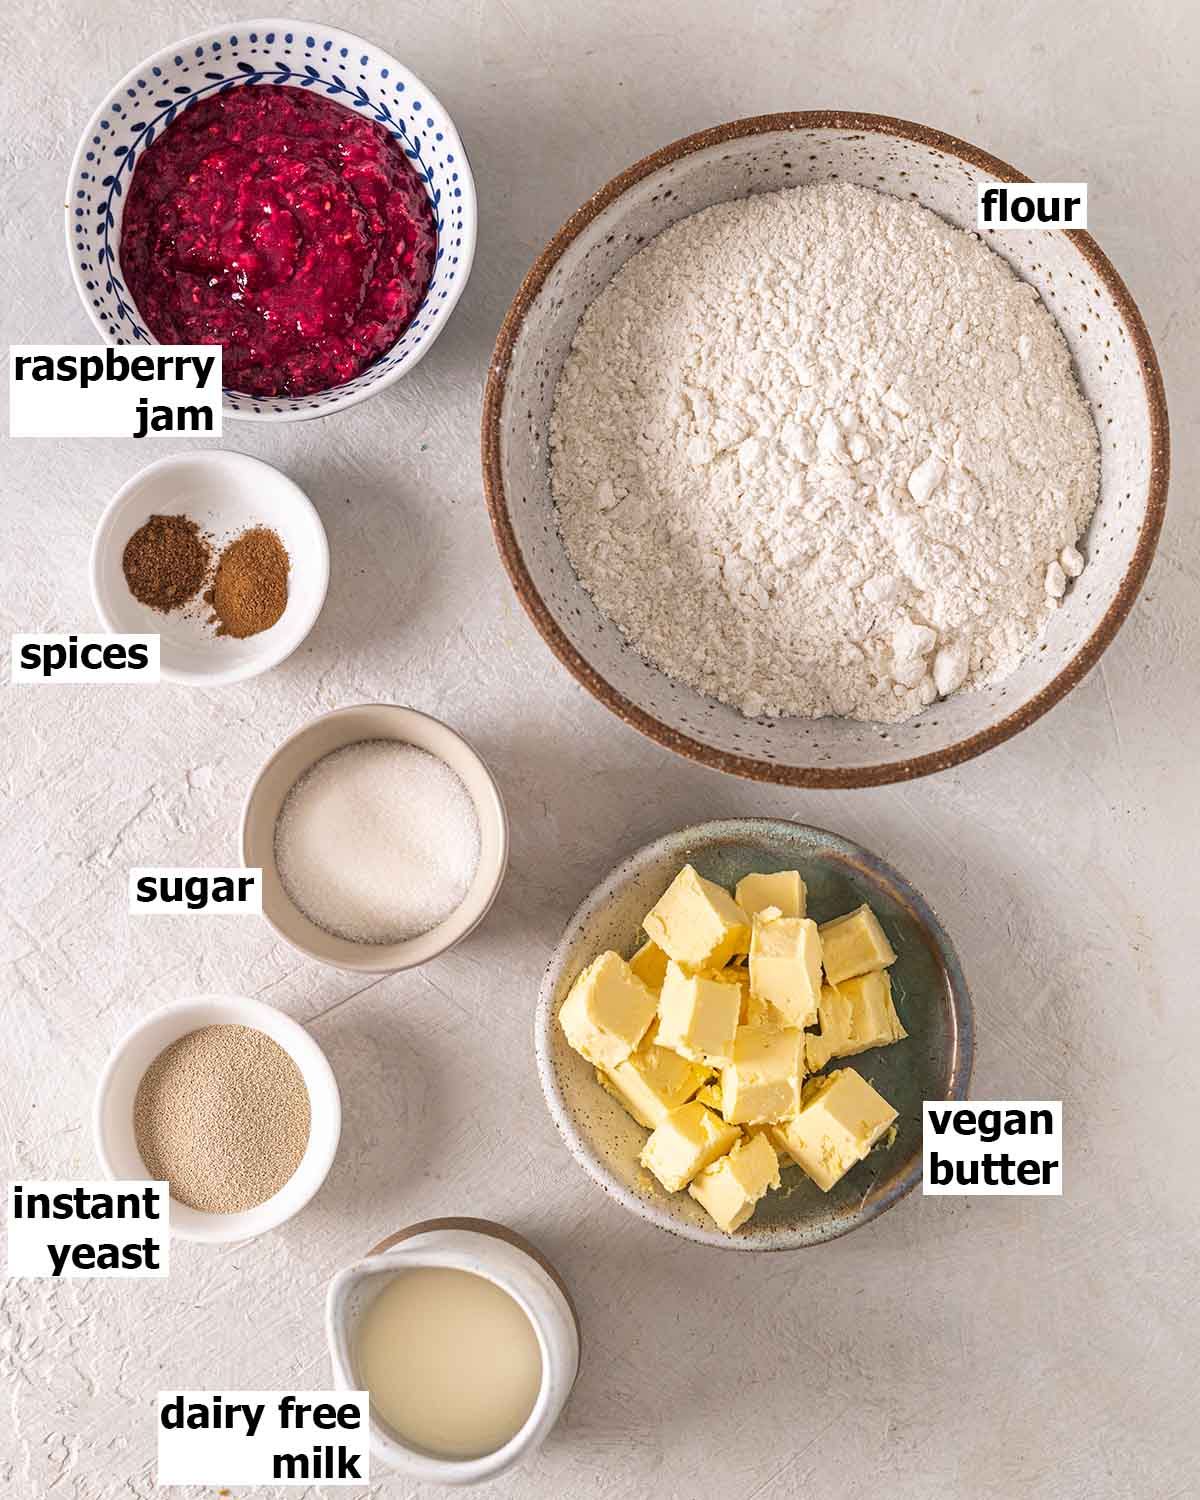
Even though this wreath looks fancy, you only need a few basic ingredients to make it!
Notes about the ingredients
All-purpose flour or bread flour are best for this recipe.
Instant dried yeast is the easiest and quickest from all varieties of yeast. You may use a different type of yeast but it’ll need to be proofed/activated beforehand.
Vegan block butter or margarine. Make sure this is room temperature otherwise it’ll be difficult to incorporate it into your dough! If you use spreadable margarine, your dough may need a little extra flour and/or less milk.
Homemade quick jam (using just 3 ingredients) or store-bought jam. I’d recommend raspberry jam as it has the most vibrant color!
Pistachios to decorate (optional but recommended). But who can say no to a red and green wreath)!
The full list of ingredient quantities and instructions are in the recipe card at the bottom of this post.
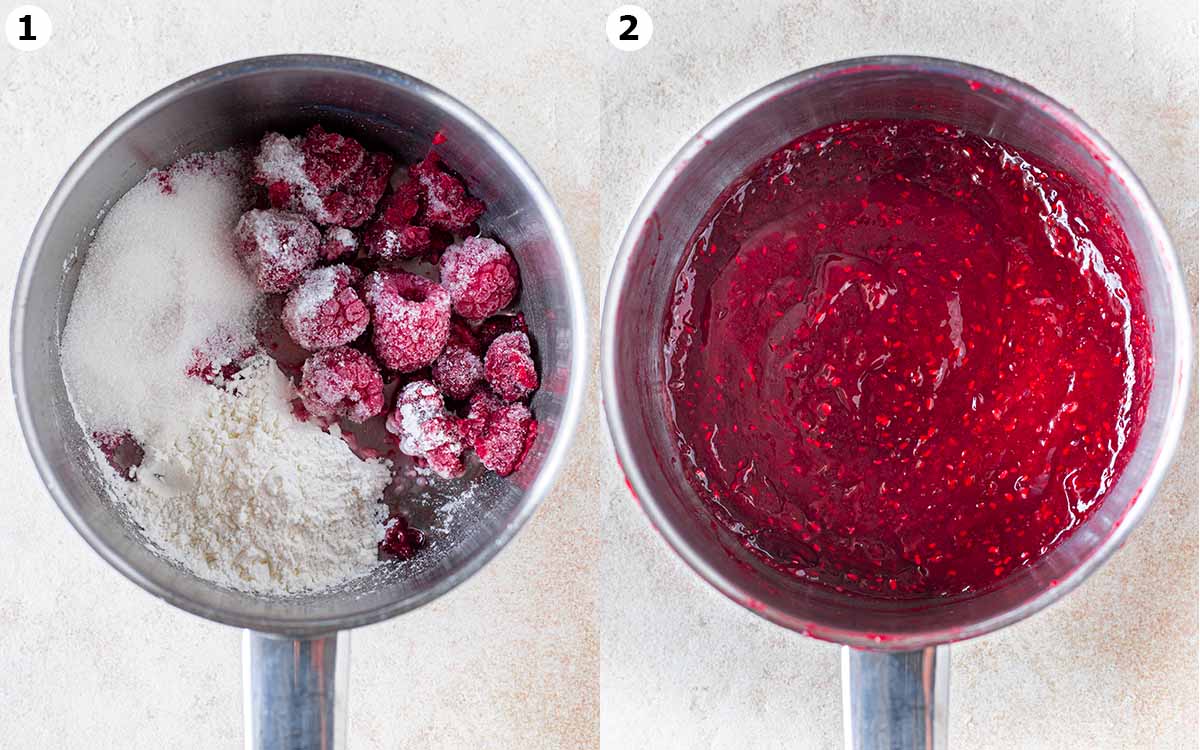
Preparing the jam for this wreath recipe
I made a quick jam out of raspberries, sugar and corn starch for this wreath. To make the jam, simply add ingredients to a saucepan then simmer it until it was very thick and sticky.
If you use store-bought jam like Bonne Maman’s raspberry conserve, you will need to reduce it on the stovetop beforehand as it’s too liquidy. The jam needs to be thick enough so it doesn’t ooze out when rolling or baking the wreath!
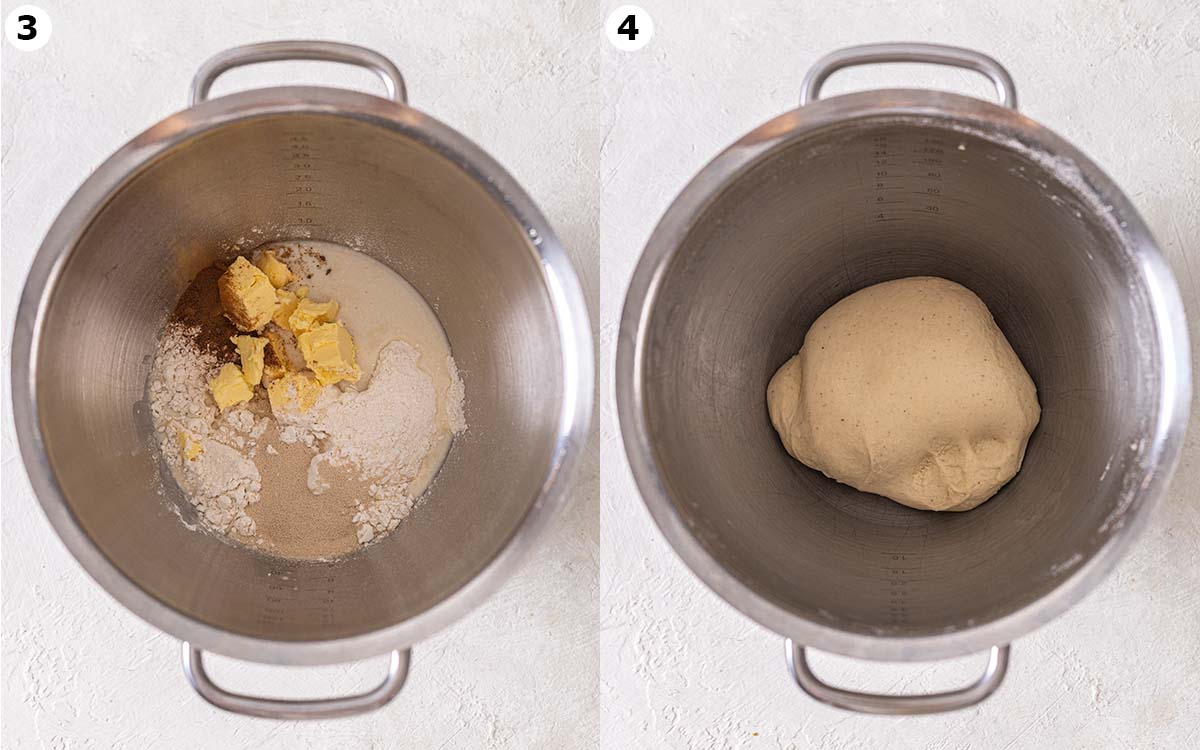
Preparing the dough for the raspberry wreath
It’s super easy to make the dough for the wreath. Instant yeast doesn’t need to be activated beforehand so you can simply add all the dough ingredients to a stand mixer and knead until it’s soft and stretchy.
If you don’t have a stand mixer, you can use a large mixing bowl. Simply mix all the ingredients in the bowl then knead it on a clean floured surface.
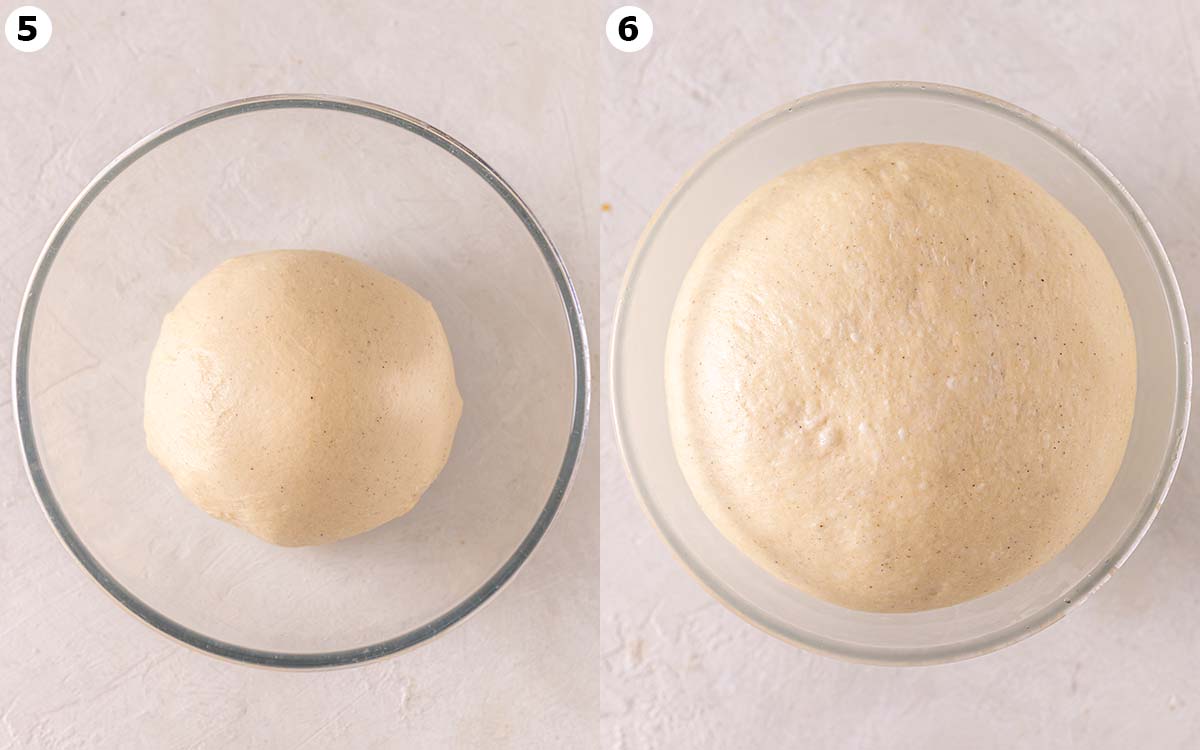
The dough should be soft and have no large cracks in it. However, it shouldn’t be sticky enough that it sticks to the side of the bowl/kneading surface.
Top tips for resting the dough
When you rest the dough for the first time, the most important thing is to keep it in a WARM humid spot in your home. King Arthur Baking recommends that dough is rested at 75°F to 78°F (23°C – 25°C) for optimal flavor.
Unlike regular pizza dough, this dough is enriched with butter. The butter inhibits the dough from rising so it takes longer to proof.
The absolute minimum time for rising is 1 hour if you live in a hot climate. However, it can take 2-4 hours if it’s Winter. And if you rest the dough in the fridge, the dough can take 8-10 hours!
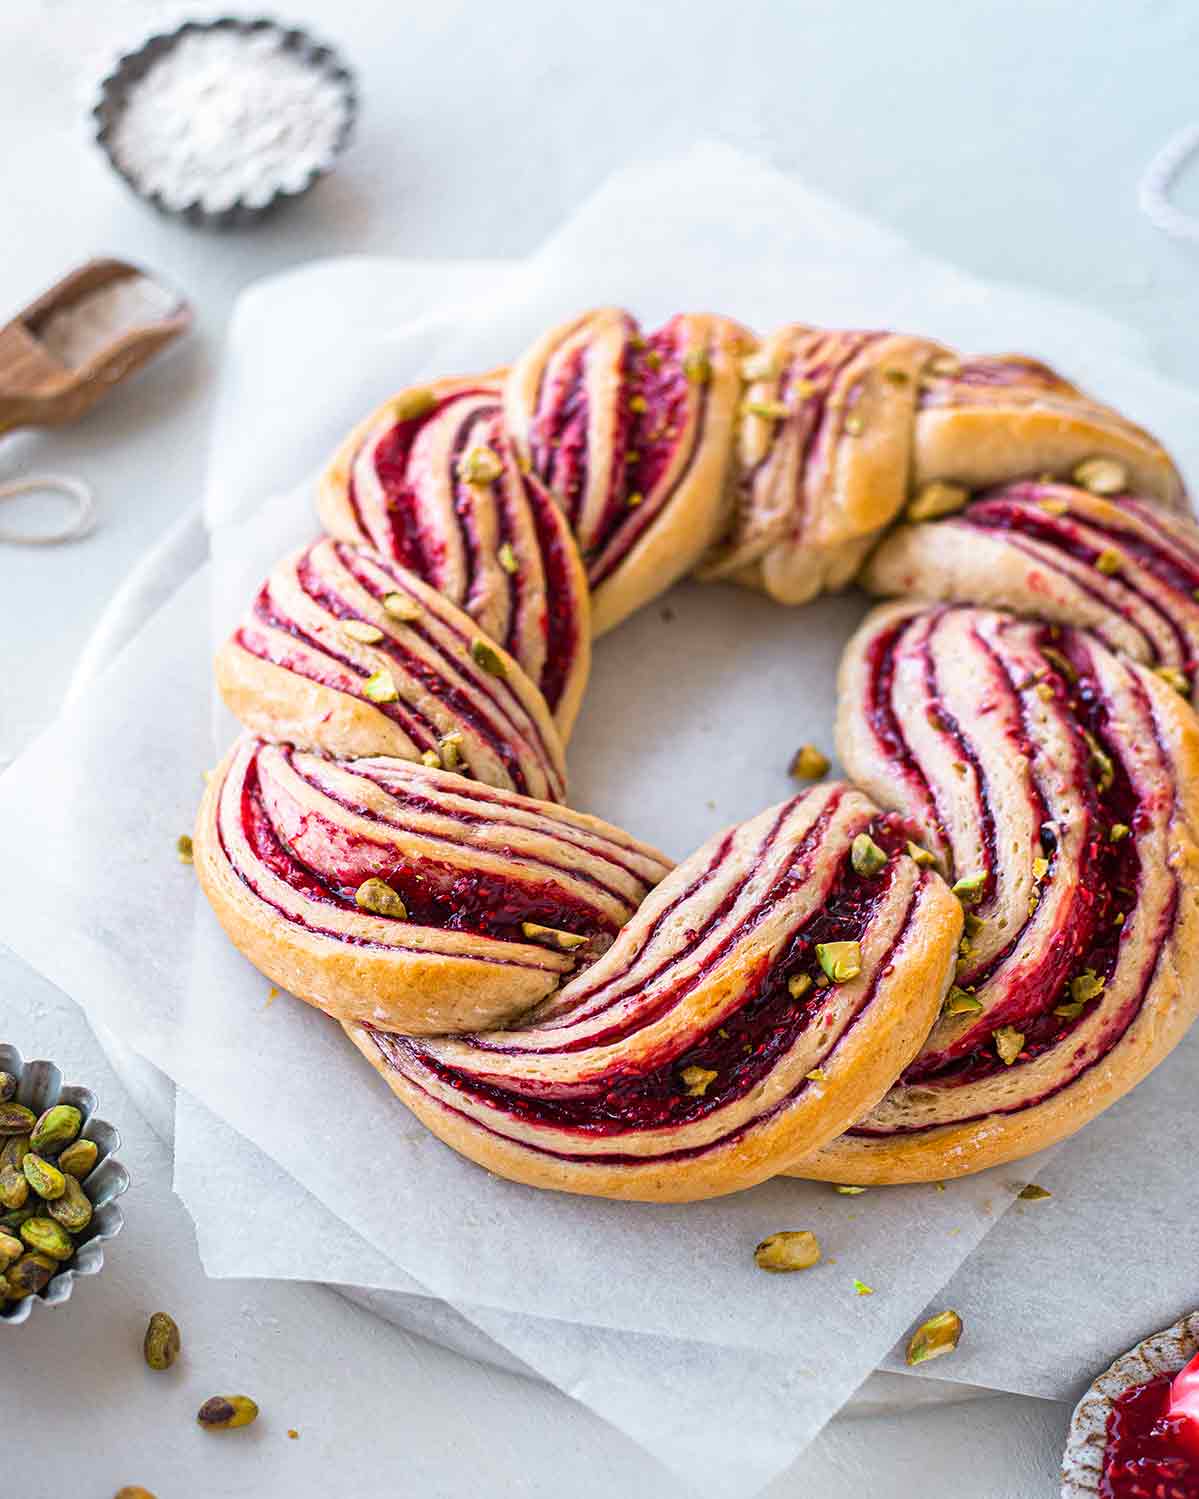
How to assemble the wreath
If you’ve made cinnamon rolls or babka before, it’s easy to master this wreath recipe.
Simply roll out the dough in a large rectangle on a floured surface. Mine was about 45 x 25 cm (18 x 10 inches) large. TIP: the longer your dough, the larger your wreath will be!
Next spread your jam on your dough. My jam was very thick and sticky so I was able to spread it very close to the edge.
Once you’ve done that, roll your dough starting from the long side. You will need two hands to do this.
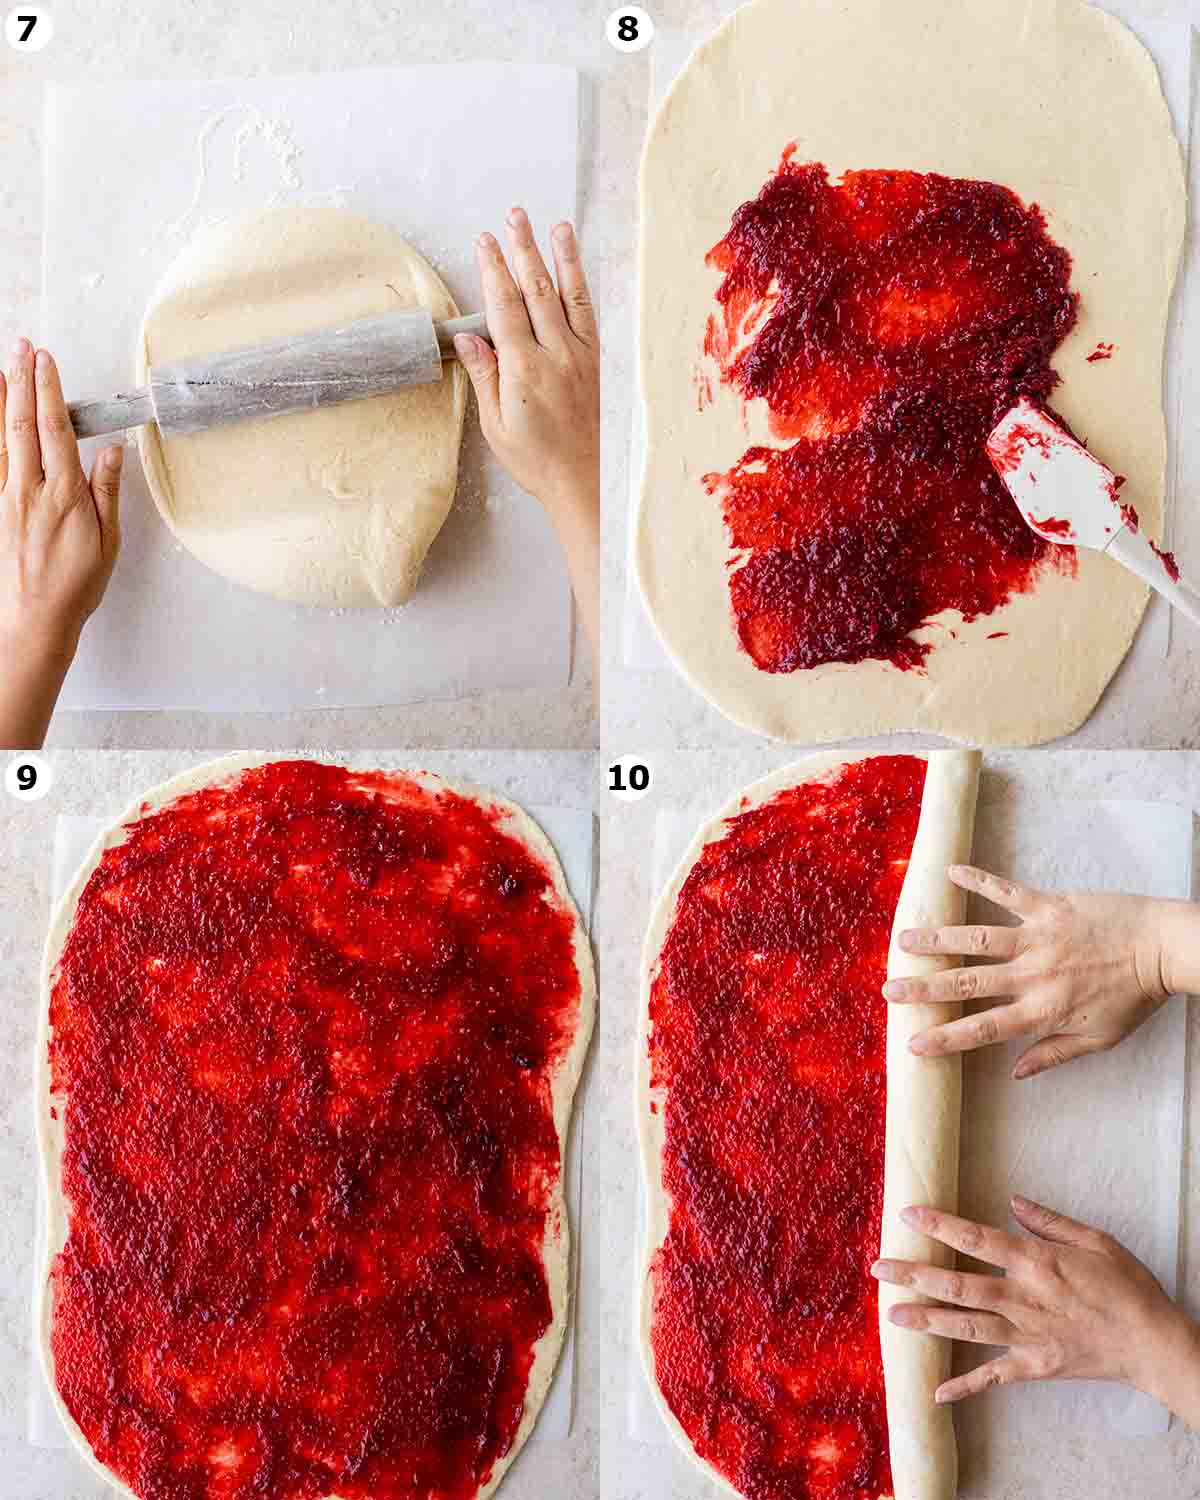
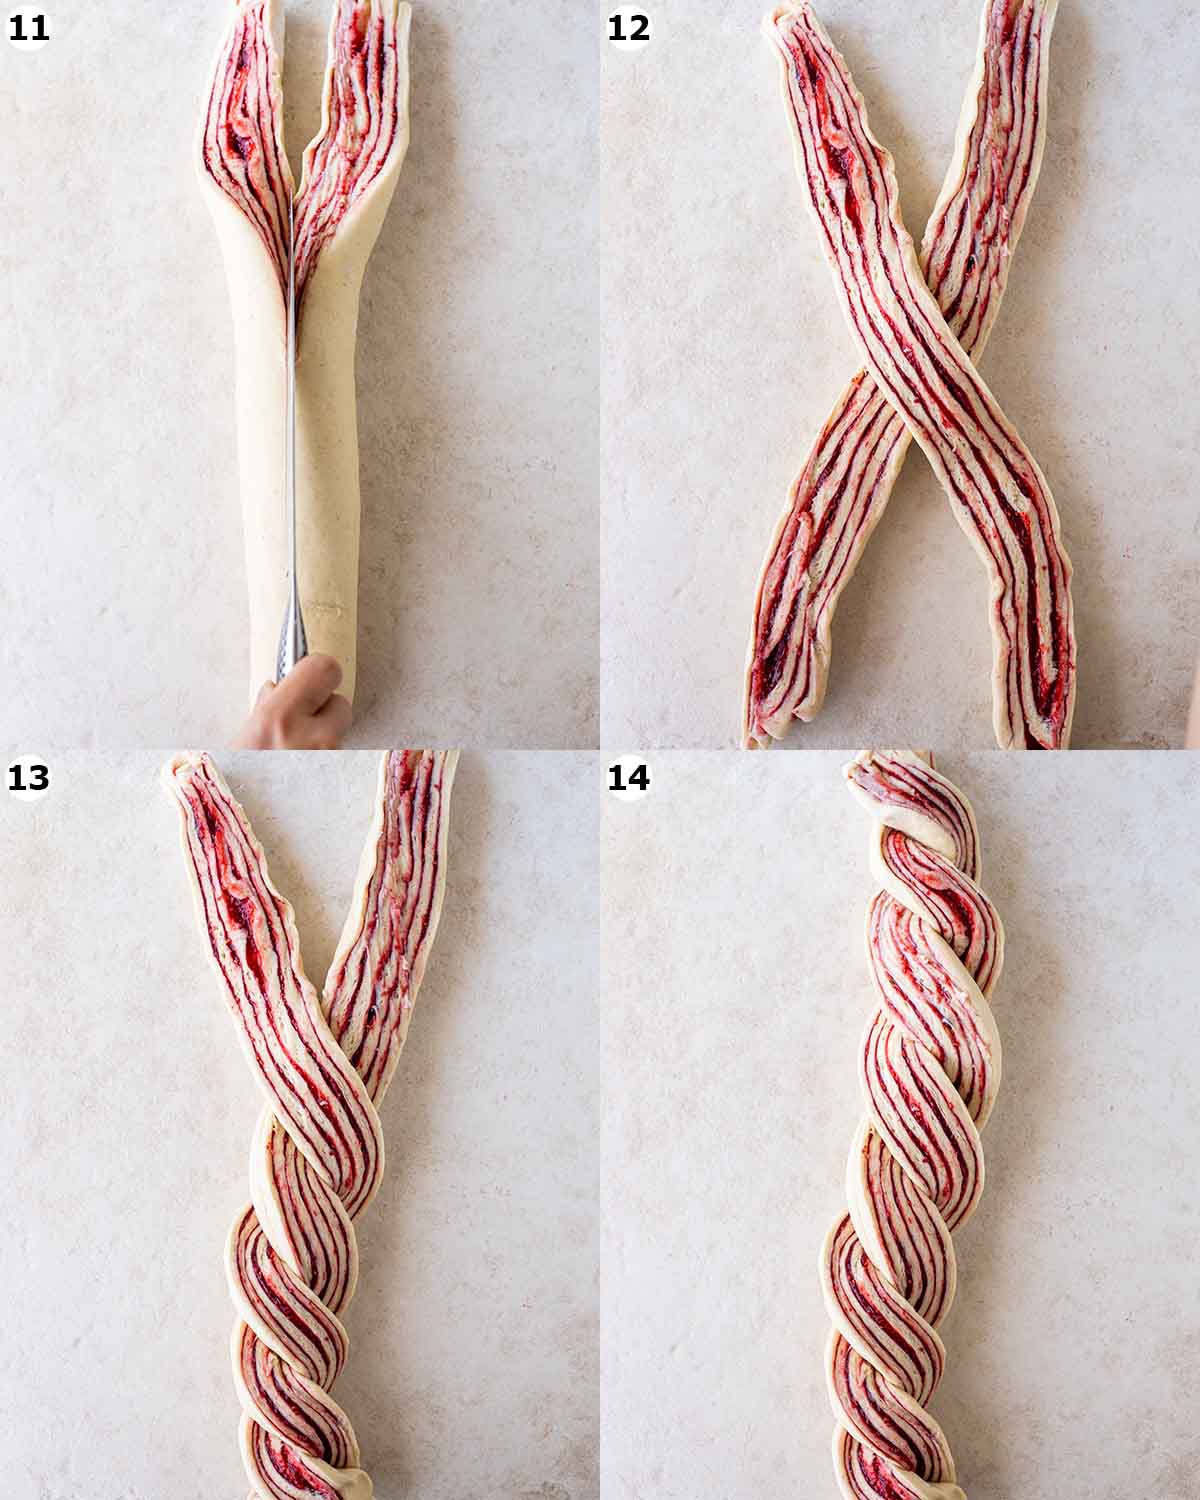
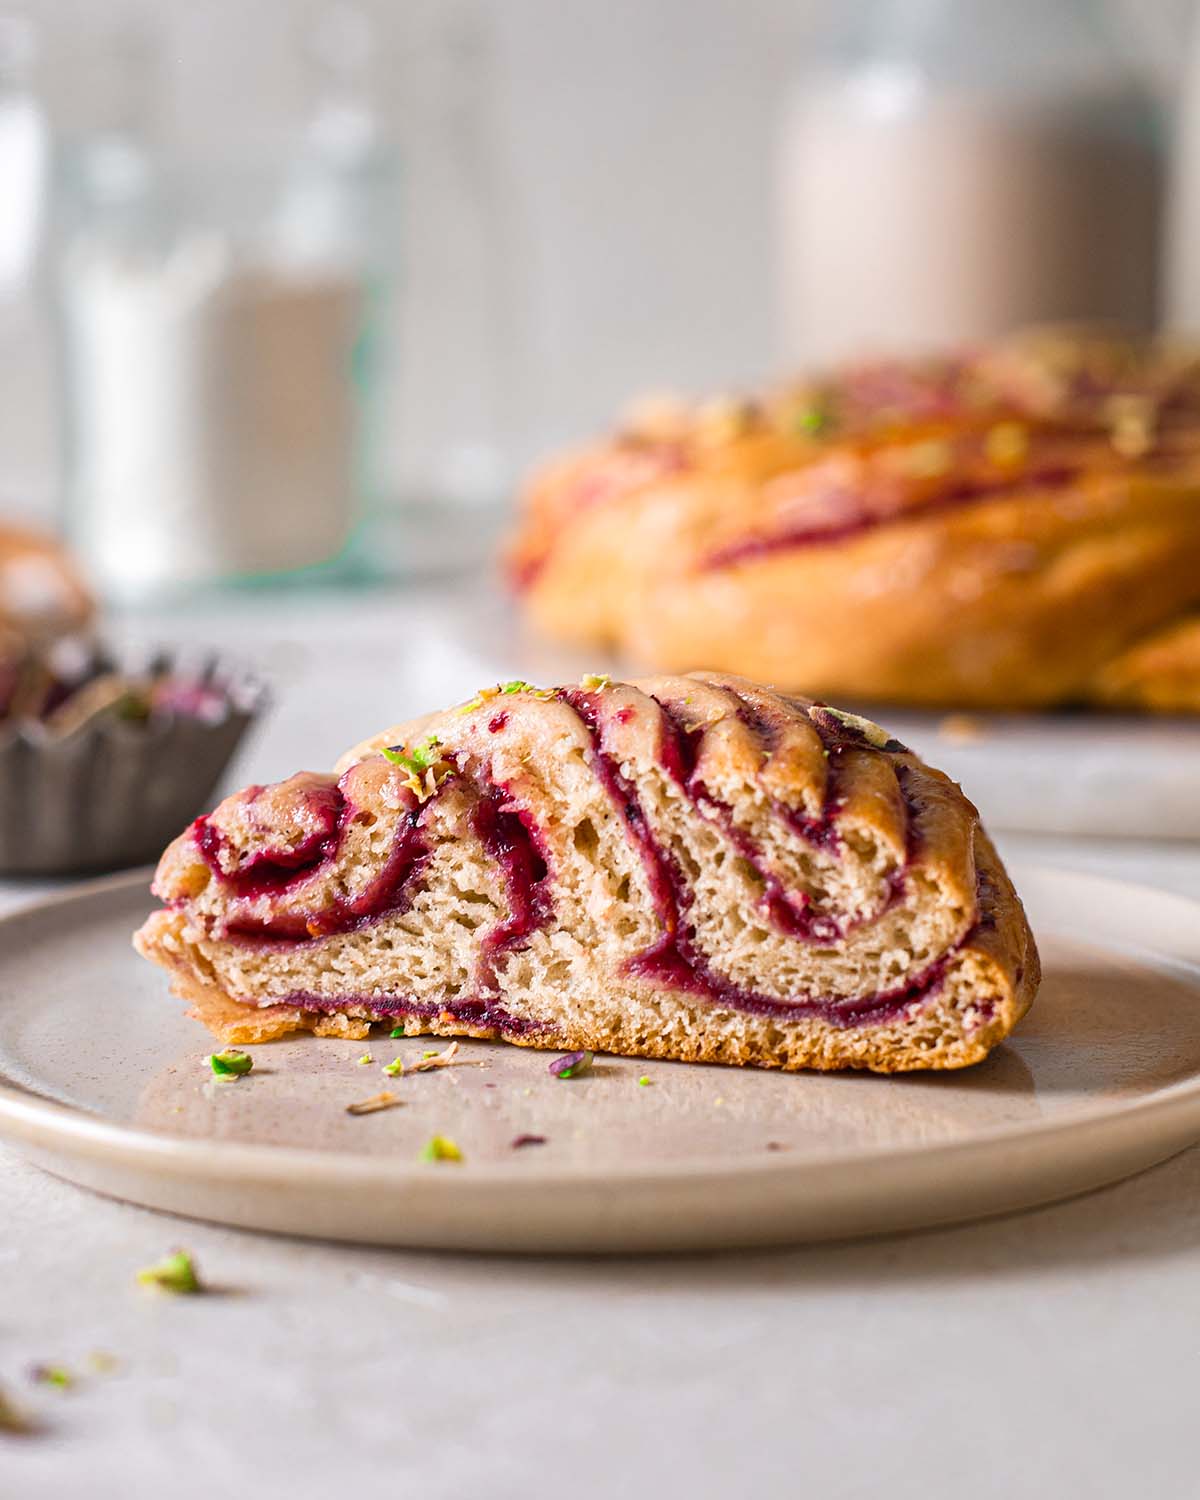
Now you have a log of dough which will be similar to a Swiss roll. Cut the dough in half lengthways so you have two long strips of dough.
Twist or fold the dough to form a braid-like shape. Try to make sure the exposed jam side is on top!
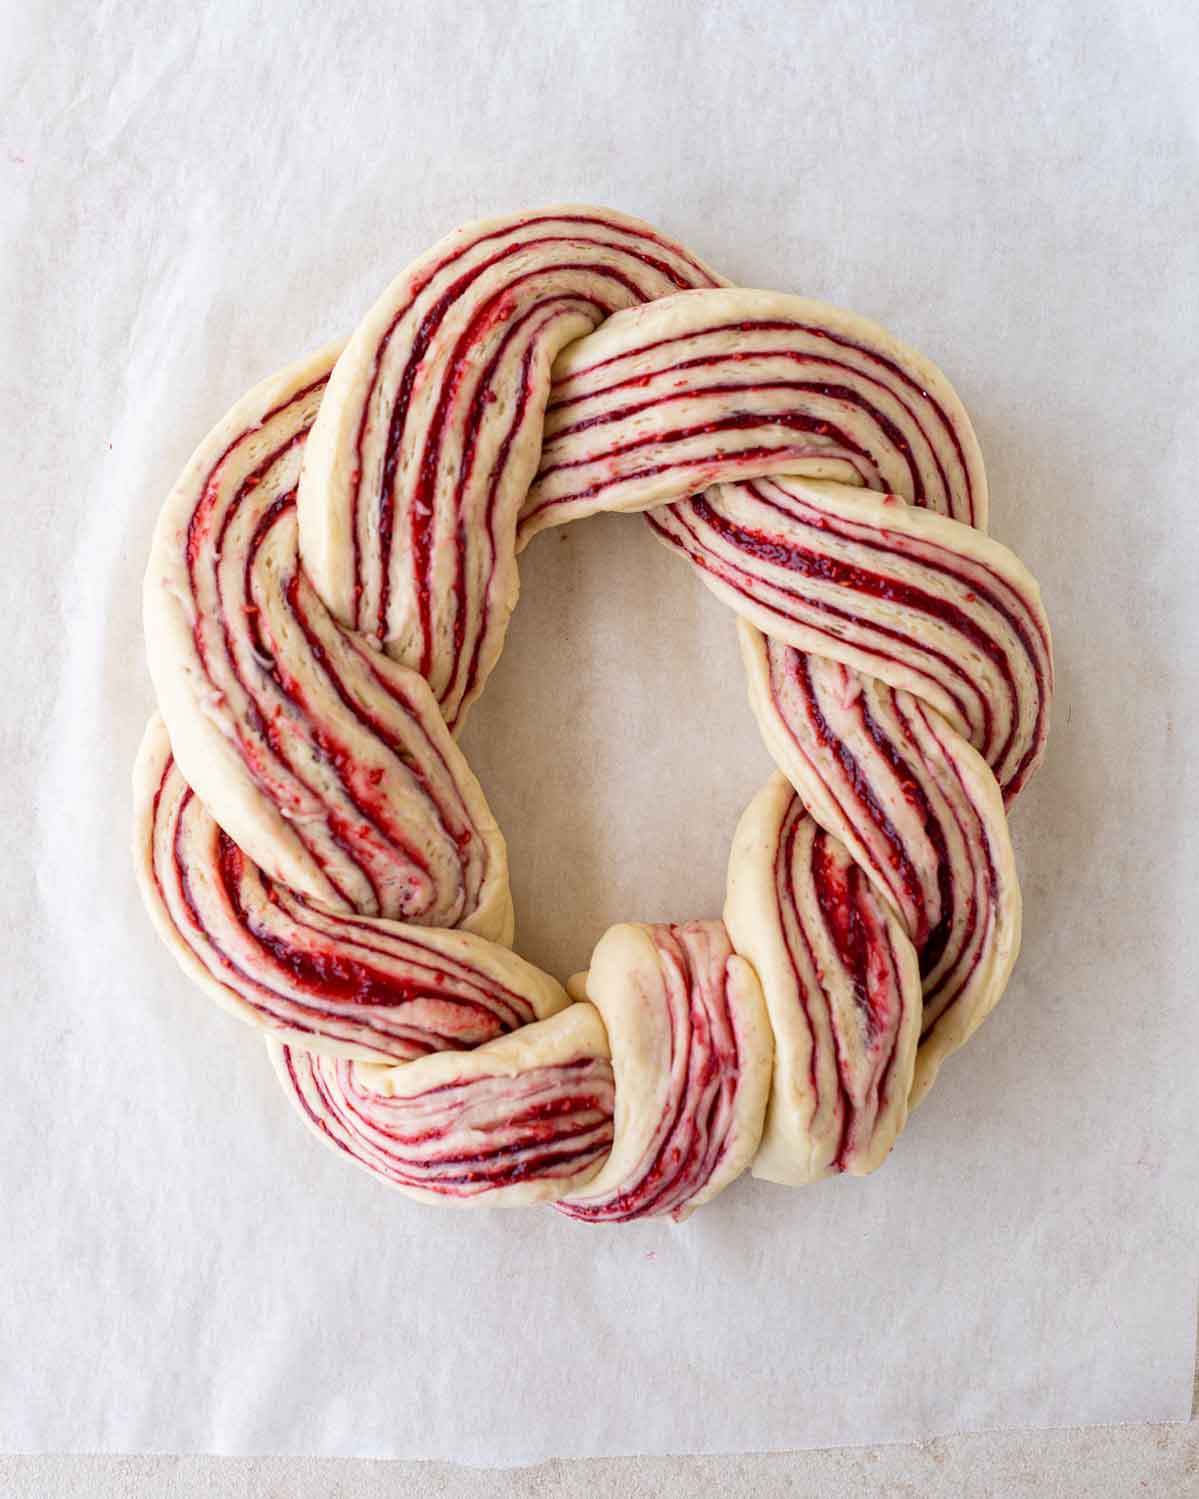
Once you have twirled your dough, transfer it to a sheet of baking paper. It’s easier to do it at this stage because shaped wreaths are hard to transfer! Then simply bring the two edges together to form a circle or wreath.
Allow the wreath to rest for about 30 minutes to 1 hour until it’s puffy again. It will increase in size a little but not dramatically. Then it’s ready to bake!
Making this wreath in advance
If you’d like to make this wreath ahead of Christmas Day, here are a few options:
- Make the dough and let it rest in the fridge overnight. I recommend placing the dough in a large container as it will expand in the fridge! On the day of baking, allow the dough to soften a little at room temperature, shape it into a wreath and let it rise once more. Chilled dough is easier to handle!
- Make the dough, assemble the wreath and let it rest in the fridge overnight. You’ll need to place the wreath on a very large baking tray as it will expand in the fridge. I recommend covering the wreath with a very large container, tea towel or something that won’t stick to the wreath as it rises. The next day, you can transfer the wreath straight from the fridge to the oven (it’ll just take an extra 5-10 minutes to bake.)
Alternatively, you can do either step 1 or 2 and freeze your dough/wreath. The dough will continue to rise until it completely freezes.
Recommendations for serving the festive raspberry wreath
For some festive color, I sprinkled some chopped pistachios on my wreath. Alternatively, you can:
- Sprinkle other nuts on the wreath
- Drizzle some dark or white chocolate on top
- Drizzle a simple sugar glaze on top. Check out the simple lemon glaze I used for my poppyseed muffins.
Customizing this wreath recipe
If you’d like to make the wreath EXTRA festive, you can also:
- Add some raisins and extra spices to the dough when you mix all the ingredients together
- Add some chocolate chips to the dough. Same as above!
- Use a gingerbread filling instead of a jam filling. I’d recommend the filling I used for my Gingerbread Cinnamon Rolls.
More showstopping Christmas desserts


Follow Rainbow Nourishments on Instagram, Facebook, TikTok and Pinterest, and subscribe via email to receive all of our latest recipes!

Raspberry and Pistachio Wreath Recipe
Ingredients
Quick Raspberry Jam (or thick store-bought jam, see note 1)
- 1 cup (110g) fresh or frozen raspberries
- 3 tablespoons (40g) granulated sugar, or liquid sweetener to taste
- 2 tablespoons (14g) cornstarch / corn flour
- Dash of water
- Squeeze of lemon juice, to taste (optional)
Wreath
- 2 ½ – 3 cups (315 – 375g) all-purpose plain flour, or bread flour (start with less flour and add more if needed)
- ⅔ cup (165g) dairy-free milk, warm
- ½ cup (115g) vegan butter, room temperature
- 3 tablespoons (40g) granulated sugar, or coconut sugar
- 1 tablespoon (10g) instant dry yeast, (note 2)
- ¼ teaspoon ground cinnamon
- ¼ teaspoon ground nutmeg
- Pinch of salt, if not using salted butter
Optional add-ins
- ½ cup roughly chopped vegan chocolate
- ¼ cup raisins
- ¼ teaspoon ground ginger
To decorate (note 3)
- ¼ cup (50g) granulated sugar
- 2 tablespoons (30g) water
- ¼ cup pistachios
Instructions
To make the jam:
- Add all ingredients to a small saucepan and bring it to a boil for 5 minutes. Stir while mashing the raspberries. Reduce to a simmer for another few minutes or until the raspberries have broken down. The final mixture should be like a thick very thick and sticky paste (the thicker, the better). It should keep shape and 'stick' to a spoon almost like frosting or buttercream. Remove from the heat and cool.
To make the dough:
- Add all ingredients (and optional add-ins) in a large bowl or stand mixer and mix until it comes together. Knead the dough for 5-10 minutes or until the dough becomes soft and stretchy. The dough should be tacky but shouldn't stick to the side of the bowl. If the dough is sticky, add a little more flour and knead again. If the dough is dry (where cracks are showing on the surface), add a dash of milk and knead again.
- Leave the dough in the bowl or stand mixer, cover with a tea towel and place it in a warm place for at least 1 hour or until the dough doubles in size. If it doesn't double in size, place it in a WARMER spot and wait until it does.
- Dust a clean surface with flour. Roll out the dough into a rectangle shape around 25 x 45 cm large (10 x 20 inch). Spread the cooled jam onto the dough so it's close to the edge.
- Starting from the long side of the dough, roll it into a tube (note 5). Use a sharp knife to cut the tube in half length ways creating two long 'strips' of pastry. Carefully twirl the two halves together.
- Place the dough on a lined baking tray. Connect the two ends of the dough together to form a wreath. Cover the wreath and let it rest in a warm place for at least 1 hour or until increased in size by at least 20%. You can also let the wreath rest in the fridge overnight.
Baking the wreath:
- If you chilled your wreath overnight, let it come to room temperature. When you are ready to bake, preheat the oven to 170°C (340°F).
- Bake the wreath for 20-30 minutes. The amount of time will depend on your dough and how you made the wreath. The wreath is ready when the surface is slightly golden brown and if you press the surface, it should feel firm and bounce back quickly. Allow the wreath to cool on the baking tray.
Decorating the wreath:
- To make a sugar glaze, add the sugar and water to a small saucepan over medium heat. Stir until the sugar has dissolved. While the babka is still hot, drizzle the sugar glaze on top.
- Sprinkle the pistachios on the wreath just before serving. Enjoy! The wreath is best eaten the day it is baked. Alternatively, store it an airtight container at room temperature for 1-2 days.
Video
Notes
- If your store-bought jam is a little runny, reduce it on the stove for 5 minutes. Add the jam to a small saucepan over medium heat and allow it to simmer until it’s thick and some of the liquid has evaporated. The jam should not drip and be sticky. If in doubt, the thicker the better! Use the pictures in the blog post as a reference.
- Instant yeast doesn’t need to be ‘activated’ or ‘bloomed’ beforehand. However, if you use another type of yeast, combine it with warm milk and a pinch of sugar beforehand. Wait until it bubbles then use it in the recipe.
- If you’re avoiding refined sugar, you can use 50g of any liquid sweetener instead of the sugar and water. Heat it up and drizzle on the wreath while it’s hot.
- If your dough is too soft and will be difficult to shape, place it in the fridge for 30 minutes to firm up. This is just for the wreath’s appearance and won’t affect its taste or texture.
This post may contain affiliate links. As an Amazon Associate, I may earn a small commission from qualifying purchases at no additional cost to you.

Hi Anthea! Would you recommend completely preparing and assembling the wreath the day prior to my gathering, then storing it in the fridge until the morning to bake? And how long will it take for it to rise again before baking? And what temperature/how long should I reheat for? Thank you! Can’t wait to try this!
Hi Katelynn! Yes, you can absolutely prepare and assemble this wreath the night before a gathering and bake it in the morning. I’ve done this a few times for this wreath and cinnamon rolls and it’s always worked out well. The wreath normally expands in size in the fridge and can be transferred straight from the fridge to the oven for baking. Bake it at the same temperature (170°C / 340°F) but just for 5-10 minutes longer. I’ve added a new section in the post above called ‘Making this wreath in advance’ with some extra tips. I hope that helps!
Hi Anthea, this looks like a wonderful recipe and I will be trying it soon! I’m considering making it to give to my non-baker friends. Can this be par-baked and then frozen until they finish it in their ovens? Or can I freeze after shaping into a wreath? It would be wonderful to give them a holiday morning treat that they can pop into the oven for an easy, homemade breakfast! Thanks so much and happy baking!
Hi Cristi, aw what a lovely present that would be! This wreath would work best if you freeze it after shaping it. When your friends want to bake it, it’s best if they let the wreath come to room temperature then bake it for breakfast. Normally a ‘second rise’ is required, but I’d say that this slowly happens when you freeze it and when it comes to room temperature. I hope that helps and let me know if you have any other questions :).
Hi Anthea! I really like my bread on the dense, goey, and doughy side (not too soft, airy or on the dry-er side). Are there any modifications I should make so the bread turns out really thick and dense?
Hi Isabella! I find that breads that need to be twisted and shaped tend to be a little denser than regular loaf breads or brioche because they need slightly less water to maintain their shape. However, for a more dense bread, make sure you don’t overknead your bread (knead it until it’s smooth and combined, rather than til the windowpane stage) and proof your bread until it’s just puffy or right before it has doubled (be careful to not overproof the bread). Also, I’d recommend using bread flour as it creates a ‘chewier’ bread rather than all-purpose plain flour which makes a soft cakey bread. I hope that helps!
Hello
I like my sweet breads to be soft and flaky, what can I do to make this bread soft and flaky?
Thanks
Hi, I’d recommend kneading the dough until it reaches the windowpane stage and making sure the dough isn’t too dry! You can also use a more advanced method of kneading which you can read about in my vegan brioche post. I hope that helps!
Hello, recipe looks wonderful and I will make today. But I have a question. Can I freeze the wreath after I bake it?
Hi Ema, yes you can! Just make sure you wrap the wreath tightly and leftovers are best eaten warm (it can be reheated in the oven) or sometimes at room temperature. If you warm it up, sprinkle a little water on the wreath so it doesn’t dry out.
This recipe took some practice to achieve a great result. Very tasty and worth the time. Anthea is quick to respond to questions about her recipe. I will be baking it again. Thanks very much.
Thanks so much Laura! Always happy to answer any questions and thank you for your willingless to learn! Your final wreath looked beautiful and I hope you’re proud of yourself for mastering it!
This looks delicious. I’m thinking of making this, this afternoon. Could you tell me, please, if your oven temperature (170c) is for a normal or a fan oven. If it’s the latter, I usually cook at a 20c lower temp. so want to be sure of temp. before I start. Thanks.
The temperature is for a normal oven! As usual, just keep an eye on the wreath and if it’s browning too quickly and not cooked inside, just turn down the heat (though, it doesn’t happen often with this recipe). Hope that helps!
Many thanks. Sadly, my wreath (now in the fridge,to bake this morning) is not looking good. That is not down to your recipe, it’s because I had two separate lots of very chatty, unexpected visitors, call, when I was mid-making and I think the lengthy interruptions, are what caused my less than successful wreath. I’ll still bake it today for my hubby but maybe I’ll try making one another day, for my guests.(And put a ‘Do Not Disturb’ sign on the door!!! 😉)
Do you know if this would work with gluten free flour? Looks amazing!
Thank you! I haven’t had great success with gluten free flour for this unfortunately! I’m still working on a good flour combination but haven’t nailed it yet.
Looks amazing!!! Thank you so much for sharing!
Does it need to be served warm? Can it keep for a few days on the counter? Need to be reheated? Refrigerated?
Thank you! I find the wreath best when it’s fresh (like most homemade bread). So if you make it for an event, I’d recommend shaping the wreath beforehand and baking it on the day of. Otherwise, it’s lovely slightly reheated :).
I like this recipe ,,,,,,thank you I know how to cook but I know several people who do not ,it is so special how some you made the directions ,,,that is wonderful because a lot of people won’t even try if it is complicated,,,,thank you so much I love this
Pretty easy recipe and I love the look of the red-striped dough. Made a couple changes since I’m not vegan, I used regular milk and butter, and brushed it with beaten egg before baking.
I will say that 15 minutes was nowhere near long enough to fully bake the wreath. Tested after 20 minutes with temperature probe and it was only 137°F. I’ve added at least another 20 minutes and I’m still not sure it’s done.
Can’t wait to try it though!
Glad you enjoyed making this wreath recipe and thanks for your feedback!
That’s interesting about the baking time! I’ve baked this recipe many times and it’s always baked at around 20 minutes for me. Can I ask if you also have an oven thermometer, used a fan-forced/conventional oven or perhaps preheated your oven to 180°F instead? This is a good example showing that all ovens run differently :). I hope you enjoy eating your wreath nevertheless.
This recipe is not only delicious and loved by all who I have baked it for, it is FULLPROOF! Since the first time I baked this wreath I now make sure there is always a supply of dried yeast in my pantry as this recipe has turned into my go-to for when I have to find something easy and problem free, for when I have hardy anything else available or if I need to take something with me to a friend’s (as it’s easy to pack and take with). I’ve baked it with a few variations, sometimes with small apple chunks, sometimes with a different icing and it’s a winner every time! It’s also a really fun one to do with the kids are there isn’t much that can go wrong and there is lots for them to be involved with
Aw thank you *a million* for your kind review and it makes me soo happy that this recipe has worked for you soo many times! I reakkt think that once people start baking with dried yeast, it opens up soo many possibilities:). And oh my, I also need to try it with apple chunks and other variations! Love the idea of involving the kids too. Thanks for taking the time to leave a comment – soo much appreciated xo
The recipe is great with a great taste and easy to made my family liked it!! I’ve used buckwheat flour which is gluten-free, that’s why the wreath collapsed and didn’t look as beautiful
Soo interesting that the wreath collapsed with buckwheat flour but glad that you enjoyed the taste and found it easy to make. Thanks for your feedback x
I made this wreath for Christmas and it was delicious. My kids absolutely devoured it and it was so cool making a wreath shape. I actually converted the dough recipe to use in the thermomix so it was extra super easy to make!
Thanks Anthea for yummy, creative recipes 🙂
That’s so cool to hear and love how you got your family involved! Thanks so much Grace xo
Hey Anthea!
I tried to make this wreath today, but kind of failed…. It looked beautiful before baking, but collapsed totally in the oven. I preheated it to 170°C and did not open it in the first 15 minutes. What do you think could have gone wrong? (I’m very new to baking and even more so to vegan baking 🙂 )
Hey! Oooh that sounds odd. Was the dough very soft and the shape just ‘melted’ away in the oven? If so, it sounds like your dough was a little too soft due to ingredients or temperature of your home. Or did it rise and collapse like a cake did? If so, it’s a yeast issue!
Hi! I made this easier recipe and it was wonderful! Perhaps for the next time I will add honey (2 tbsp) to the rapsberries! And I will paint with egg instead of oil before cut it. Thank you so much??
So glad to hear Alice! Jam is another option for glazing the wreath too! Thank you for your feedback 🙂
This is beautiful! (I’m deciding between this and your pistachio cranberry linzer cookies for Christmas this year.) For the jam, if you used store-bought instead, how much jam would you need?
Thanks Casey! For the store-bought jam, I’d recommend using around 200g then reducing it on the stovetop until it’s about 150g or really thick and not drippy. I hope that helps!
Thanks Anthea for a beautiful recipe! It’s easy to make and delicious to fill your tummy❤️ And what I liked the most is how equally beautiful the wreath looks before oven and after , very Instagram friendly bread indeed?
Aw thanks for your feedback Natasha! I’m so glad to hear you enjoyed the whole process and eating it too!