Vegan Pesto Bread Wreath
This vegan pesto bread wreath has layers of brioche-style dough and easy macadamia pesto. It’s the perfect centerpiece for celebrations such as Christmas!

The recipe card only is sponsored by Australian Macadamias. As always, all opinions are my own.
Ingredients for this recipe
To make the bread and pesto, you will need:

The full list of ingredient quantities and instructions are in the recipe card at the bottom of this post.
Notes about the ingredients
Instant yeast is the quickest and easiest type of yeast to use. You may use regular yeast but make sure you proof it beforehand.
Dried herbs for flavoring the bread dough. I recommend using herbs you’d normally find in an Italian seasoning blend such as dried basil, oregano, rosemary, parsley, thyme and even garlic powder.
Macadamia nuts add a lovely crunch and richness to the pesto!
Nutritional yeast adds a cheesy umami profile to the pesto, similar to how parmesan cheese will work.
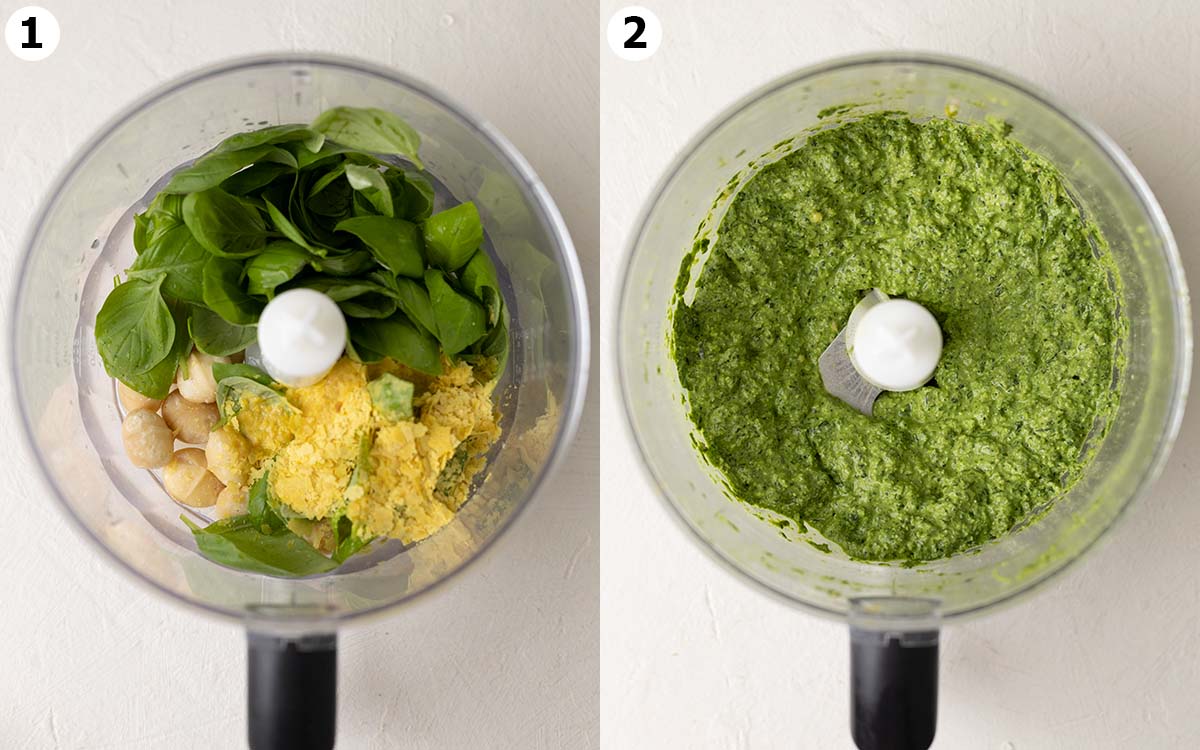
Making the pesto
The pesto is easy to make and you can easily adjust it to your tastes. My top tips are:
- Try to make sure your pesto is thick rather than runny. It’s easier to braid and assemble a wreath with a thicker pesto!
- Don’t be afraid to add extra salt, pepper, lemon juice or nutritional yeast to taste. The pesto is the essence of this bread wreath so it needs to be delicious!
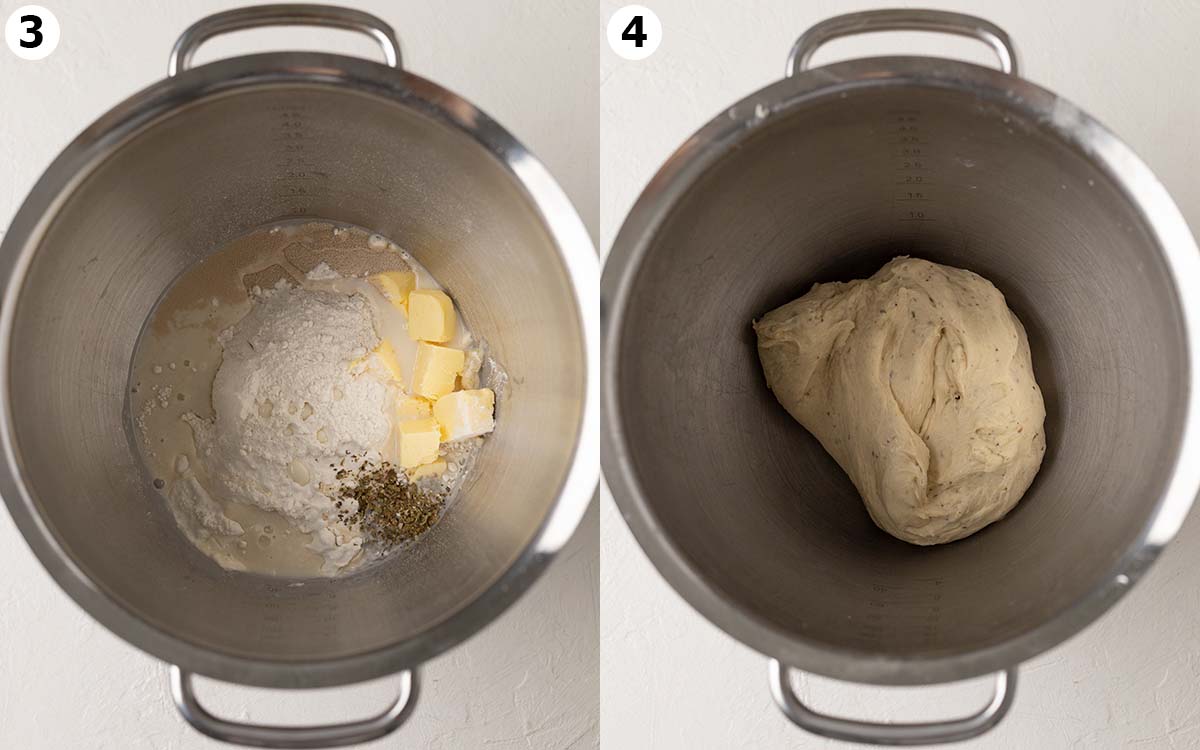
Preparing the dough
The dough is also easy to prepare and comes together in just one bowl. My top tips are:
- Make sure your ingredients are at room temperature and your milk is warm. Yeast is activated in a warm environment!
- The softer your dough, the softer your final bread will be. Your dough should be tacky but not sticky. It shouldn’t stick to your hands or kneading surface.
- If your dough isn’t the right consistency, don’t be afraid to add more milk or flour. When the dough is already formed, it will initially resist any liquid but, with a little patience, it will eventually come together.
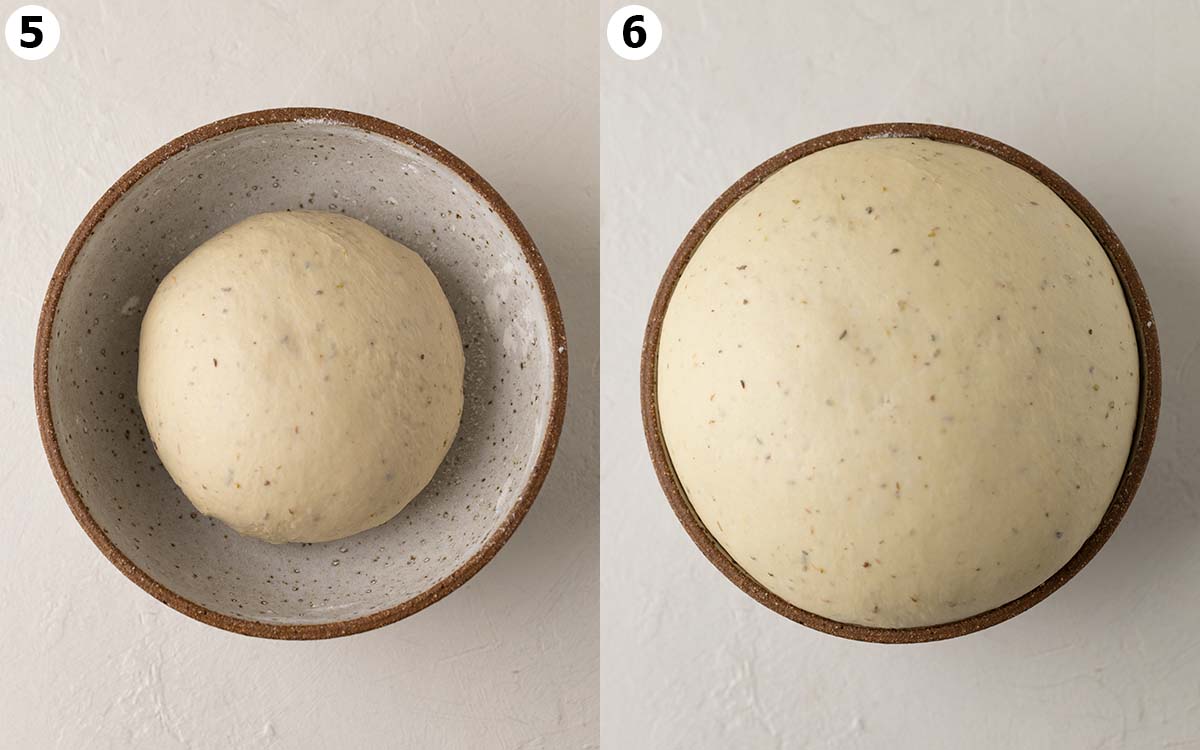
Resting the dough (first rise)
When resting the dough, the most important thing is to make sure it’s in a warm spot in your home.
King Arthur Baking says the ideal temperature for dough to rise is between 24°C-25°C (75-78°F). This is especially important for enriched dough (dough that contains butter) as the butter needs to stay warm in order for the dough to grow.
Assembling the bread wreath
I recommend rolling out your dough to 60 x 20 cm large (24 x 8 inches). This will feel like a very large rectangle! Don’t worry, the longer your dough is, the more defined your wreath circle will be. A shorter rectangle will work but will create a thicker smaller wreath.
Next, spread the pesto on only two-thirds of the dough. At the moment, we’re leaving one-third of the dough bare!

Next, fold the outer two-thirds of the dough onto the middle third. You’ll eventually have an ‘envelope’ of pesto bread dough!

Use a sharp knife to cut the pesto dough into three strips. To maintain the distinct layers, I recommend using long-cutting motions with your knife (as if you were drawing long lines with your knife).
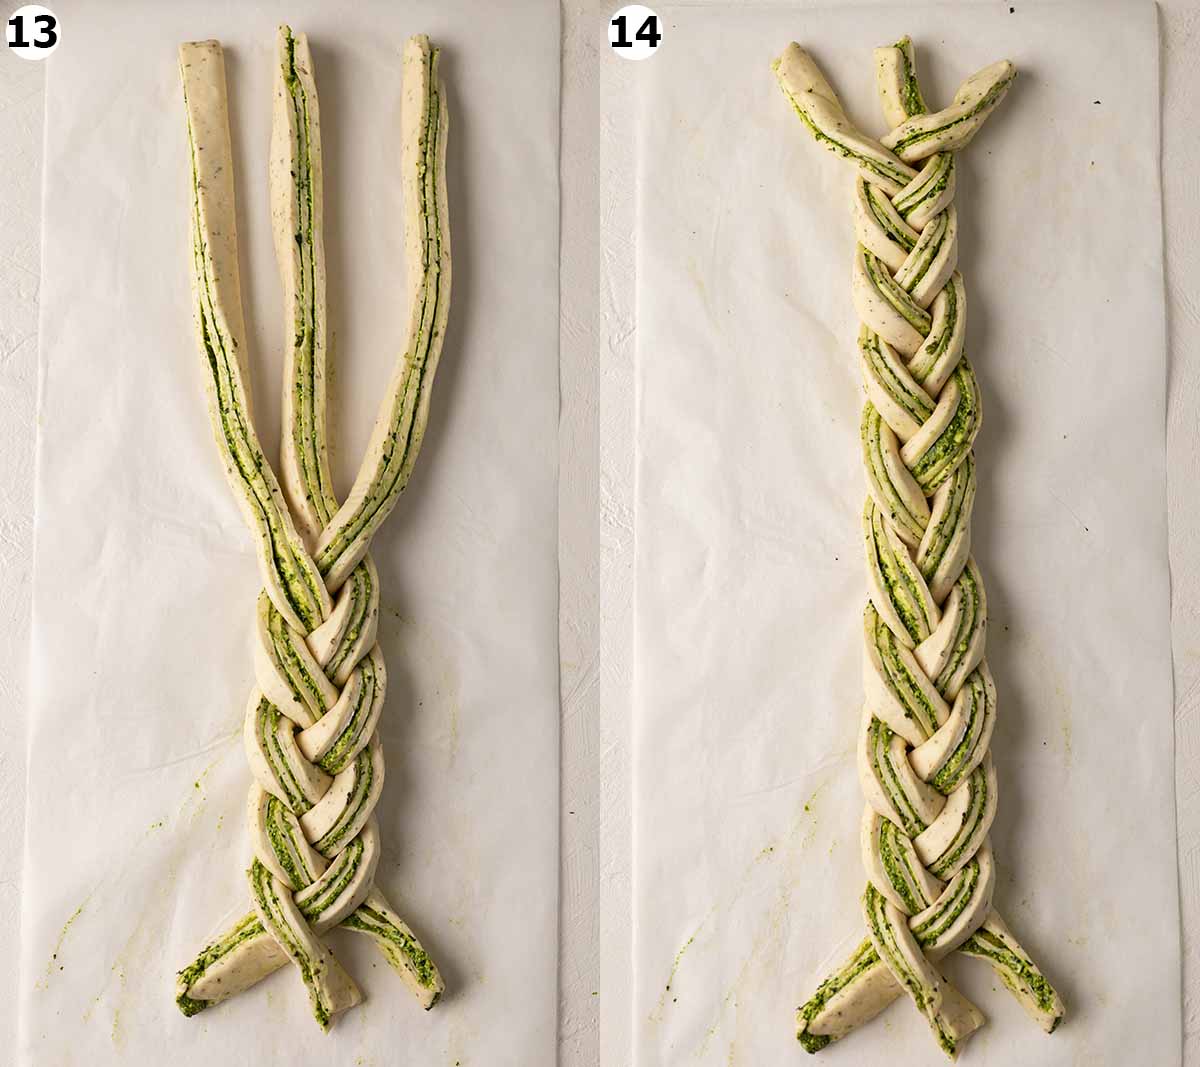
For ease, I recommend braiding the three strips from the middle (image 12). If you start from the top, you’ll have to move the long strips of dough every time.
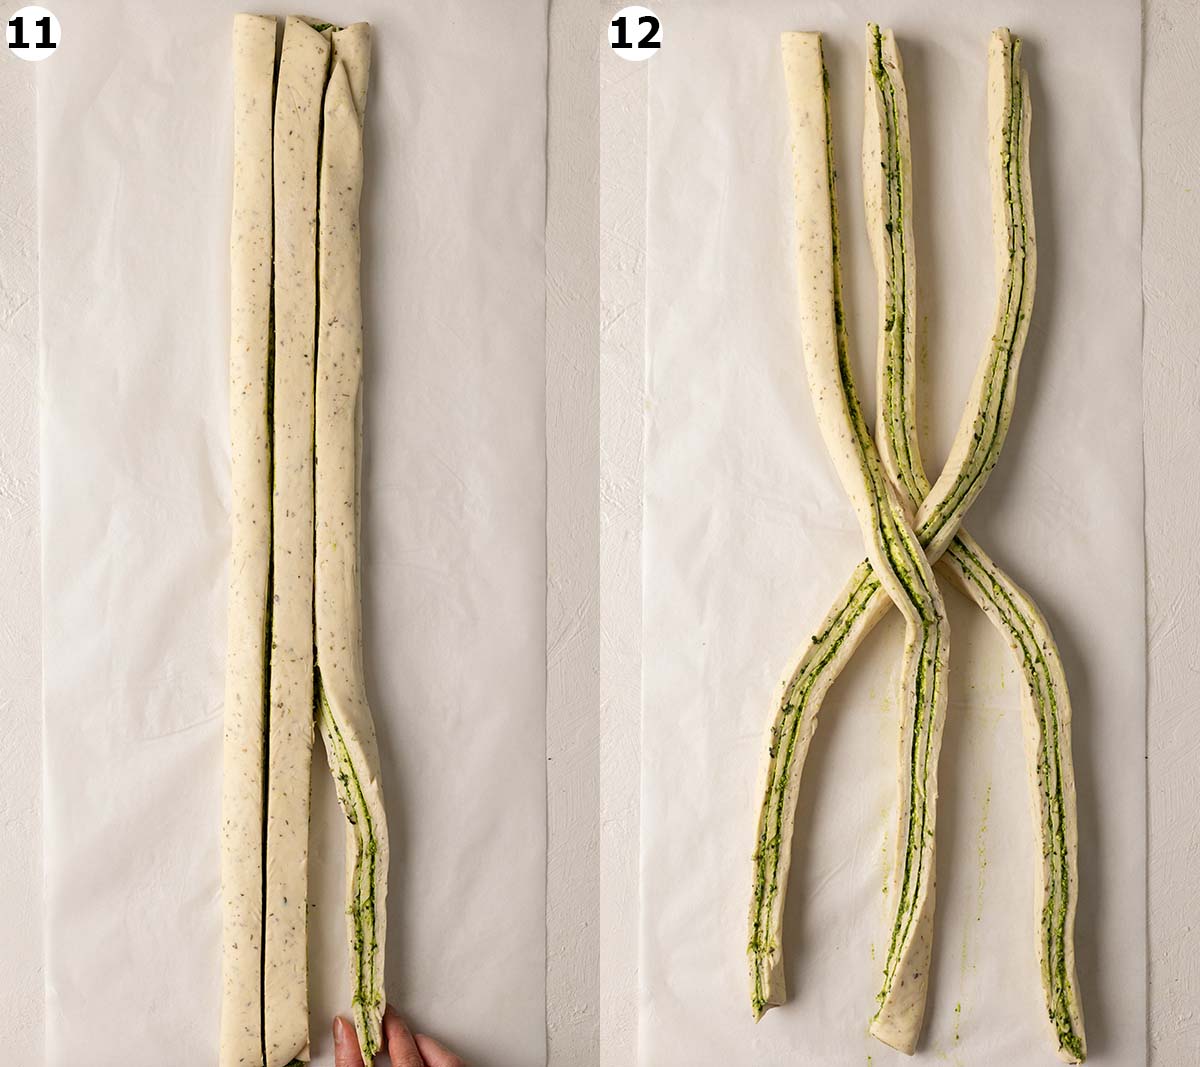
Braiding the strips (images 12-13) is similar to how you would braid hair. However, I recommend using two hands as the strips are very long!
When you’re braiding the second half of the dough (image 14), you’ll need to do it in reverse motion, so you can continue the pattern of your existing braid. This will make more sense when you do it. Just take your time and you can always re-braid parts of the dough!
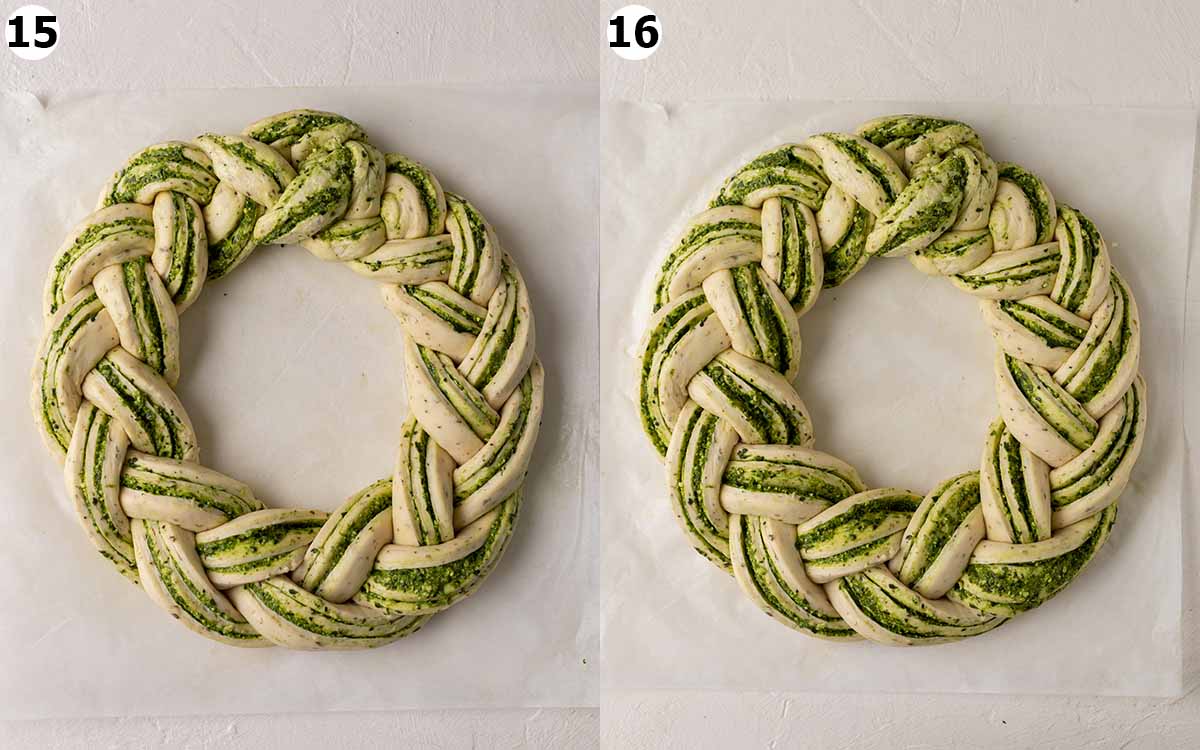
If your dough isn’t on parchment paper or a baking sheet, I recommend transferring it at this stage. It’s easier to transfer dough when it’s a log rather than a circle.
Next, bring the two ends of the braid together to form a circular wreath shape. If you’re having trouble moving your braid, rest one end of the braid along your forearm and use that to move the braid.
Finally, connect the two ends of the braid together. Try to wrap the loose ends together and tuck any excess bits into the wreath. But don’t worry, it doesn’t need to be perfect!
The pesto bread dough needs to rest one more time then it’s ready to bake!
Tips for assembling the wreath
- If you have time, chill your dough before braiding the wreath. You can pop the dough in the fridge for the whole first rise or just toward the end. Chilled dough is easier to handle than room-temperature dough!
- Take your time to braid the wreath. It’s fun seeing it come together!
- It can be a little tricky to transfer the unbaked log or wreath to a baking tray. I recommend slipping something large and flat (such as the lid of a container) underneath the wreath and then sliding it off onto your baking tray.
- Use a wet pastry brush to brush away any excess pesto.
Baking the bread
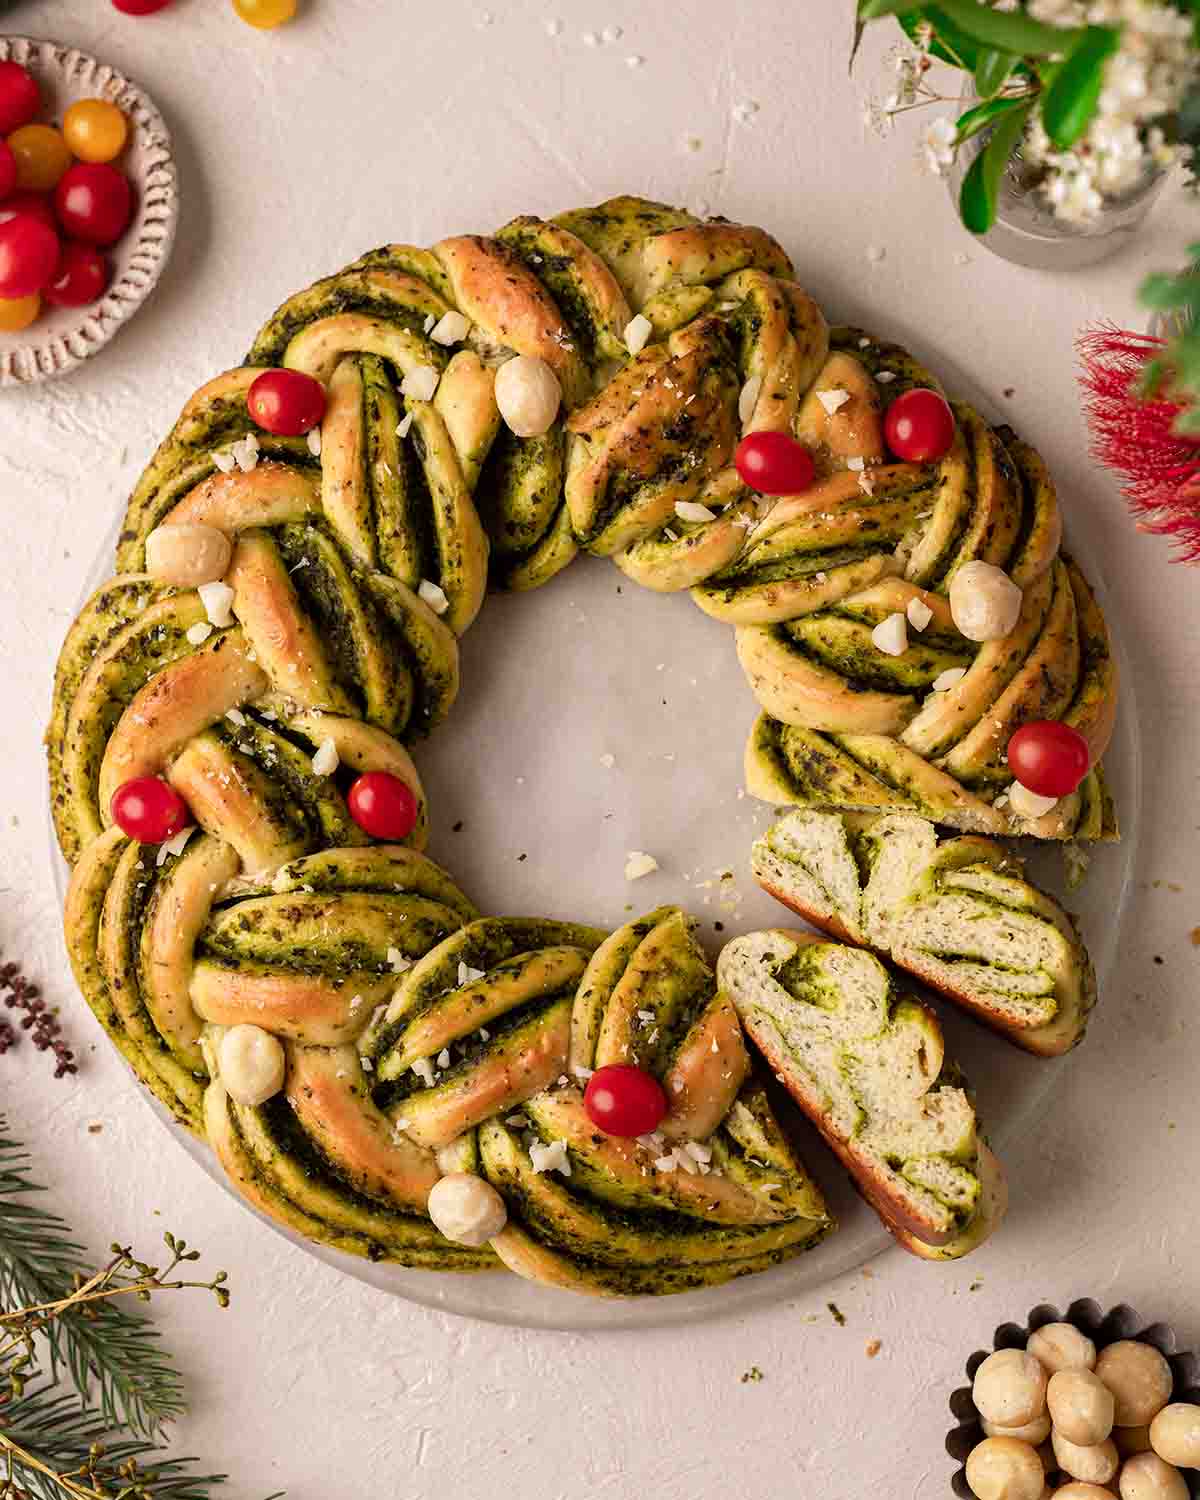
The wreath bread is done when the surface is slightly golden brown. If you gently press the dough, there should be a little resistance. The dough shouldn’t feel squishy or raw when you press it.
Expert Tips
Yes! The pesto can easily be made the day before.
For the dough, I recommend making it the day or night before, storing it in an airtight container and letting it rise in the fridge overnight. The next day, when the dough is warm enough to handle, you can assemble the wreath.
I don’t recommend braiding the wreath and storing it in the fridge overnight. The dough can crack when it’s chilled and it’s hard to predict how much it’ll grow overnight.
Yes of course! You can simply twist the bread and bake it in a wreath shape or loaf pan. See my chocolate babka recipe for a step-by-step assembly guide.
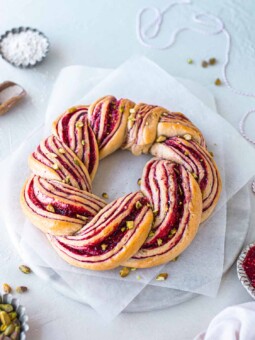
I also have simpler wreath designs which you can see in my Raspberry Pistachio Wreath and Blueberry Almond Wreath.
The pesto filling will go wonderfully with:
– sun-dried tomatoes or capsicum
– finely chopped fresh capsicum or tomato
– finely chopped olives
– vegan cheese
– dried cranberries
You may also glaze the bread with garlic butter. In a small bowl, combine melted butter with crushed garlic and brush it on the warm bread.

More Christmas Bread Recipes


Follow Rainbow Nourishments on Instagram, Facebook, TikTok and Pinterest, and subscribe via email to receive all of our latest recipes!

Vegan Pesto Bread Wreath
Ingredients
Macadamia Basil Pesto (need 125g)
- 2 cups (40g) packed basil leaves, (can substitute half with other green herbs or leafy greens)
- ¼ cup (35g) Australian macadamias
- 1 tablespoon lemon juice, to taste
- 3 tablespoons nutritional yeast, to taste
- 1-2 cloves garlic, to taste
- ½ teaspoon salt, to taste
- ¼ – ½ cup (65g-125g) extra virgin olive oil
Wreath
- 2 ½ – 3 cups (315 – 375g) all-purpose plain flour, or bread flour (start with less flour and add more if needed)
- ⅔ cup (165g) dairy-free milk, warm
- ½ cup (115g) vegan butter, room temperature (note 1)
- 2 tablespoons (25g) granulated sugar
- 1 tablespoon (10g) instant dry yeast, (note 2)
- 1 tablespoon dried herbs of choice, e.g. dried oregano, basil, rosemary
- Pinch of salt, if not using salted butter
To decorate
- melted vegan butter
- whole and crushed macadamia nuts
- cherry tomatoes
Instructions
Make the pesto:
- Optional: Toast the macadamias on a dry frying pan for 5 minutes or until fragrant.
- Add all the ingredients except the oil to a food processor. Process until the mixture has broken down. Drizzle the oil into the food processor and process until you have a thick paste. You may need to stop the food processor, scrape the sides and process again.
- Taste the pesto and season it, to taste. Set aside.
Make the dough:
- Add all the ingredients to the bowl of stand mixer or large mixing bowl. If you're using a stand mixer, use the hook attachment and knead the dough for 5-10 minutes or until the dough is soft and stretchy. If mixing by hand, use a large wooden spoon to combine the ingredients in your bowl. Transfer the dough to a lightly floured surface and knead until the dough is soft and stretchy.
- If your dough is a little sticky, add more flour and continue kneading. If the dough is a little dry, add more milk and knead again.
- Place the dough in a clean bowl and cover it with a tea towel. Position the bowl in a warm spot for at least 1-2 hours or until the dough doubles in size. (See note 3 for an overnight rise).
Assemble the wreath (note 3):
- Note: I strongly recommend checking out the step-by-step pictures in the blog post above!
- Dust a clean surface with flour. Roll out the dough into a rectangle around 60 x 20 cm large (24 x 8 inches). Spread the pesto on only two-thirds of the dough, close to the edge. You may have some pesto leftover. One-third of the dough should be bare.
- Flip over the bare third of the dough to cover the middle part. Flip over the remaining third of the dough.
- Use a sharp knife to cut the dough into 3 long strips. Turn the strips so the pesto filling is facing up.
- Starting from the middle, braid the strips. Make sure your braid is as tight and even as possible.
- Bring together the two ends of the braid to form a circular wreath shape. If your dough isn't already on parchment paper, I recommend transferring it at this stage.
- Cover the wreath with a tea towel. Let it rest in a warm place for at least 1 hour or until it has increased in size by at least 20%.
Baking the wreath:
- When you are ready to bake, preheat your oven to 180°C (350°F).
- Bake the wreath for 25-30 minutes or until done (note 5). The wreath is ready when the surface is lightly golden brown. If you press the surface, it should feel a little firm and bounce back quickly. Allow the wreath to cool on the baking tray.
Decorating the wreath:
- Brush your wreath with melted butter. Sprinkle with macadamias and cherry tomatoes. Slice and enjoy!
- The wreath is best eaten on the day it is baked, either warm or at room temperature. Alternatively, store the wreath in an airtight container at room temperature for 1 day or in the fridge for up to 3 days. Warm up the wreath if you're enjoying it on a later day.
Notes
- This recipe will work with spreadable vegan butter but you will need to add more flour.
- Instant yeast doesn’t need to be proofed beforehand. If you use another type of yeast, mix it with warm milk from the recipe and a pinch of sugar beforehand. Wait until it bubbles then use it in the recipe.
- Alternatively, place the dough in an airtight container and chill it in the fridge overnight. The next day, when your dough is warm enough to handle, you can prepare the wreath. Chilled dough is much easier to shape!
- If your dough is too soft to shape, chill it in the fridge for at least 30 minutes.
- If your oven has hot spots and the wreath is browning too quickly in the oven, carefully cover it with aluminum foil.
This post may contain affiliate links. As an Amazon Associate, I may earn a small commission from qualifying purchases at no additional cost to you.

looks great! how is this done so the dough rises overnight ? do you prove it and then store it in the fridge ? thanks
Hi Anji, I would make the dough, put it in an airtight container straight away and let it proof in the fridge overnight. There are more tips under the section ‘Expert Tips’. The dough does proof/rise in the fridge if you leave it overnight – the cold temperature just slows down the process so it doesn’t overproof. Hope that helps!
buongiorno Anthea, io sono vegana e le tue ricette sono meravigliose, come posso fare per averle in italiano?
Grazie per ciò che potrai fare🙏🏻
Thank you so much for getting in touch, we’re so happy you love the recipes! If you open the link in Google Chrome, the browser gives you the option to translate ❤️/Grazie mille per averci contattato, siamo così felici che ti piacciano le ricette! Se apri il link su Google Chrome, il browser ti dà la possibilità di tradurre ❤️
can you make the wreath the night before, chill overnight (wrapped airtight), and then bake the next day?
This wreath can be shaped the night before and chilled, but I don’t recommend wrapping it airtight because it will continue to expand in the fridge. Personally, I prefer preparing the unshaped dough and chilling it overnight, then assembling it the next day. If you shape the wreath ahead of time, it’s difficult to gauge how much it will rise, and if the plastic wrap or container presses against it, it could ruin the wreath’s shape.
It’s so good, I have no words! Made exactly as written except that I used regular unsalted butter and almond milk. The texture is perfect. I’ll be making this again a lot!
Hi S! I’m thrilled that you loved this bread!! Thanks so much for letting me know and I’m glad that the recipe will be a keeper for you 🙂
It was amazing!
May i ask if i can make it as gluten free? Any tips for gluten free version please?
Hi Mischa, I’m so glad that you enjoyed it! Unfortunately, gluten-free all-purpose flour doesn’t work well with this recipe. It may work if you use gluten-free bread flour with some hydrated psyllium husk, but I haven’t tried it.
How big in diameter is your wreath? I need to find a large enough pan!
I’m not home right now so I can’t measure my baking pans. However, I have a small oven and the wreath could only fit on the big square black pan that comes with the oven, rather than my usual rectangle baking pans.
Instructions are very clear, every question is answered. Really easy to follow steps and so good. I made the vegan pesto with cashew nuts and it worked nicely.
Thank you
Hi Diane, I’m so glad that you found this recipe and blog post approachable! Thank you so much for your lovely feedback and I hope you have a great start to the new year!
This recipe looks amazing! Is it possible to freeze the wreath before baking or should it be frozen once cooked and reheated? And if so, what is the best way to defrost / cook after freezing? I want to get organised for Christmas and have this ready in the freezer!
Hi Koryn, thank you! I haven’t frozen this bread before, but from experience it’s probably better to bake the bread, freeze it then reheat. Once yeast has been activated, it can lose some of its power in the freezer (or the opposite happens where the bread overproofs and deflates), and it’s impossible to fix. If you freeze the baked bread, please thaw it at room temperature for a few hours. When you reheat it in the oven, try placing a small dish of water at the bottom of the oven and the steam from the water will make the bread soft again. I hope that helps!
I wish you would have mentioned blooming the yeast before adding to flour. And maybe chilling the dough before braiding. Other than that, it turned out pretty well for a non- bread maker.
Ann, I suggest reading the post and the full recipe including the notes before you bake, especially if you’re not familiar with bread making. Both of these were mentioned in the post and in the notes of the recipe card. Nevertheless, I’m glad that your wreath turned out well.
So. Damn. Delicious. I made it with my standard pesto recipe (with parmesan and pine nuts rather than nutritional yeast). Easy and ridiculously delish.
Hi Mariam, aw I’m stoked that you loved this wreath and found it approachable and tasty!! Thanks so much for letting me know and I hope you’re enjoying your December!
This recipe is the best and very forgiving. I tried it using the overnight in the fridge method. The dough doubled in size overnight in the fridge. I put it together and it turned out delicious. I made enough pesto for 2 and made it again a few days later, This time it did not rise at all in the fridge overnight? I went ahead and put the wreath together anyway and it doubled in size within half an hour of putting it together. Awesome. So yummy. I have also used this pesto recipe for a quick pasta dinner lol It’s very good. Thank you for sharing.
Hi Mike, I’m so happy that you enjoyed making this wreath and it was approachable! Yes, it’s so strange how dough rises on some days but it doesn’t really on other days… it’s happened to me too! My guess is it’s due to the climate when we first made the dough (as if warm weather is a kick start) or how long we kneaded the dough for. However, I’m glad that it rose very quickly after! Thanks so much for your feedback 🙂
This wreath was actually super easy to make for someone who doesn’t often make bread, and honestly just the tastiest thing ever. The pesto was so great in flavour and the bread was so soft on the inside and crisp on the outside. I’ll definitely be making it again!
Aw that’s so lovely to hear and reading your review makes me want to make it again! Thanks so much Veronika!
Hi,
Is there a difference, or do you have a preference, between using all-purpose or bread flour?
Thank you!
Hi Denise, I prefer using bread flour as it makes a slightly fluffier and ‘chewier’ bread, whereas all-purpose flour makes bread a little cakier. I hope that helps!