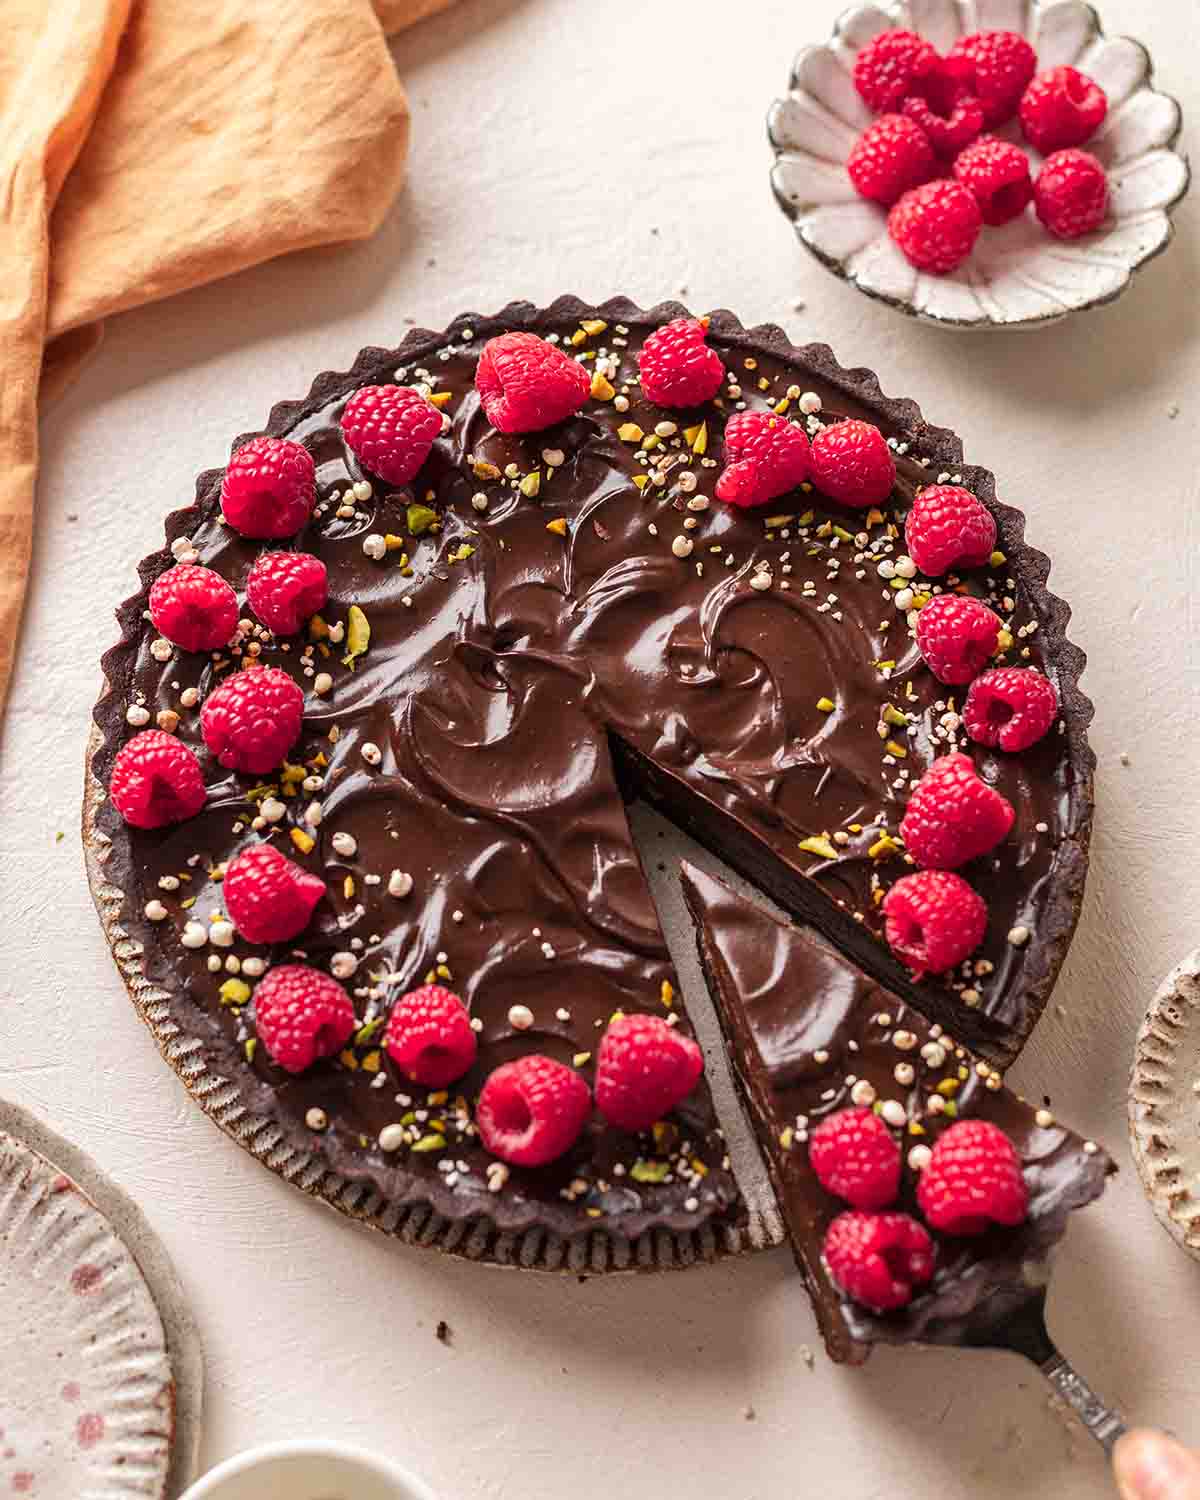
Avocado Chocolate Tart
Creamy avocado tart with a buttery chocolate shortcrust pastry and a silky rich avocado chocolate mousse filling. This tart is vegan, refined sugar-free and can easily be made gluten-free!
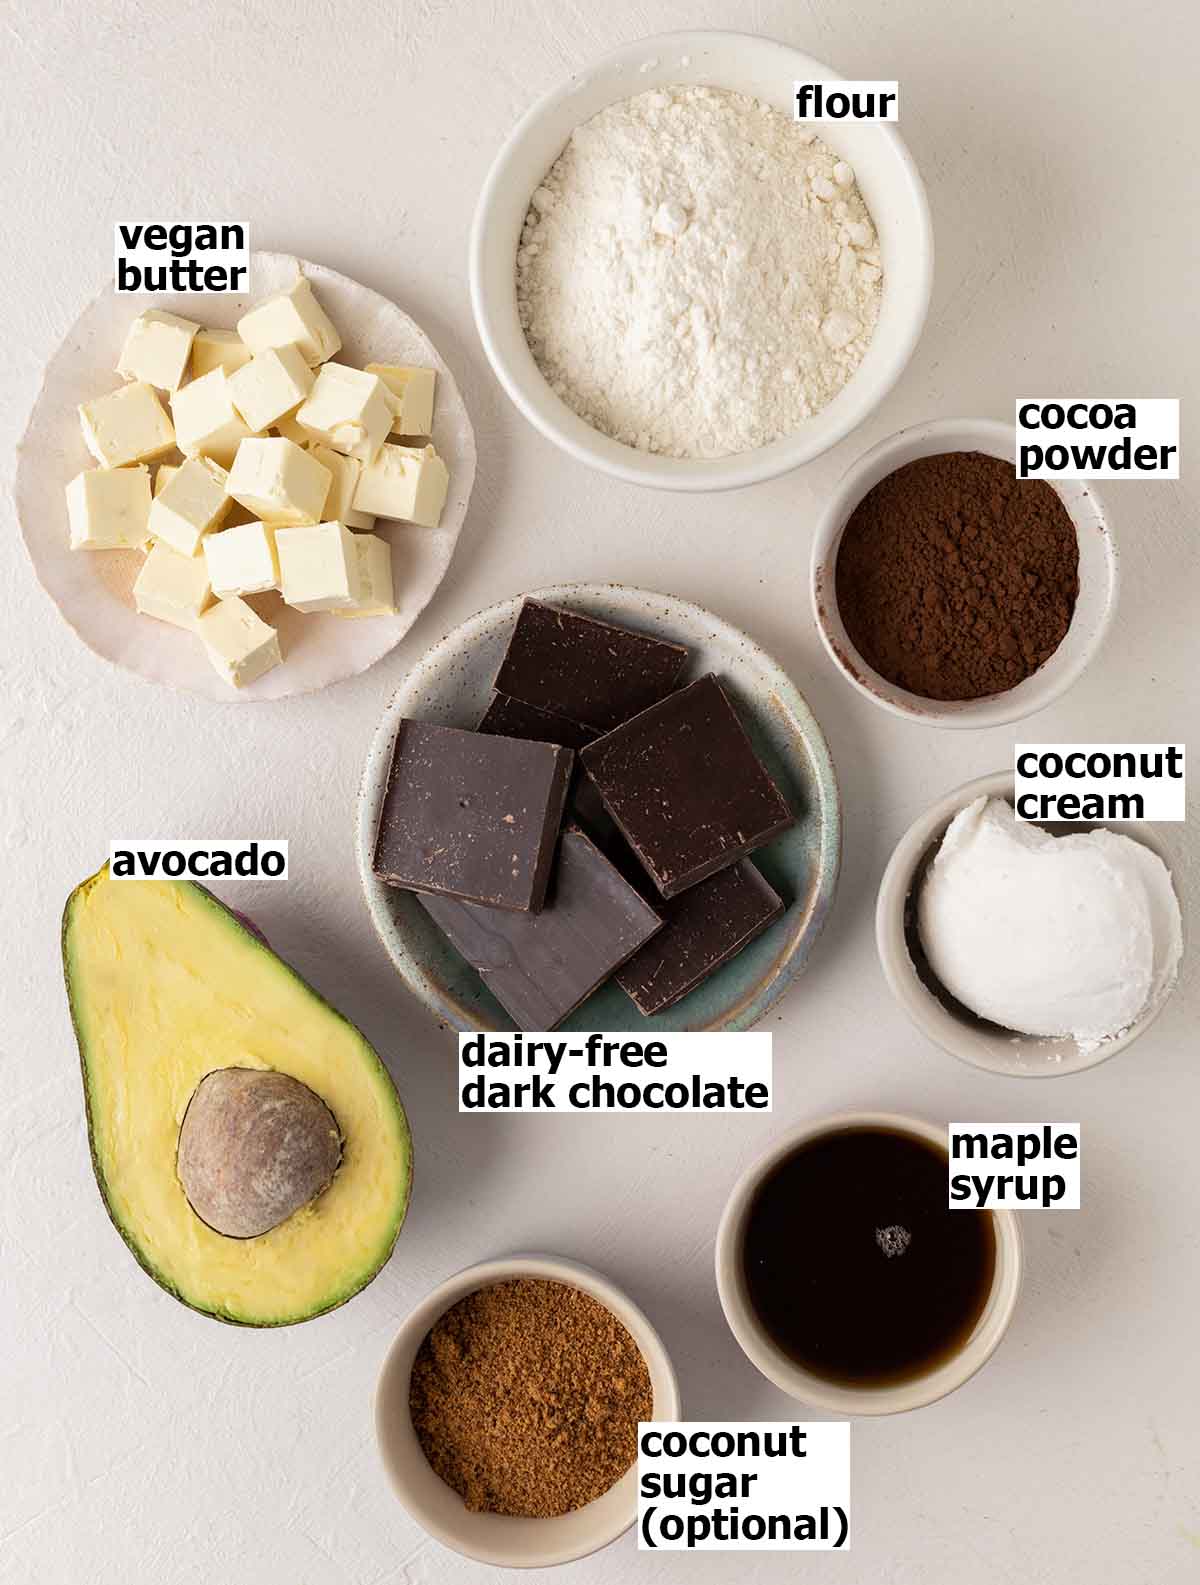
Ingredients you’ll need
The full list of ingredient quantities and instructions are in the recipe card at the bottom of this post.
Notes about the ingredients
Flour, butter and coconut sugar for the shortcrust pastry. If you need a gluten-free crust or don’t want to use butter, I’ve included other options at the bottom of this post and in the recipe card.
Avocado. I recommend using a very ripe avocado as it will blend easier. If you don’t like avocado, check out my chocolate tofu tart.
Semi-sweetened dark chocolate helps set the avocado chocolate mousse filling and unsweetened cocoa powder for a richer chocolate flavor.
Maple syrup to sweeten the avocado chocolate mousse. Alternatively, you can use another liquid sweetener, more coconut sugar or another granulated sweetener.
Coconut cream balances the richness of the avocado mousse and minimizes any possible avocado flavor. The coconut flavor is not noticeable but you can use dairy-free milk if you prefer (quantities are listed in the notes of the recipe card).
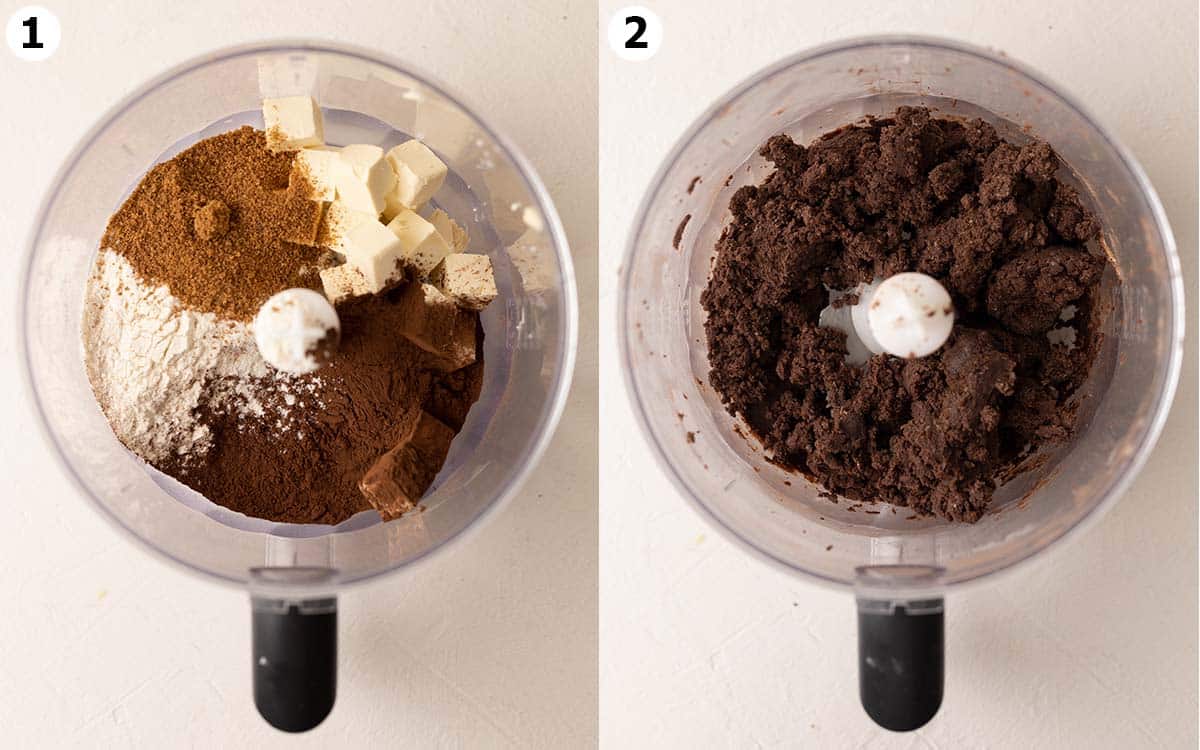
Making the chocolate shortcrust pastry
The tart base is easy to make, even if you’ve never made pastry before!
Simply add all the ingredients to a food processor and blend until it’s JUST combined. Add a dash of water if the pastry isn’t sticking together or a little flour if the pastry is a little sticky.
If you don’t have a food processor, you can mix all the ingredients in a bowl with a spoon. Just make sure there are no chunks of butter!
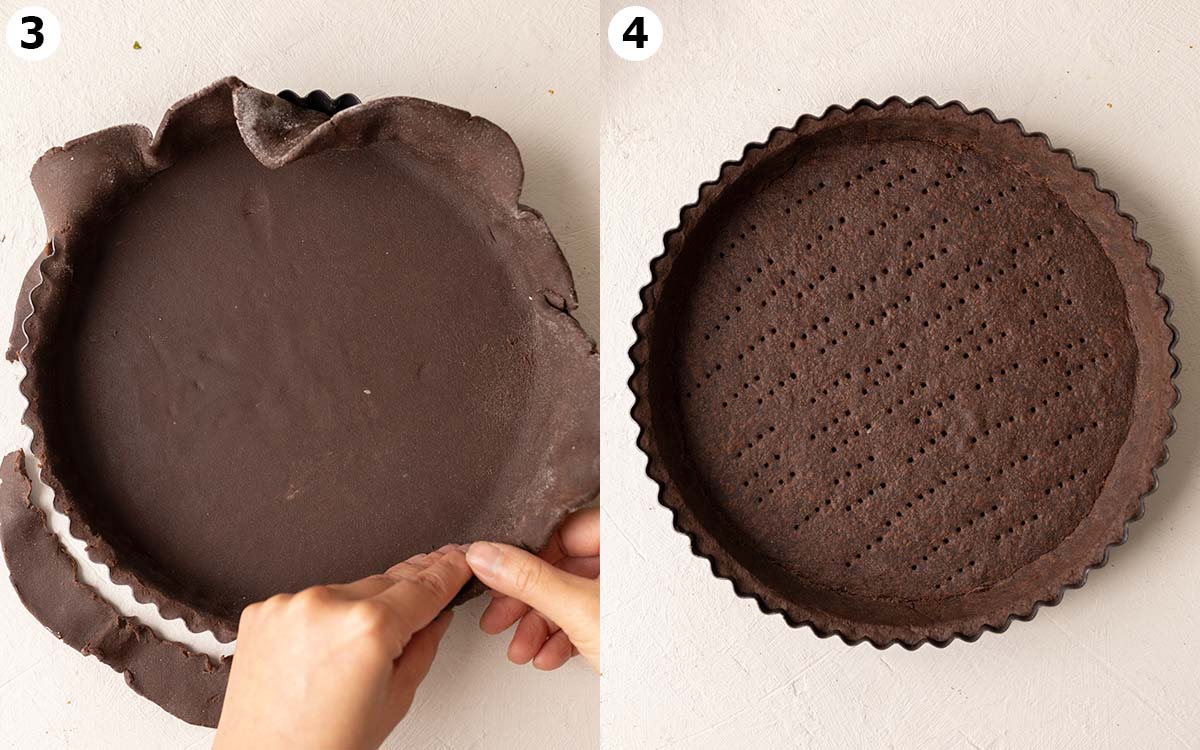
To transfer the pastry to your tart pan, you can either:
- Roll out the pastry on a floured surface then transfer it to your tart pan OR
- Dump the mixture directly into your tart part and press it against the bottom and sides.
Once you’ve done this, prick the bottom with a fork then bake it for 10-15 minutes.
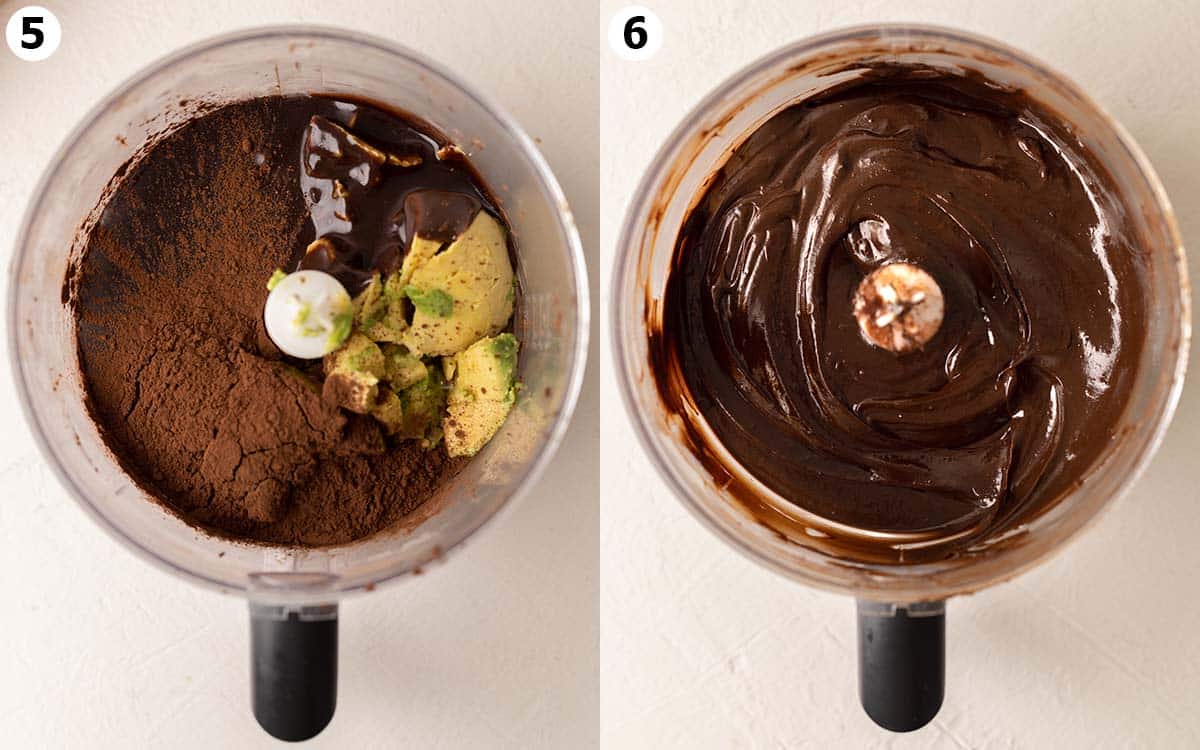
Making the avocado chocolate mousse
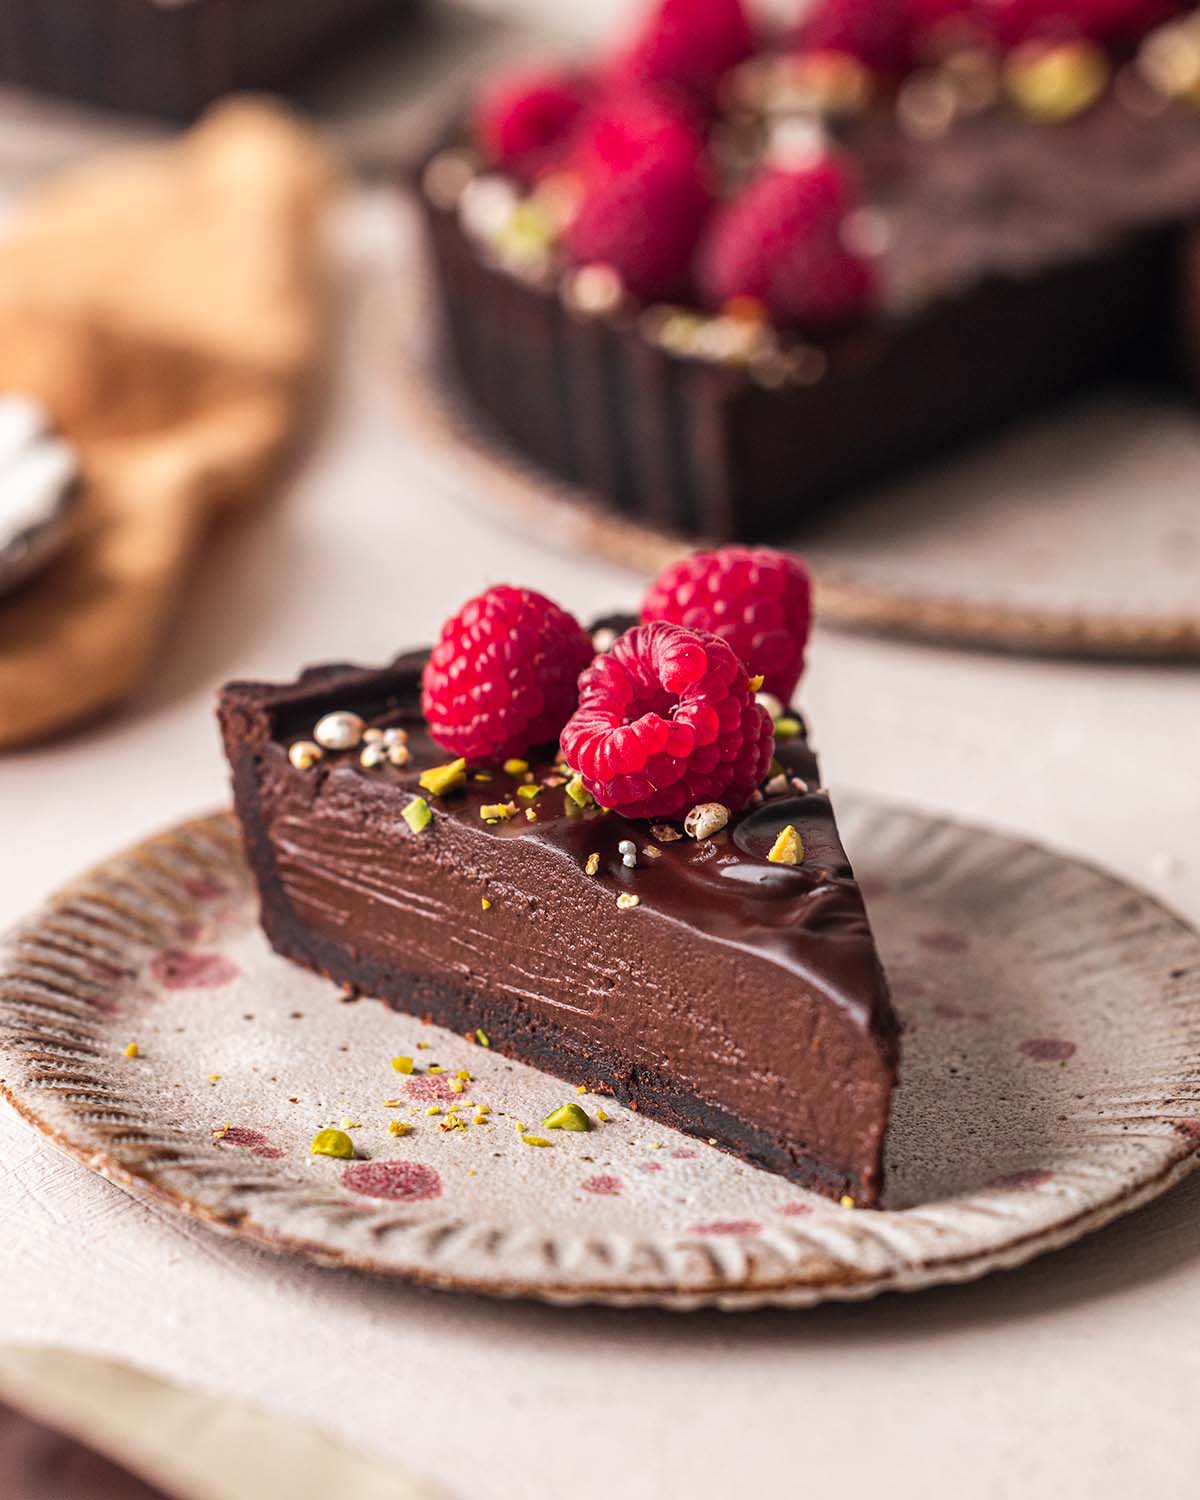
The avocado tart filling combines a classic avocado chocolate mousse (avocado, cocoa powder and maple syrup) and chocolate ganache (chocolate and coconut cream). This makes a balanced tart filling that is not too bitter and not too heavy.
First, melt the chocolate and coconut cream in a small saucepan. Then combine the mixture with all the other ingredients in your food processor (or use a blender).
The consistency of your final mixture will depend on the temperature of your ingredients and whether you’re making this on a hot or cold day. If you’re making this on a cold Winter day, your mixture may separate – don’t worry, just warm up a small portion of the filling then mix it again.
Pour your avocado mousse filling into your tart pan then put your tart in the fridge to set!
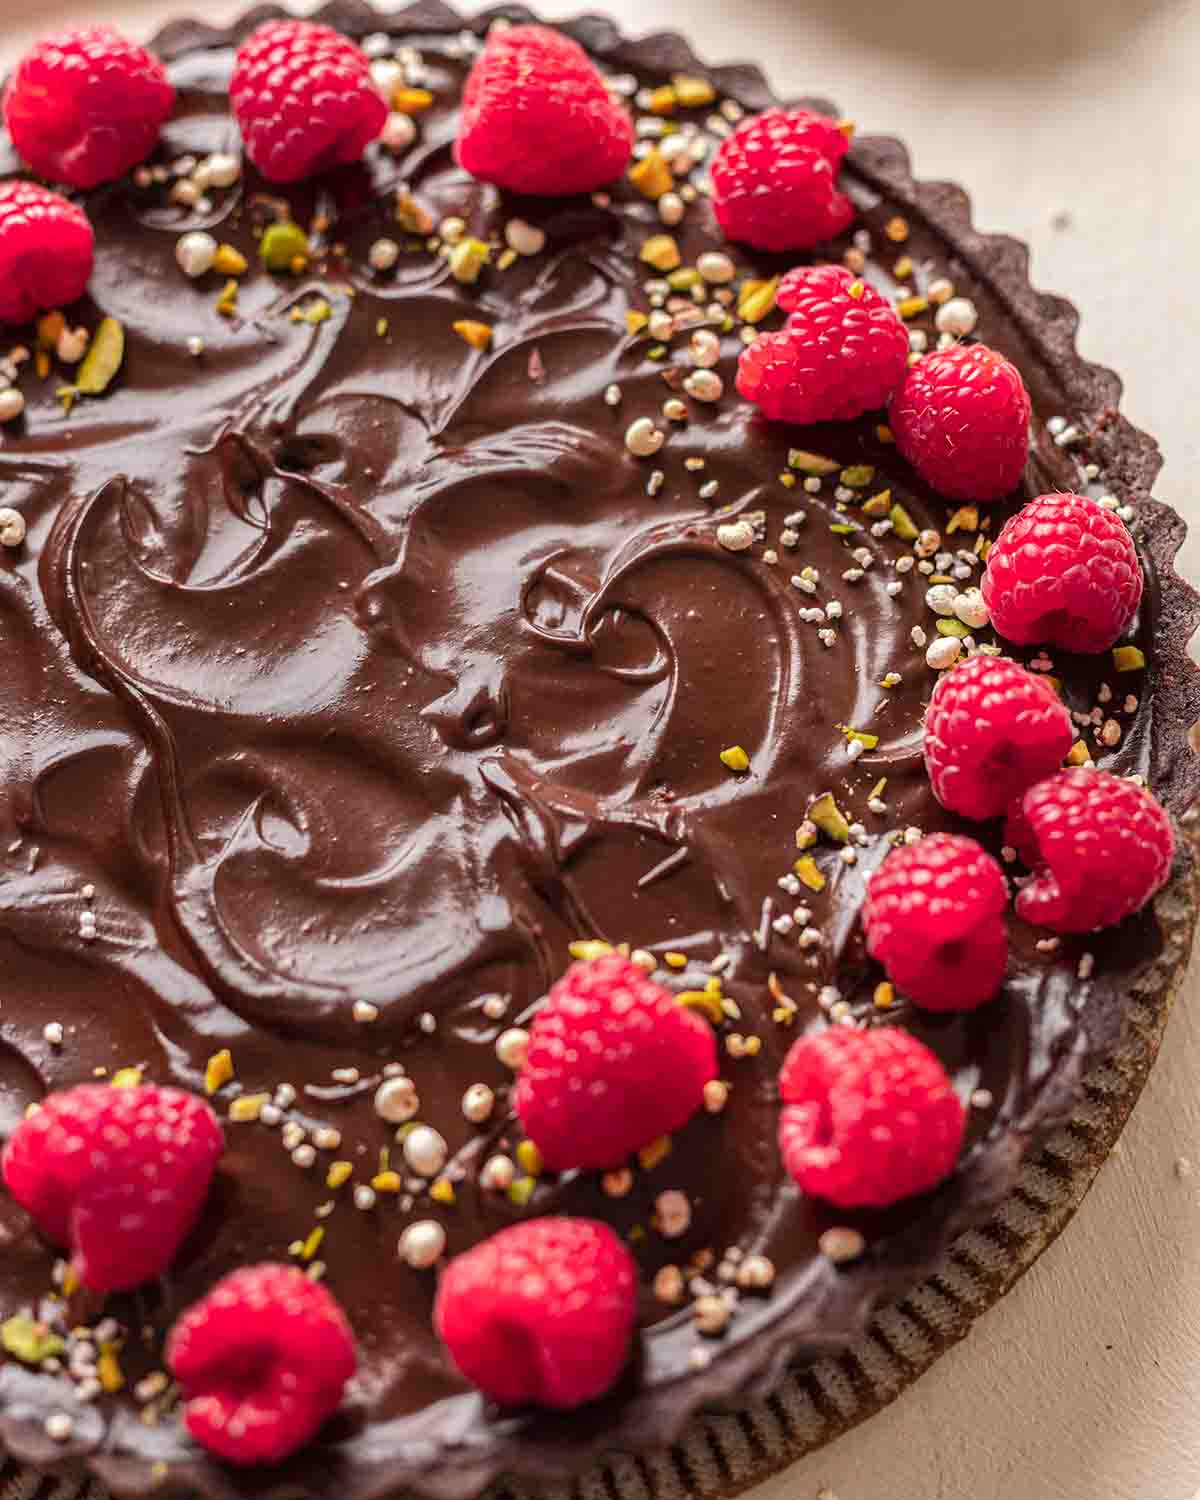
Decorating this avocado tart
This tart is wonderful by itself with no decorations!
However, for a touch of color and to balance the richness of the chocolate avocado mousse, I decorated mine with fresh berries and pistachios. You can also decorate your tart with:
- A light dusting of cocoa powder
- Shredded coconut
- Shaved chocolate
- Whipped cream for example coconut cream
- Chocolate chips
Customizing this avocado tart
Yes! Some options are:
– No-bake nut and date crust from my tofu chocolate tart.
– Chocolate cookie crust made from chocolate cookies and butter from my peanut butter pie. I prefer baking the crust to make it more stable but if you don’t mind serving the tart straight from the fridge/freezer, you don’t need to bake it.
– Buttery shortcrust pastry from my vegan strawberry tart.
I haven’t tried it but I recommend replacing the dark chocolate with vegan white chocolate and adding lime juice and lime zest, to taste. Omit the cocoa powder and make sure you use a light-colored sweetener so your tart is a beautiful green color!
Alternatively, check out my vegan grasshopper pie which uses avocado.
Yes! Alternatively, check out my other vegan desserts that use avocado:
– pistachio lemon avocado cake
– beetroot brownies with avocado chocolate frosting
– no bake brownies
– grasshopper pie
More vegan chocolate desserts


Follow Rainbow Nourishments on Instagram, Facebook, TikTok and Pinterest, and subscribe via email to receive all of our latest recipes!

Avocado Chocolate Tart
Ingredients
Chocolate shortcrust pastry
- 1 ¼ cup (155g) all-purpose plain flour, plus extra for dusting (note 1 for gluten-free)
- ½ cup (115g) vegan block butter, or scoopable coconut oil (not liquid)
- ¼ cup (40g) coconut sugar, or granulated sweetener of choice
- ¼ cup (25g) cocoa powder
- Pinch of salt, if using unsalted butter or coconut oil
Chocolate avocado mousse filling
- ~350g avocado flesh, (around 2 large avocados)
- 250g semi-sweet vegan dark chocolate, roughly chopped
- ¾ cup (180g) thick scoopable canned coconut cream, (note 2)
- ½ – ¾ cup (170 – 225g) maple syrup, or sweetener of choice (start with less and add more to taste)
- ⅓ cup (35g) cocoa or raw cacao powder, or to taste
- 1 teaspoon vanilla extract, optional
- Pinch of salt
Decorations (optional)
- ~1 cup (120g) fresh raspberries, strawberries or as desired
Instructions
To make the base:
- Preheat your oven to 180°C (350°F). Grease a 9-inch (23 cm) loose-bottom tart pan.
- Add all the pastry ingredients to a food processor. Mix until combined and there are no more chunks of butter. Add 1-3 tablespoons of chilled water and mix until the dough is soft and pliable but not sticky.
- On a lightly floured surface, use a rolling pin to roll out your pastry into a large circle about 1/4 inch (5mm) thick. Transfer the pastry to your prepared tart pan. Alternatively, you can dump the pastry directly into your tart pan.
- Press the pastry against the bottom and sides of the tart pan to form a crust. Trim off the excess. If there are any holes, patch it up with the remaining pastry.
- Prick the bottom of the tart shell with a fork. Bake the crust for 10-15 minutes or until dry to the touch. If the tart puffs up or collapses in areas, use a spoon to press it back, while the tart is hot.in
To make the filling:
- Melt the chocolate and coconut cream in a small saucepan or a double boiler.
- Add all the filling ingredients to your food processor. Blend until the mixture is as smooth as possible. Taste test the avocado mousse and add more sweetener or cocoa powder if desired. Note that the mousse will firm up when you chill the tart.
- Pour the mousse into your cooled tart base. Place the tart in an airtight container in the fridge for 4 hours or until the filling is set.
Decorate and storage:
- Decorate the tart as desired. Serve immediately.
- Store leftovers in an airtight container at room temperature for a few hours or in the fridge for up to 3 days. You can also freeze the tart without any decorations for up to 1 month.
Video
Notes
- To make the pastry gluten-free, you can either use a high-quality 1:1 gluten-free flour blend OR use 3/4 cup (95g) gluten-free all-purpose flour which has xantham gum and 1/2 cup (50g) almond flour. You may need to add more flour or water to get the right consistency. The gluten-free pastry is more delicate and should be pressed directly into your tart pan.
- You can replace the whole amount of coconut cream with 1/3 cup (85g) pourable dairy-free cream or your milk of choice (I like soy milk or almond milk).
This post was originally published in October 2019 and updated in 2022 with step-by-step images and tips.
This post may contain affiliate links. As an Amazon Associate, I may earn a small commission from qualifying purchases at no additional cost to you.

DELICIOUS!! Mom with diabetes really enjoyed! She wants mini versions for more regular snacking!
That’s so wonderful to hear, we’re thrilled your mum enjoyed them! We love the idea of mini versions for regular snacking… we might have to try that ourselves! Thanks so much for sharing this with us ☺️
Super delicious!!! Nobody believes the filling is made with avocados. The family just loved it! Thank you so much, Anthea.
Hi Elizabeth, aw that’s just amazing! I’m thrilled that your family loved it too. Thanks so much for taking the time to leave a comment here!
Have just made this for a friends birthday & can’t stop sniffing it. It’s in the fridge, her birthday’s tomorrow. Just curious how long it can hold it’s shape after it’s out of the fridge or whether I should freeze it tonight?
Hi Mel, I’m glad the tart smells good! With storing it, it depends on the temperature of your home (or where ever you’re celebrating your friend’s birthday). On a hot day (more than 24C), it’d probably hold shape for 1-2 hours. On a cooler day, it’d hold for around 4 hours. I hope that helps!
As soon as we saw it on IG my daughter and I knew we needed to make it. The recipe is super simple and comes together quickly. The flavor is really rich and def hits the spot if you’re looking for something chocolatey. Will def make again!
I’m so happy that you and your daughter found this recipe approachable and tasty too! Thanks so much for your kind review 🙂
I made this and it was SO GOOD!
Aw, that’s great to hear! Thanks Saja!
I have made this chocolate tart 3 or 4 times now for various events and EVERY SINGLE TIME I receive comments about how darn delicious it is. My vegan-hating Brother even loved it, so that must be saying something!!!!! Thank you Anthea for sharing this recipe, its a life saver xxx
Oooh this is THE BEST news I’ve had all week! And even better than your vegan-hating brother loved it (I hear you loud and clear on that one haha). Thanks so much for leaving such a lovely review and I hope you have a lovely day xoxo
Looks beautiful! Love the cookie crust!
Aw, thanks so much Lisa!!
I made this for an event with my partner’s family and just as I put it to set in the fridge, we had to leave the house early… leaving this magnificent tart in the fridge until we returned. We tasted it at 2AM and and had more for breakfast this morning… His family will have to wait for the next event, there won’t be any left by the end of the weekend.
I have no regrets.
Incredibly quick and easy and absolutely one of the most decadent and smooth tastes of all time. Just a fantastic recipe.
Oh that’s the BEST news ever!!! I’m so glad that you enjoyed it a lot (and so much that you ate it before your event). Thanks for taking the time to leave such a positive review too. Take care xo