Vegan Tres Leches Cake
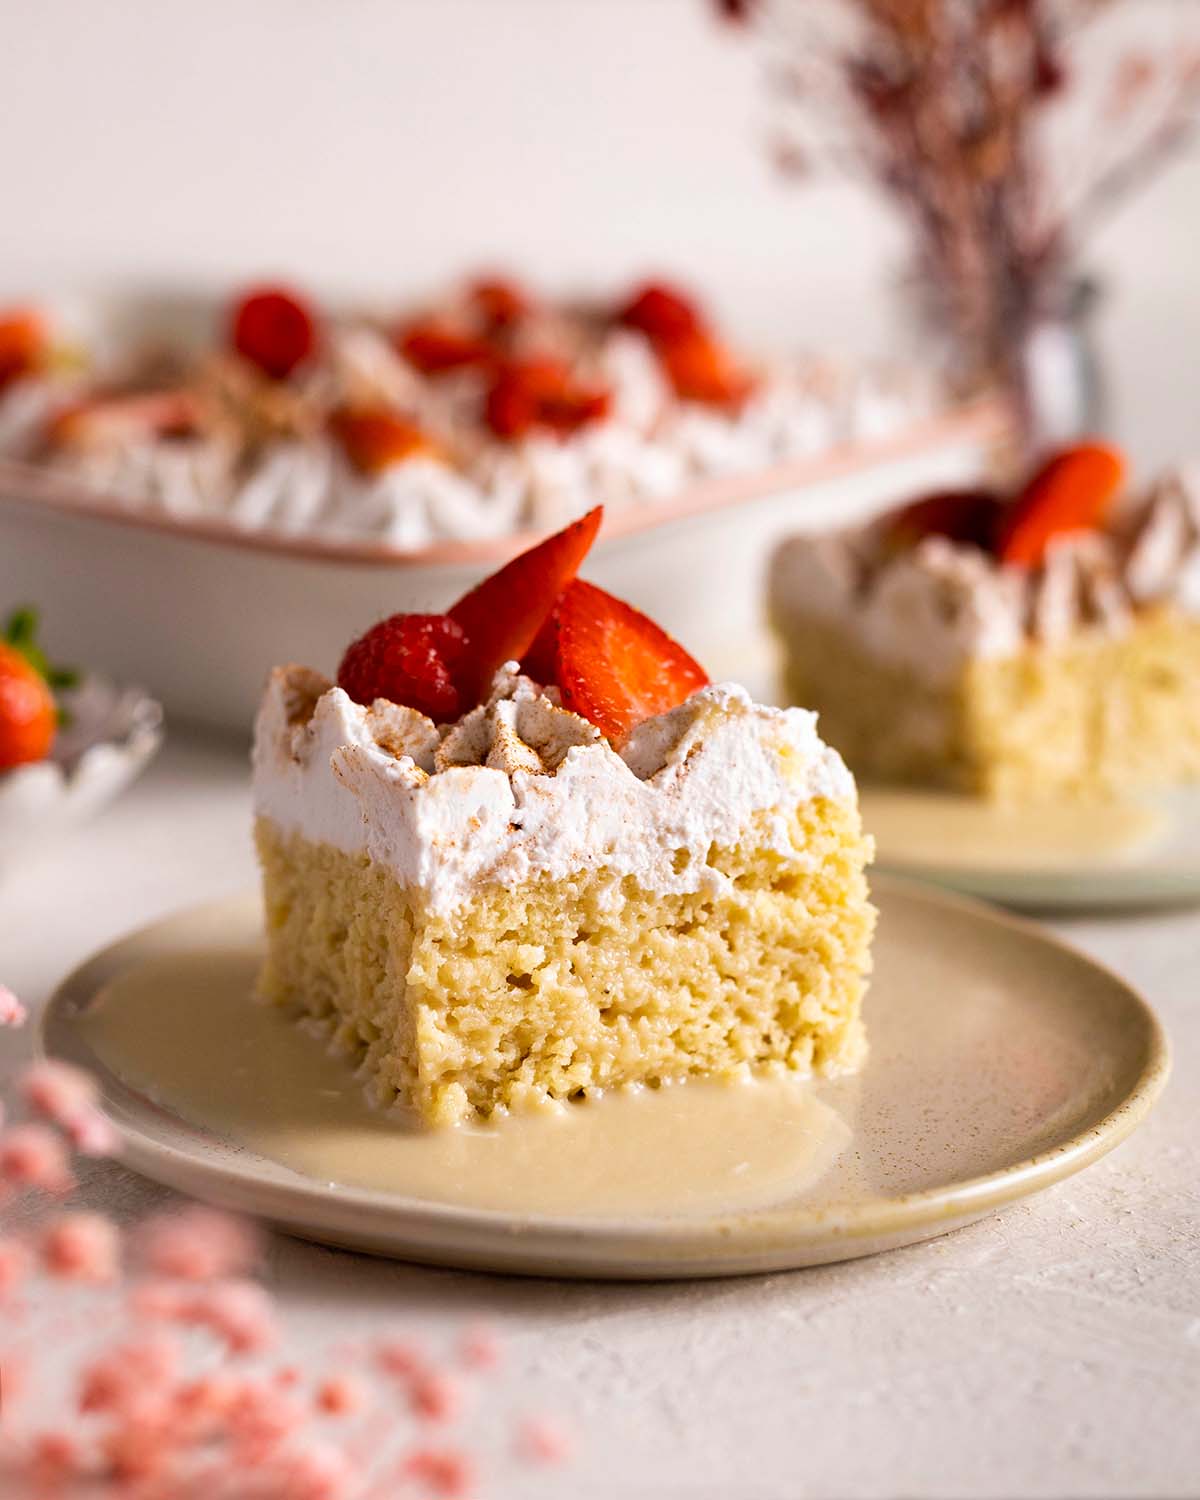
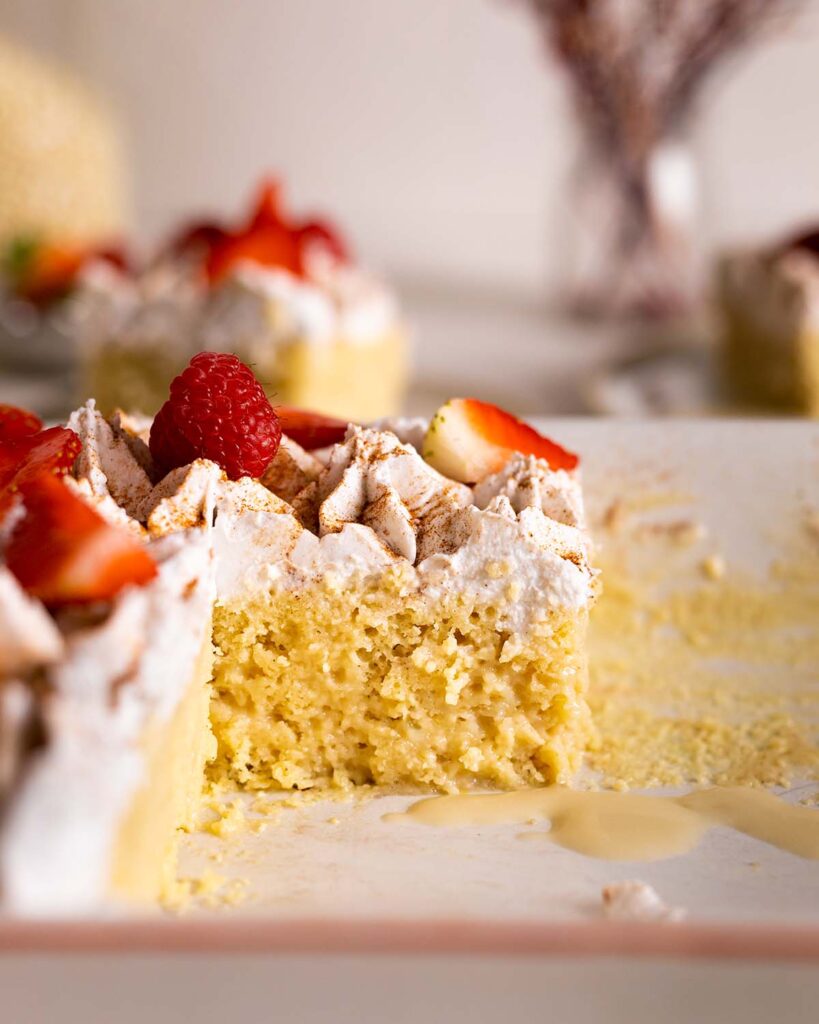
This vegan tres leches cake has an incredibly fluffy sponge soaked in 3 types of milk and is topped with whipped cream. It’s soft, moist and easy to make!
What is tres leches cake?
Tres leches cake is traditionally from Latin America and translates to ‘three milks cake’. It consists of a fluffy vanilla sponge lightly soaked in three types of milk and topped with light whipped cream.
Traditionally, tres leches cake is not vegan as it contains eggs and 3 dairy milks. However, it’s easy to make a vegan version of tres leches with dairy-free substitutes and a few tweaks.
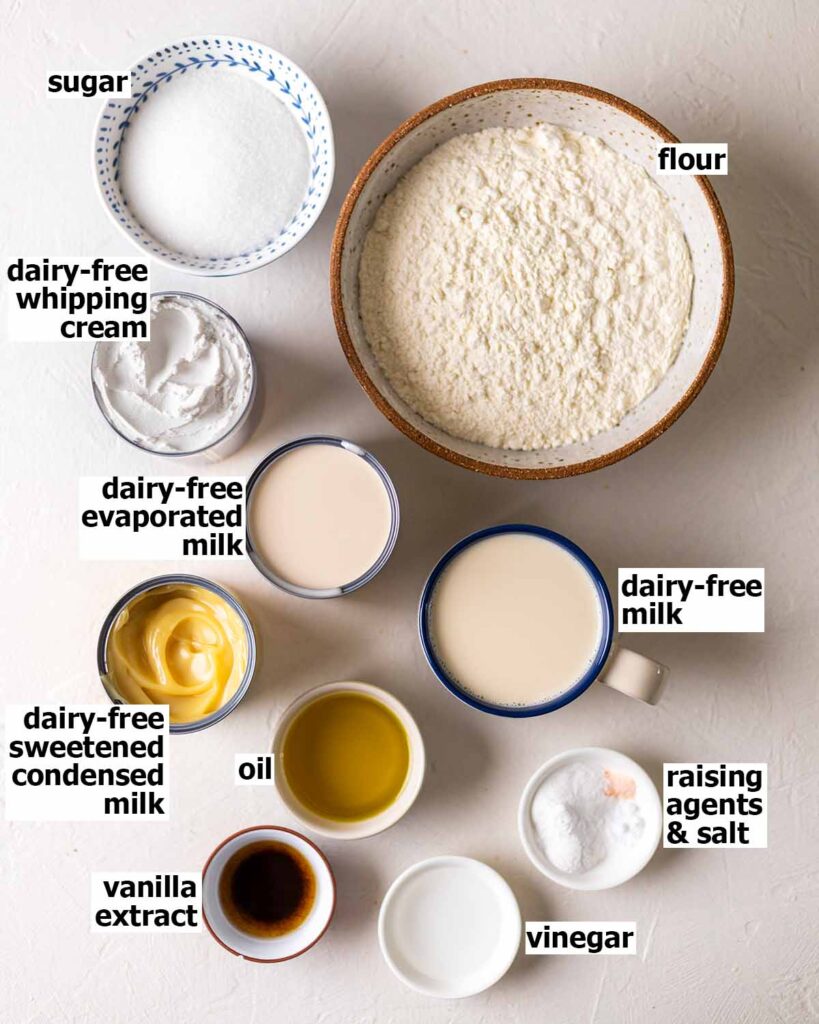
Ingredients you’ll need
Ingredient notes
Dairy-free sweetened condensed milk is poured on top of the cake to add moisture and a rich ‘melt in your mouth’ texture. I’d recommend using high-quality coconut or oat condensed milk, such as the ones by Nature’s Charm.
Dairy-free evaporated milk which has a creamy mouthfeel similar to milk but is thicker and is slightly sweet. This can be substituted with canned coconut milk or extra dairy-free milk. If you’d like to know how evaporated milk is made, check out this post by The Spruce Eats.
Dairy-free milk. I’d recommend creamy and flavorful milk such as soy milk or oat milk. Almond milk and others will work but your cake may be less tender.
Oil. Traditionally, tres leches cake doesn’t contain oil or butter. However, since we’re omitting eggs (a source of fat), we need to add a little oil to make sure the cake stays moist. The vanilla cake contains less oil than a regular vegan cake as we’re soaking the cake in liquid after baking.
Baking powder AND baking soda. We’re using double baking agents to make this cake extra fluffy, similar to a traditional tres leches sponge cake! You don’t need any special egg replacers for this recipe.
Apple cider vinegar or white vinegar is often used in vegan cakes to create a fluffier and tender crumb.
The full list of ingredient quantities and instructions are in the recipe card at the bottom of this post.
How to make the vanilla sponge cake
The sponge cake is EASY to make and comes together in one bowl.
Simply add all the dry ingredients to a large mixing bowl and mix until combined.
Add all the wet ingredients and mix until there are no pockets of flour or liquid. Some lumps are fine! At this stage, I like to fold the batter to prevent any overmixing.

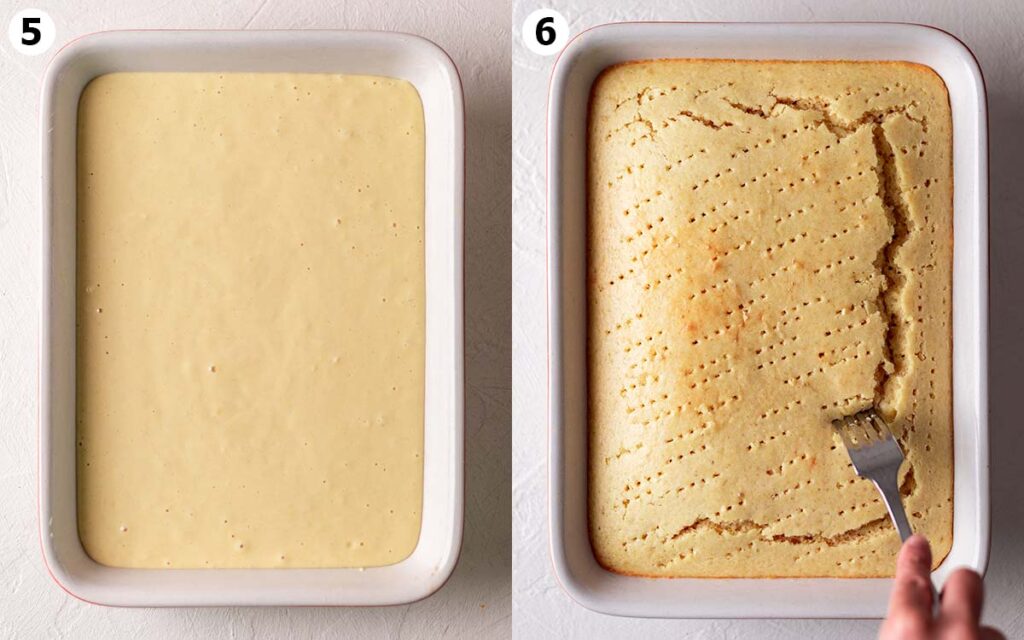
Your final cake batter should be a little thinner than regular pancake batter.
Pour your batter into a greased casserole dish and bake it in a preheated oven. It doesn’t matter if the cake cracks on top – you’re going to be covering it anyway!
Whilst the cake is warm, generously poke holes in it with a fork, skewer or toothpick. Make sure your fork reaches the bottom of the cake as this will allow the milk mixture to seep through!
Preparing the milk mixture
To make your three-milk mixture, simply add all ingredients to a bowl or jug with a pouring spout and whisk until combined. The final mixture should have the consistency of thick milk!
While the cake is still warm, pour the milk mixture on top. A warmer cake absorbs the liquid easier.
Don’t worry if the cake doesn’t absorb all of the liquid immediately. The surface of the cake has developed a crust from baking which acts as a barrier to the liquid. The cake can take anywhere from 30 minutes to overnight to completely absorb the soaking liquid.

Decorating the tres leches cake
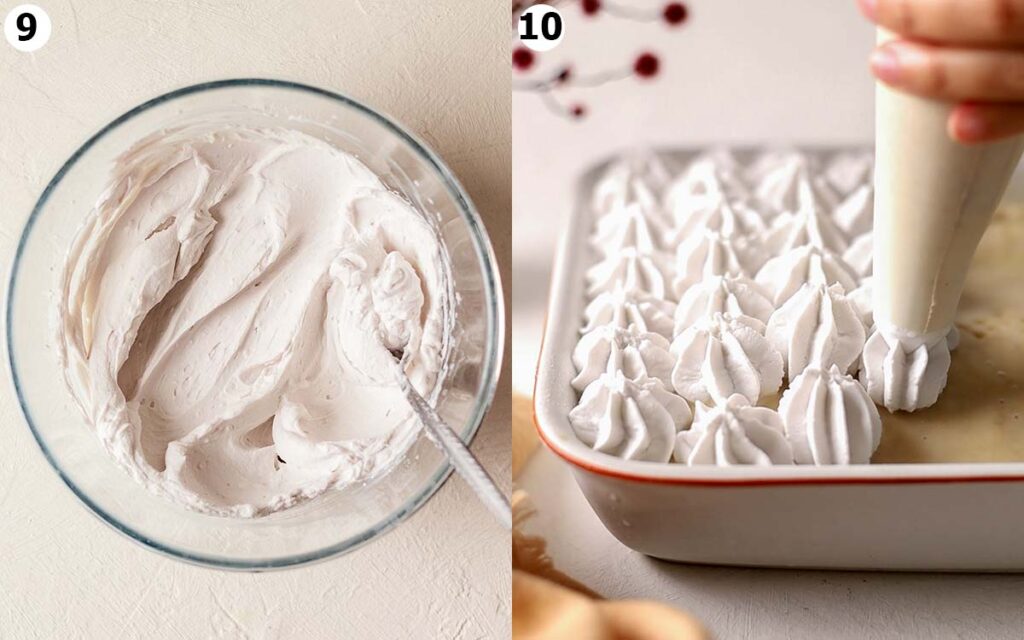
While your cake is cooling and resting, prepare your whipped cream topping according to packet instructions. For ease, I like using a stand mixer or hand beaters to whip up the cream.
Make sure you decorate the cake when it’s fully cool. A warm cake will definitely melt the whipped cream topping.
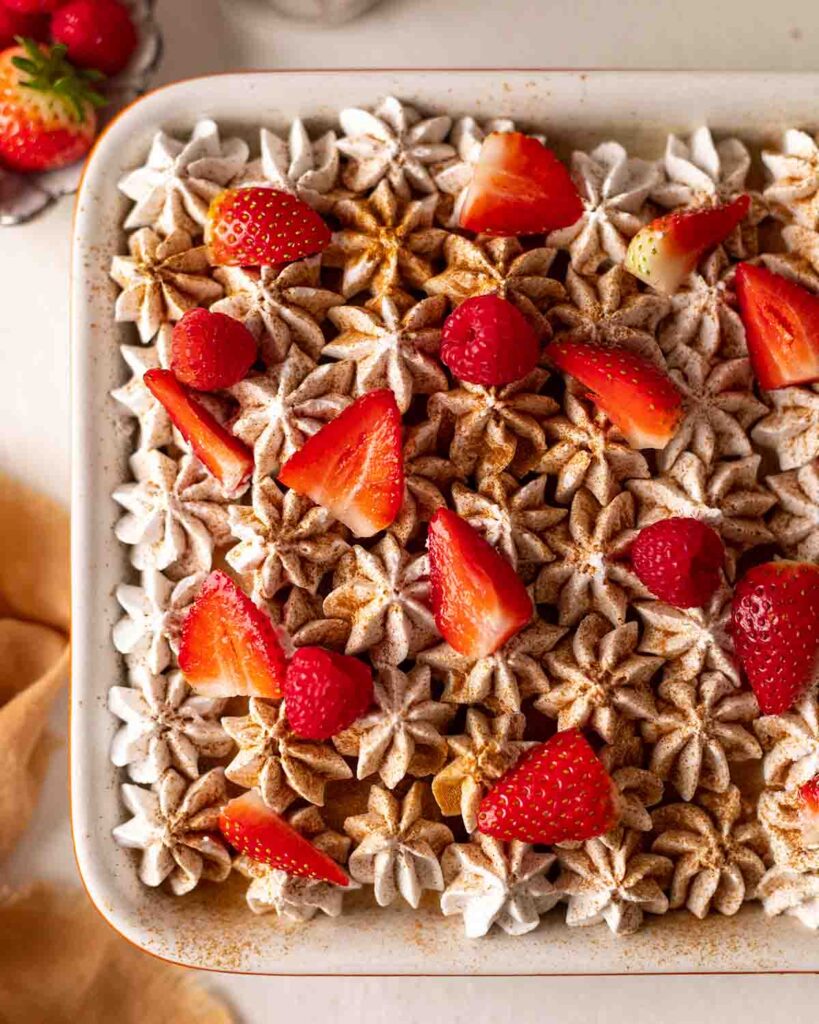
Traditionally, people simply spread whipped cream on top of a tres leches cake. However, I love the look of piped cream!
You can enjoy your tres leches cake just with the whipped cream topping. Or, you can also top it with:
- A dusting of ground cinnamon.
- Sliced strawberries and/or raspberries. When you enjoy a slice of the cake, the tart berries help cut through all the creamy flavors!
How to customize vegan tres leches
To make the cake gluten-free, check out the notes in the recipe box at the bottom of this page.
For a refined sugar-free cake, you can use coconut sugar instead of granulated sugar. This will make the cake brown in color. However, store-bought condensed milk and evaporated milk always contain refined sugar.
Yes, you can either:
1. Make the cake and pour over the milk mixture. Cover and chill in the fridge OR
2. Make the entire cake with the cream topping but without the fresh strawberries. Cover and chill in the fridge.
I personally prefer the first option as an undecorated cake is easier to cover and it allows more of the milk mixture to penetrate the cake.
I wouldn’t recommend it. The vanilla sponge was adapted from my tiramisu cupcakes but I decreased the amount of sugar and oil to balance out the sweet milk mixture that is poured onto the cake. The cake by itself is a little dry.
Expert tips
To make the most delicious vegan tres leches cake, I’d recommend that you:
- Weigh all your ingredients rather than using the cups measurement. This recipe was tested using grams and it provides the most accurate and consistent results.
- Prepare your milk mixture while the cake is baking! This helps save some time.
- Don’t underbake your cake. Underbaked cakes have more moisture and since we’re pouring a milk mixture over the cake, your cake may be too moist. If you’re unsure, bake your cake for a few extra minutes.
- The longer you let your cake absorb the milk mixture, the better. For the best results, I’d recommend making the cake 1-2 days in advance.
More easy vegan dessert recipes


Follow Rainbow Nourishments on Instagram, Facebook, TikTok and Pinterest, and subscribe via email to receive all of our latest recipes!

Vegan Tres Leches Cake
Ingredients
Vegan Vanilla Sponge Cake
- 2 ½ cups (310g) all-purpose plain flour, (note 1 for gluten free)
- ¾ cup (150g) granulated sugar
- 3 teaspoons baking powder
- ⅛ teaspoon baking soda
- Pinch of salt
- 1 ¼ cup (310g) dairy-free milk
- ¼ cup (65g) neutral flavored oil
- 1 tablespoon white or apple cider vinegar, optional
- 1 teaspoon vanilla extract, optional
Three-milk syrup
- 320g (11 oz) dairy-free sweetened condensed milk, for example coconut or oat
- ¾ cup (190g or 7 oz) dairy-free evaporated milk, (note 2)
- ¼ cup (65g or 2 oz) dairy-free milk, or more evaporated milk
To decorate
- 400g (15 oz) dairy-free whipping cream, (I used Nature's Charm coconut whipping cream)
- ground cinnamon, optional
- fresh strawberries or raspberries, optional
Instructions
To make the cake:
- Preheat the oven to 180°C (340°F). Grease a 11×6 inch casserole dish or a pan in a similar size (note 3).
- Add all the dry ingredients (flour, sugar, raising agents and salt) to a large mixing bowl. Mix until combined.
- Add all the wet ingredients (dairy-free milk, oil, vinegar and vanilla) to the bowl. Mix until just combined.
- Pour the batter into your prepared pan.
- Bake the vanilla cake for 22-25 minutes or until you can insert a toothpick in the middle and it comes out clean. Allow the cake to cool in the casserole dish.
- Generously poke holes in the cake with a fork or skewer.
To make the milk mixture (you can do this while the cake is baking):
- Add the condensed milk, evaporated milk and dairy-free milk to a pouring jug or bowl. Whisk or mix until well combined.
- While your cake is warm, pour the milk mixture over your cake. If desired, you may reserve some of the milk mixture for serving. Allow the cake to absorb the milk mixture for at least 30 minutes (note 4).
To make the cream frosting and decorate:
- Whip your cream according to packet instructions or until stiff peaks form.
- When the cake has fully cooled, spread or pipe the cream on the cake. Dust with ground cinnamon and/or fresh strawberries, if desired.
- Cut the cake into portions. Use a cake server to transfer the cake to individual plates. Enjoy!
- Leftovers can be stored covered in the refrigerator for up to 3-5 days.
Video
Notes
- For a gluten-free cake, I recommend using 1 1/2 cups (150g) almond flour and 1 cup (160g) gluten free all-purpose flour.
- Evaporated milk can be substituted with coconut milk (to make it richer) or extra dairy-free milk (for a lighter version). In addition, if you’d like to use up the entire can of evaporated milk (usually 360 mL or 12.2 oz), I’d recommend substituting some of the plant-based milk in the cake mixture and/or the milk mixture with evaporated milk.
- If you don’t have a casserole dish, you can bake your cake in a rectangular cake pan lined with parchment paper. Allow the cake to cool in the pan for 10 minutes, remove it from the pan then remove the parchment paper. You can return the cake to the cake pan or place it on a large serving plate, ready for soaking.
- If you’d like to make the vegan tres leches in advance, I’d recommend:
- Making the cake and pour over the soaking liquid. Cover the cake and place it in your refrigerator 1-2 days in advance OR
- Making the cake and topping it with whipped cream. Place it in your refrigerator 1 day in advance
This post may contain affiliate links. As an Amazon Associate, I may earn a small commission from qualifying purchases at no additional cost to you.

I bake a lot, and this genuinely is the best cake I’ve ever made and had! The recipe is great, very easy to follow & the cake turned out perfect. I’m in the UK and used biona organic condensed coconut milk, and made my own evaporated milk by cooking down soya milk. Can’t wait to make this again and again!
Wow, thank you for such a lovely review! We’re absolutely thrilled this became your new favourite and it’s great to hear it worked so well with your homemade evaporated soy milk!
I loved this cake! I topped the cake with a mixture of coconut milk 1/4cup, 4 tablespoons of plant butter and 6 tablespoons of brown sugar-melt in a pot than added 1 cup of unsweetend coconut.Spread the topping on the cooled cake. A quick broil to toast the topping and ready to eat. Just an alternative to whip topping and fruit.
We’re thrilled this cake was a hit with you! Thank you for sharing your delicious twist! That coconut topping sounds amazing and like the perfect way to switch things up. We love hearing how you make the recipe your own 🥥😊
Deliciously moist cake! I used Nature’s Charm oat condensed milk and oat evaporated milk from Whole Foods here in the U.S. and saved extra milk mixture to pour over the cake the next day. Tastes just like my childhood! I’ll be making again 🙂 <3
Hi Maria, I’m thrilled that you loved this cake and it reminded you of childhood!! Those two Nature’s Charm products are wonderful. Thank you soo much for your kind feedback 🙂
Hey
What can I use instead of vinegar in vanilla sponge?
Hi! You can use lemon juice 🙂
Wasn’t “soupy” enough for me. The next time I made it I used a regular vanilla cake recipe( still vegan) abs it was perfect
It sounds like your cake absorbed too much of the liquid. A dry cake can happen if you if you accidentally overbake the cake or use incorrectly measure the flour. I recommend using the spoon and level method, as measuring the flour without accuracy can add an extra 50% of flour to your cake and change its texture.
Thank you for this recipe! I’ve been craving a tres leches cake for years. And while this doesn’t taste exactly like a non vegan tres leches cake, it is *incredibly* fluffy & most; even my non vegan husband loved it. My only wish is that the ingredients were listed in grams first with cup measurements being in parentheses to emphasize that it is best measured in grams. My batter turned out thick, but thankfully still baked well.
Will definitely be making this again!
The batter was just a blob of dough. Not thin at all. Turned out awful.
I’m sorry you didn’t have the same success as others. If your batter was too thick, it sounds like your flour was overmeasured – I suggest using the spoon and level method if you used measuring cups. If you use your cup to scoop out of your flour container, it can add an extra 50% flour which will throw off the recipe. A thick batter can also be from using cold milk, or if you reduced the sugar.
The cake was delicious, however I don’t think the measurements for your casserole dish are correct. I used a ‘bigger’ one than what you measured, and there was too much cake batter for my tin.
Looking at the video I think you used larger than 11×6 inches.
Other than that it was still really nice 🙂
Hi Ellen, I’m so glad that you enjoyed this tres leches cake! With the measurements of my baking dish – that’s really interesting. I just re-measured my baking dish, and it really is 11×6 inches, but at the bottom. However, the dish is larger at the top so it would look bigger when you see it on video. Some websites say that baking dishes should be measured at the bottom whereas others say it should be measured at the top, so I’ll look into it. Thanks for your feedback!
Hey Anthea! I can’t wait to bake this! How long does the cake last after baking and pouring on the milk mixture? My family will just snack on it throughout the week generally. I’m dairy intolerant and I CANNOT wait to have my favorite desert again. Thank you for this recipe!
Hi Mistee! The cake with the milk mixture lasts pretty long (up to 4-5 days). The milk actually helps keep the cake soft and moist for a longer time than regular cakes. I hope that helps and let me know if you get to make it!
I LOVED this cake! I used homemade condensed milk and less of the liquid to mix it with. Ended up using thick condensed milk as frosting – so good and so easy! Will be making it again:)