Vegan Sticky Cinnamon Buns (with maple glaze)
Buttery and soft vegan cinnamon sticky buns or rolls with an irresistible maple glaze. You can make them with common ingredients you probably already have in your pantry. And this post features step-by-step pictures!

How are these sticky buns different?
Sticky buns originated in Pennsylvania in the USA. They are typically a little denser than cinnamon rolls and are drenched in a glaze and pecans.
They are normally made by pouring a glaze on the bottom of a baking pan which is then sprinkled with nuts. Cinnamon rolls go on top then it is baked. Afterward, the tray is inverted and you’re greeted with traditional sticky buns!
Contrary to popular opinion, I don’t think sticky buns are pretty – they are brown, squashed and lack definition. Delicious but ugly if I’m honest!
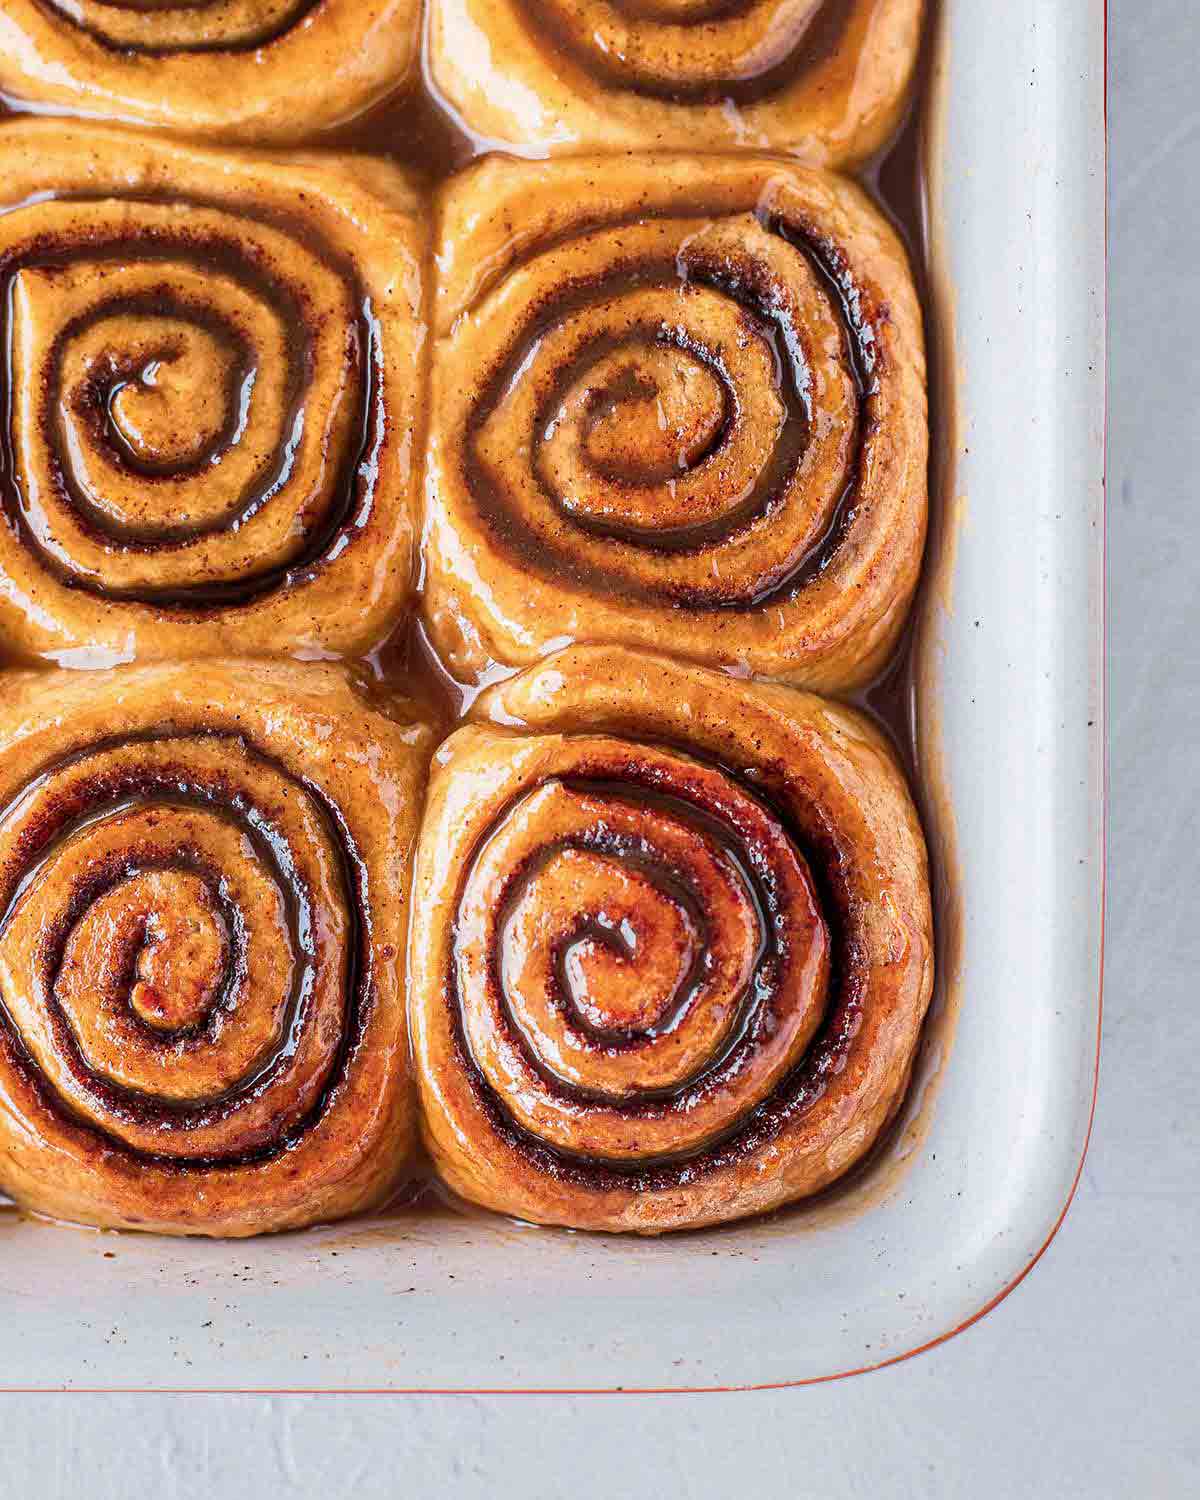
Instead of making sticky buns the traditional way, I opted for classic vegan cinnamon rolls drizzled heavily in maple glaze. I LOVE the appearance of the top of classic cinnamon rolls and knew the glaze would suit it perfectly.
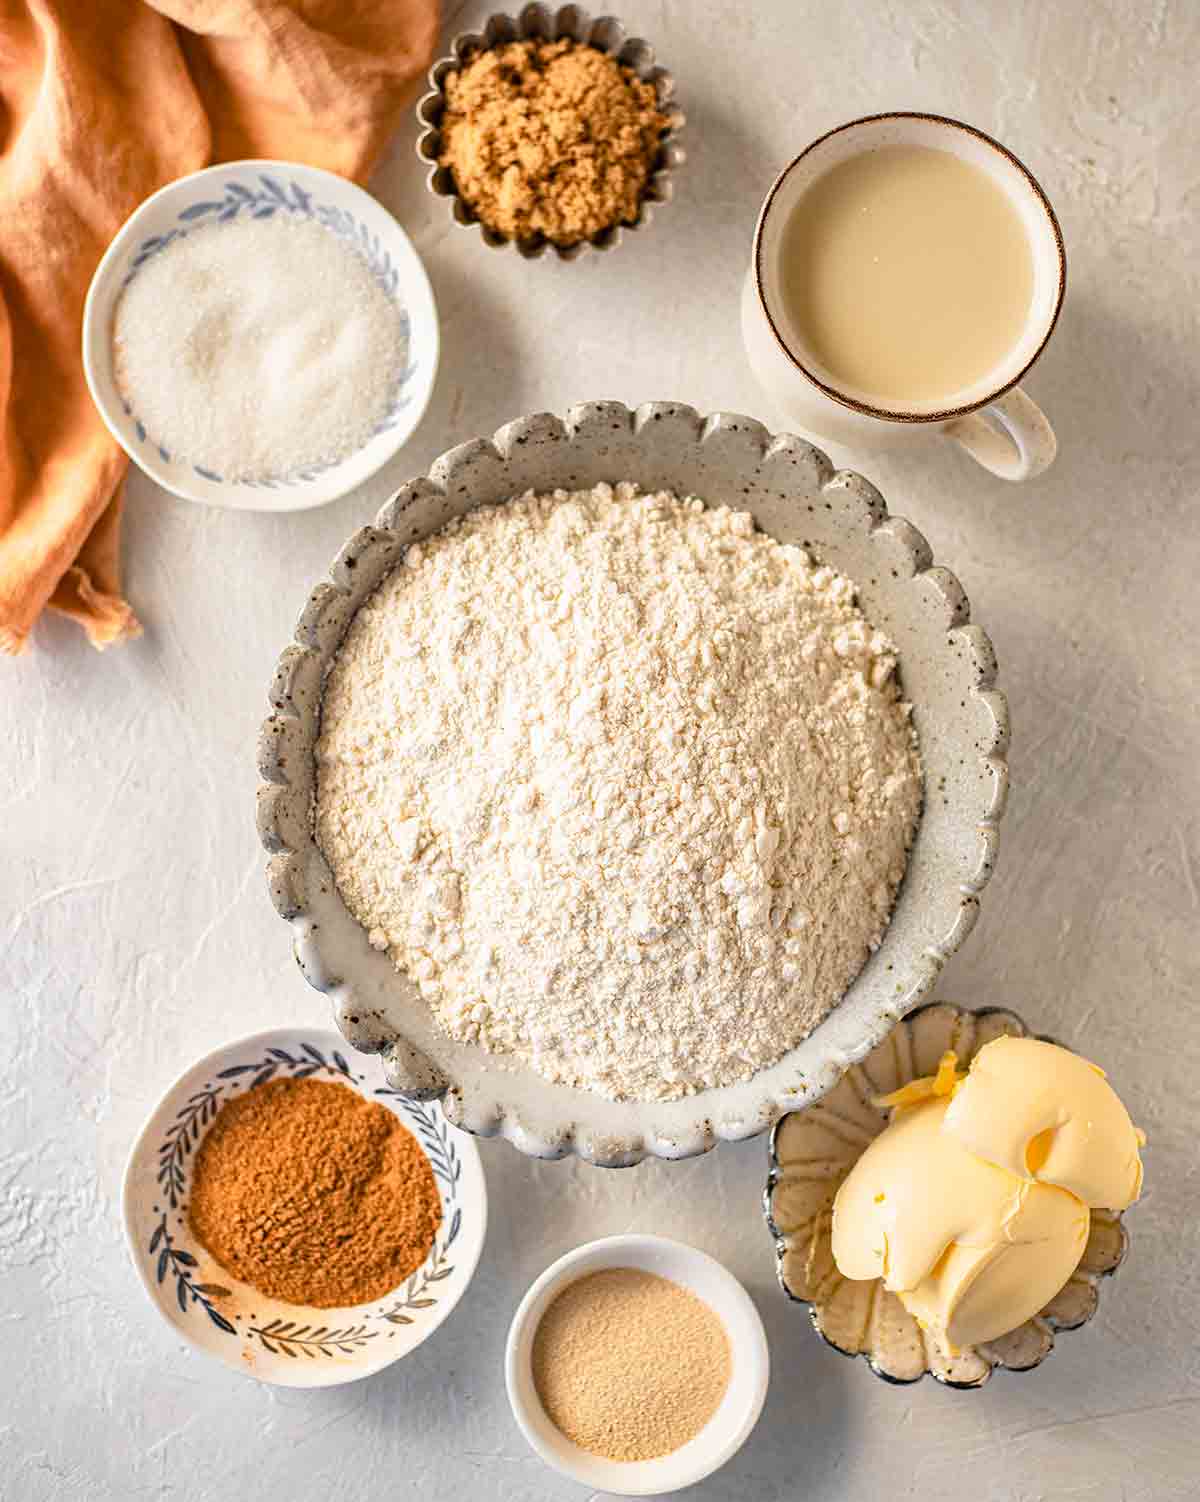
Ingredients you will need for these vegan sticky buns
These homemade cinnamon rolls use common pantry staples and no weird ingredients! You will need:
- Plain aka all-purpose flour
- Plant-based milk, such as soy, coconut or almond
- Cane sugar or coconut sugar
- Brown sugar or coconut sugar
- Instant dried yeast
- Vegan butter or margarine
- Ground cinnamon
Ingredient substitutions
I’ve tried a 1:1 gluten free flour substitute for these vegan sticky buns and they didn’t work well. However, different brands of gluten-free flour behave differently so it might work for the brand you have. If it does, please let me know!
Instead of using plain flour for these vegan sticky buns, you can use white spelt flour or wholemeal flour. However, your buns will be denser.
If you don’t want to use vegan butter or margarine, you can use oil instead. Like above, this results in a denser dough which makes it harder to knead and rise.
Making the dough for the cinnamon rolls
I love one-bowl recipes! Simply put all the dough ingredients in a stand mixer or large mixing bowl. Mix and knead until it’s combined.
Your sticky bun dough should be relatively smooth, cohesive and have no pockets of butter or flour. I’ve tested this recipe many times but I understand that every brand of flour and plant-based milk have different absorbencies. You may need to ‘eye’ the dough and:
- If the dough is too dry, add 1 tablespoon of milk at a time and knead until it comes together. The dough will resist the milk initially but eventually, it will combine.
- If the dough is too sticky, add 1 tablespoon of flour at a time and knead until it’s no longer sticking the side of the bowl.
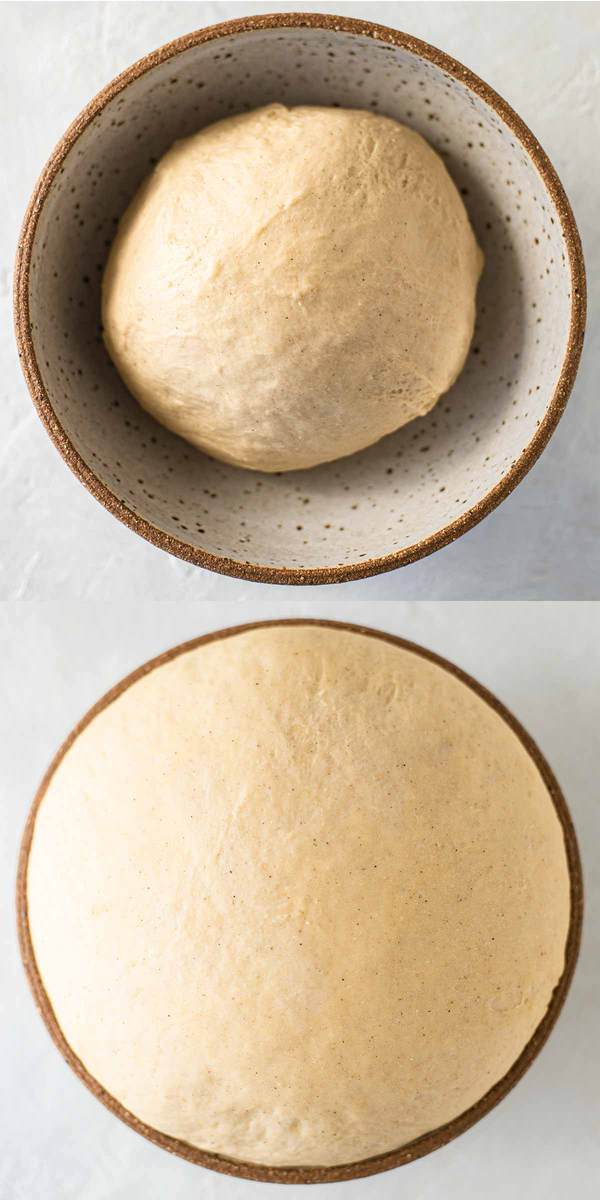
Resting the dough the first time
Place the dough for the sticky buns in a large and deep bowl and cover it with a damp tea towel. The moisture from the towel will prevent it from drying out. Don’t place the dough in a small bowl where it’ll rise and overflow (like the pictures below)…. hahaha….
Position the bowl in a WARM spot in your house. That could be:
- in the oven with the light on
- near the stove while you’re cooking something else.
- close to a window in shade
- near a heater (if it’s Winter)
If it doesn’t double or grow 150% in size, don’t ignore it. Reposition the dough in a warmer spot and wait until it does.
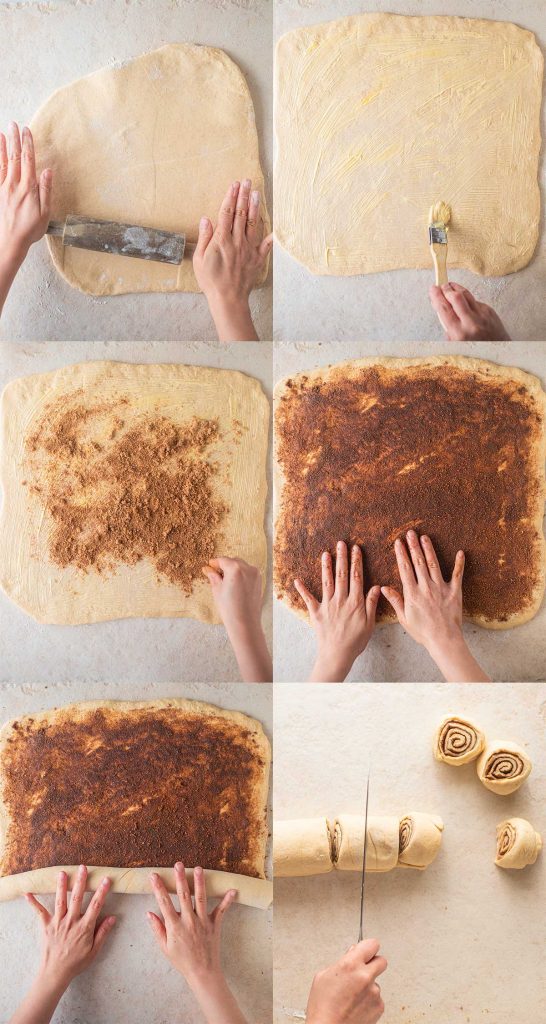
How to shape the vegan cinnamon rolls
Place the risen dough on a floured surface. Then roll it into a large square or rectangle. I used a rolling pin but a round and even jar will work too :).
Once you’ve done that, liberally spread the vegan butter or margarine on the surface. I like spreading mine to the edges because I think the end sticky buns need a bit of love too!
Liberally sprinkle your cinnamon sugar on top. Then get your fingertips dirty and rub it in! If you don’t rub it in, it’ll get pretty messy when you try to roll it up.
Ok, then roll up the dough as tightly as possible. Start from the long side and, bit by bit, roll it up into a long tube!
Use a sharp knife or unflavoured dental floss to cut rolls out of the tube. I prefer to ident the tube at halfway then quarters so I get relatively even rolls.
Resting the dough the second time
Since we just handled the dough for the sticky buns A LOT, it needs to rest again. It’s like self-care for people – after we work, we need to look after ourselves and rest ;).
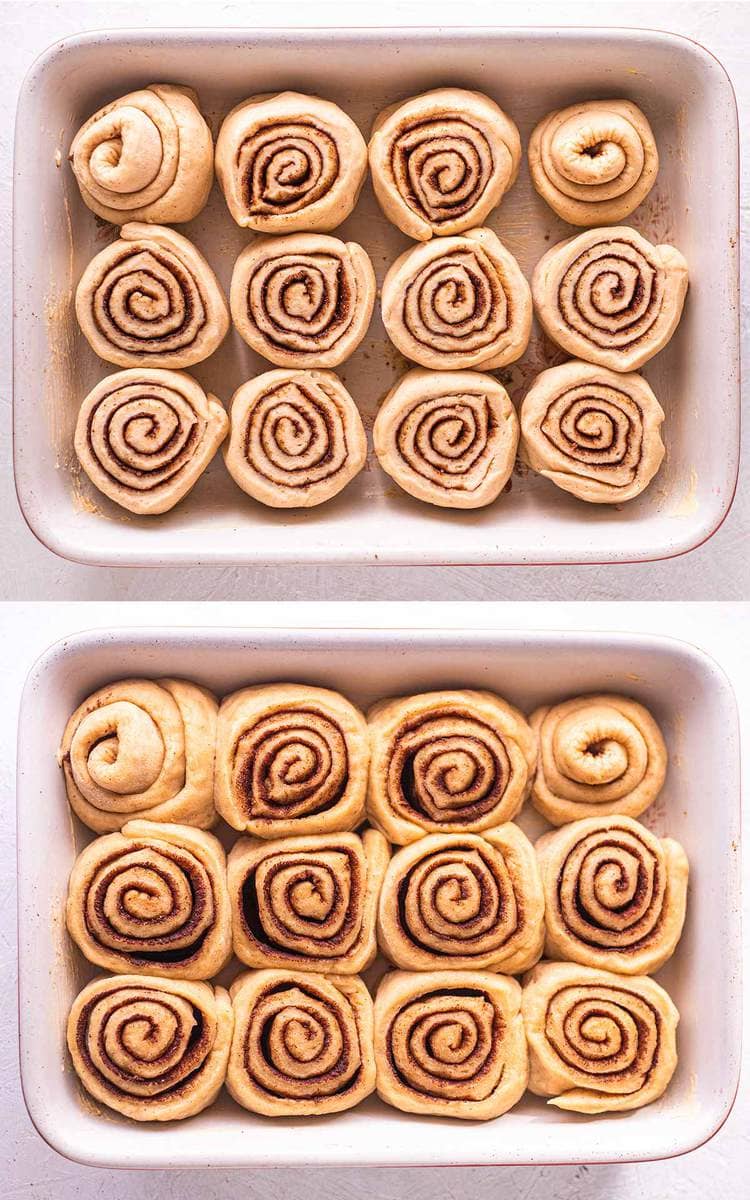
Place all the vegan cinnamon rolls in a greased baking tray. With spacing the rolls, you have two options:
- Arrange the rolls CLOSE to each other (like below). Your rolls will likely be square-shaped (nothing wrong with that) and be forced to grow upwards. It also means the rolls have soft and pillowy edges, OR
- Arrange the rolls SPACED APART. Your rolls will likely be round as they’ll have room to grow outwards. It will also mean your rolls will have a crispier edge.
Sometimes you are limited by what baking tin you have. Or you can pick which one you prefer and space your rolls accordingly!
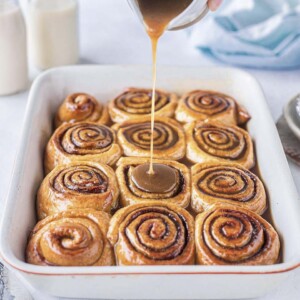
The maple glaze for the vegan sticky buns
While the buns are baking, you can prepare the delicious glaze for your vegan sticky buns! Simply put all the ingredients into a small saucepan and heat until everything is combined and thick.
If you don’t have maple syrup, you can use corn syrup or powdered sugar, but they won’t taste as good ;).
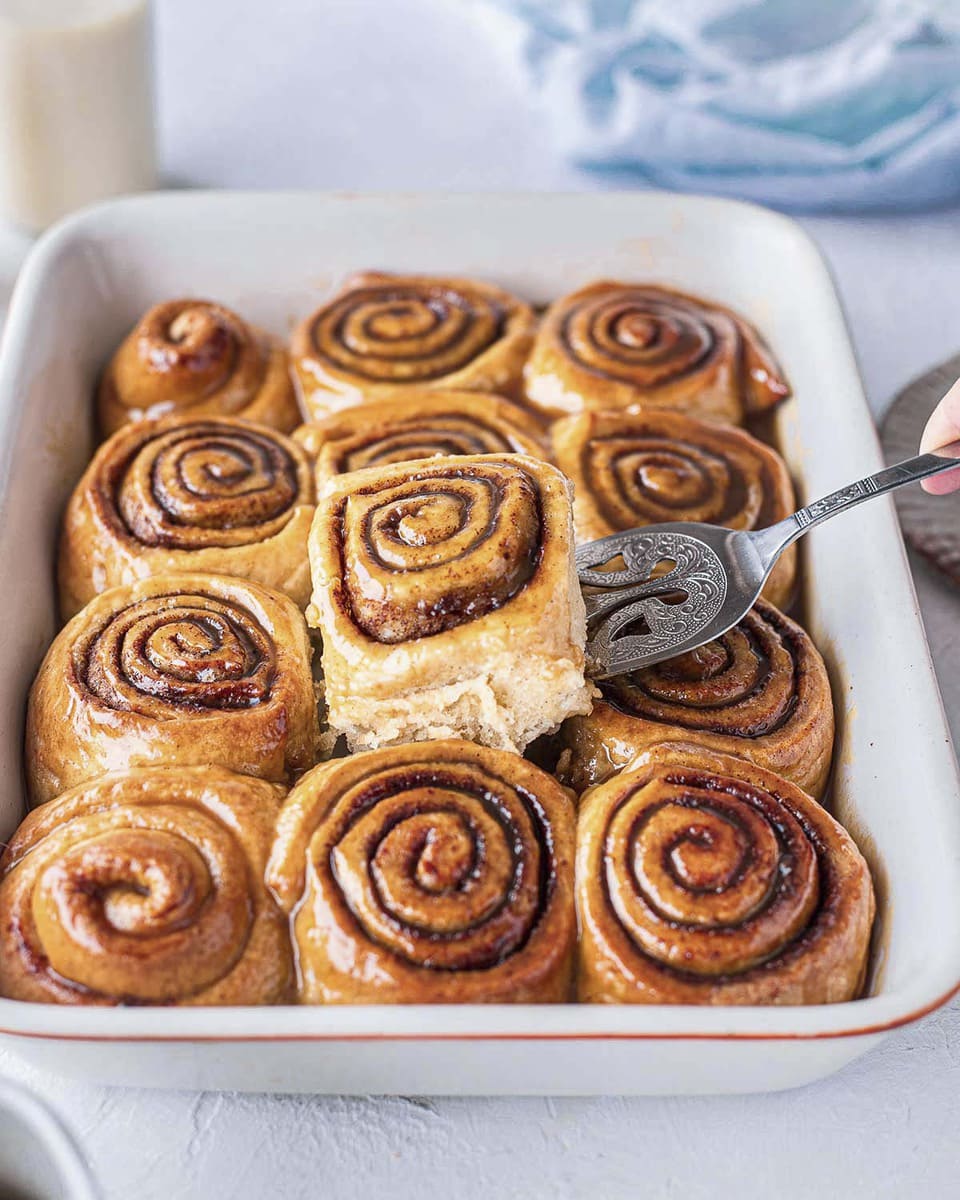
Generously drizzle the glaze on top when the buns are hot from the oven. The glaze helps keep the buns moist for longer and simply irresistible.
More vegan cinnamon roll recipes


Or check out my upside-down pecan cake!
Follow Rainbow Nourishments on Instagram, Facebook, TikTok and Pinterest, and subscribe via email to receive all of our latest recipes!
Vegan Sticky Cinnamon Buns (with maple glaze)
Ingredients
Buns
- 3 ¼ cups (405g) all-purpose plain flour, plus more for dusting
- 1 cup (250g) dairy-free milk, warm
- ½ cup (115g) vegan butter or margarine, room temperature
- 3 tablespoons (40g) granulated sugar, or coconut sugar
- 1 tablespoon (9g) instant dry yeast
- 1 teaspoon ground cinnamon
- Pinch of salt, if you're not using salted butter
Bun filling
- 2 tablespoons (30g) vegan butter, melted
- ¼ cup (50g) packed brown sugar, or coconut sugar
- 1 tablespoon ground cinnamon
Maple glaze
- ¼ cup (85g) maple syrup, or any other liquid sweetener
- ¼ cup (50g) granulated sugar, or coconut sugar
- 1 tablespoon (15g) vegan butter
- 1 tablespoon (15g) thick scoopable canned coconut cream, optional for a thicker glaze
Instructions
To make the buns:
- Combine all the ingredients in a large bowl or stand mixer and mix until it comes together. Knead the mixture until it forms a smooth and stretchy dough. Add a little more milk if the dough is too dry or a little more flour if the dough sticks to the bowl.
- Remove the dough from the dough hook and cover the bowl with a damp tea towel. Set it aside in a warm spot for at least 1 hour or until the dough has doubled in size. If it doesn't double, place the dough in a WARMER spot until it does.
To prepare the filling:
- Combine the sugar and cinnamon in a small bowl.
To assemble the vegan sticky buns:
- Scoop the dough onto a lightly floured surface and roll it out into a large rectangular shape.**
- Use a pastry brush to spread the melted butter or margarine on the dough, making sure it reaches all edges. Liberally sprinkle the cinnamon sugar and rub it into the surface with your fingertips.
- Starting from the long side, tightly roll the dough into a large tube. Use a sharp knife to cut buns out of the dough.
- Arrange the rolls on a greased baking tray, leaving a little space in between each bun. Place a tea towel over the buns and set aside to rise for at least 1 hour or until they have increased in size by 20% and are puffy again.
Baking the vegan sticky buns:
- When you're ready to bake the buns, preheat the oven to 180°C (350°F).
- When the oven is hot, bake the buns for 15-20 minutes. The rolls are ready when they are slightly golden brown or when you insert a skewer in one of the middle buns and it doesn't have wet dough on it. Set aside to cool.
- To make the glaze: Whisk all the ingredients in a small saucepan over low heat until combined. Generously drizzle the glaze onto the buns.
- The buns are best eaten the day they are baked. Alternatively, store them in an airtight container at room temperature for 1-2 days or in the fridge for 3-4 days. Warm up the buns before you enjoy them.
Notes
This post may contain affiliate links. As an Amazon Associate, I may earn a small commission from qualifying purchases at no additional cost to you.

Hi, what size baking pan did you use in this recipe?
Thank you!
My baking pan was about 28 x 15 cm (11 x 6 inches). Hope that helps!
Would it work to roll and put in pan then refrigerate and cook the next day?
Yes absolutely!
Such a simple recipe for such a delicious treat! Loved making and eating these yummy buns. I topped mines with chopped pecans too, yum!
That sounds incredible Francesca!
Amazing recipe. I love them so much! Warm, gooey deliciousness. I 100 percent recommend.
Aw thanks so much Eden! Happy that you loved these!
My family and I were very happy with how these turned out! Very delicious! Thank you so much!
Soo glad to hear and thanks so much for your lovely feedback!! 🙂
Absolutely delicious. Will definitely be making again. Best eaten on the day, but just as nice warmed up a couple of days later.
Thanks so much for your feedback Kelly! And I agree 🙂
This was wonderful! My daughter made these and they were excellent. We did use regular yeast in the warm milk.
I love it when younger family members successfully make recipes! Thanks so much for your feedback 🙂
I am about to try with sourdough discard also- I am curious, did you omit the yeast and adjust for wetness/bulk (this was my thinking but i haven’t tried this before)?
Hi Amie, yes that’s basically what you should do! I have a sourdough cinnamon roll recipe with very similar ratios here!
This was so easy and fun to make, thanks for the recipe!
So glad to hear Lilli! Thanks for your kind feedback!
They were amazing! The buns are very easy to make thanks to the step by step instructions (only the butter is mentioned in ml instead of gr and that was a little bit confusing for me ?). It takes a little bit of time due the resting time (2x), but the ‘handwork’ goes really quick. The day after they were just as easy! will make them again very soon! ?. Thanks for the recipe! Just like all your other recipes…perfect ??.
Glad you enjoyed these rolls Wendy! Thanks so much for your feedback and ongoing support xo
AMAZING & ACTUALLY EASY! Any recipe that requires yeast usually puts me off but I was really craving some cinnabuns today. Will definitely be making these again! Already have some filling variations in my head: raspberry or strawberry jam, chocolate and banana, spiced pear….
The dough turned out perfectly and I used spelt flour. In this case, I used 370g and kept all other measurement the same because spelt absorbs more liquid. It yielded 12 good size buns. Also, ran out of vegan butter, so used olive oil for the filling and it worked great.
Oooh I’m SO glad to hear that Vai! I hear you about baking with yeast – they key thing is to make sure your yeasted dough is warm but it seems like you perfected them! Ooh all those fillings sound amazing and glad that spelt flour worked for you too! Thanks so much for your feedback xo
Amazing! It had been a long time since I’d done any baking with yeast, so I was a little intimidated. Instructions were very good and the recipe offered several options for substitution. I was delighted at how they turned out! Just writing this makes me want to go make some more. Flavours were awesome- not too sweet and plenty of cinnamon. Mmmmmm. Takes a little time and prep but so worth it.
So so glad to hear Belinda and that the scrolls hit the spot! I can be intimidated by yeast-baking too but I realise just making sure the dough is in a warm place is the trick. Thanks for the kind review xo
Thanks for the recipe! I made mine with wholemeal flour and monk fruit sweetener to make them a bit lower carb. Came out really well! A little bit crisper than I was hoping particularly around the edges but I think that’s due to the wholemeal flour and/or sweetener and I spaced them apart in the baking dish. But still super tasty and I’ll be making again!
My pleasure! Glad that wholemeal flour and monk fruit sweetener worked for you :). Yes, spacing the buns out tends to give them crisper edges! And sometimes wholemeal flour absorbs more liquid so your dough might’ve been a little drier and makes for crispier buns. Nevertheless, glad you enjoyed them and thanks for your feedback! xo
Excellent recipe! I made this with my sour thought starter discard and they are delicious, I just added pecans and the sticky bun glaze…. Yumm! Thank you!!
Ooh that’s so amazing! I love sourdough buns and definitely love pecans in the buns too. Thanks so much for your feedback!
Just perfect! It was easier than I expected and were delicious. I will try it with gluten free flour next time.
Oh I’m so glad you enjoyed it Mel!! Thanks so much for your lovely comment 🙂
They look amazing ! I can’t wait to try making my own .
By vegan butter, do you mean margarine ?
Thank you !
Thank you! And oh, I meant vegan butter or margarine. I’ll update the recipe 🙂
These are absolutely amazing! So easy to make, especially with the step-by-step photos and instructions – perfect! I’ll be making these again and again – thank you!
Thanks so much Karina! Glad you found the photos and instructions helpful :). Have a lovely day xo
Wow, these look so good! I’ve been dying to make these recently so thanks for the inspiration!
My pleasure! Thanks Tori!