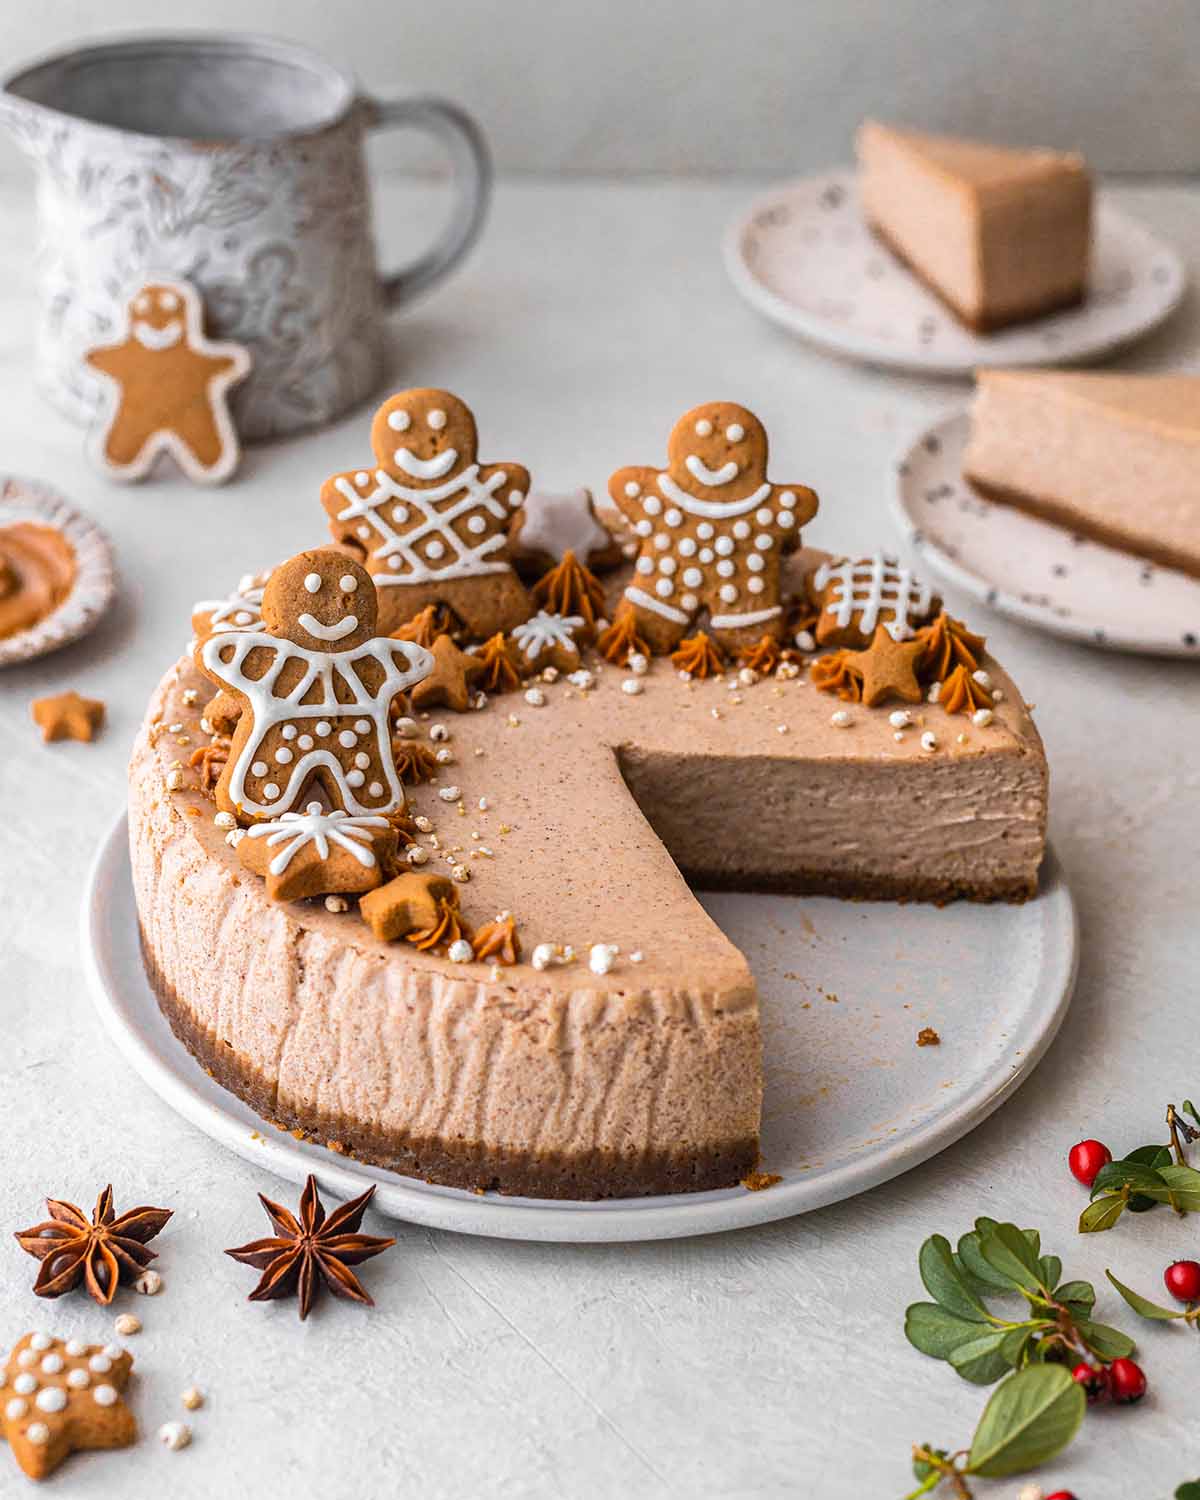
Vegan Gingerbread Cheesecake (baked)
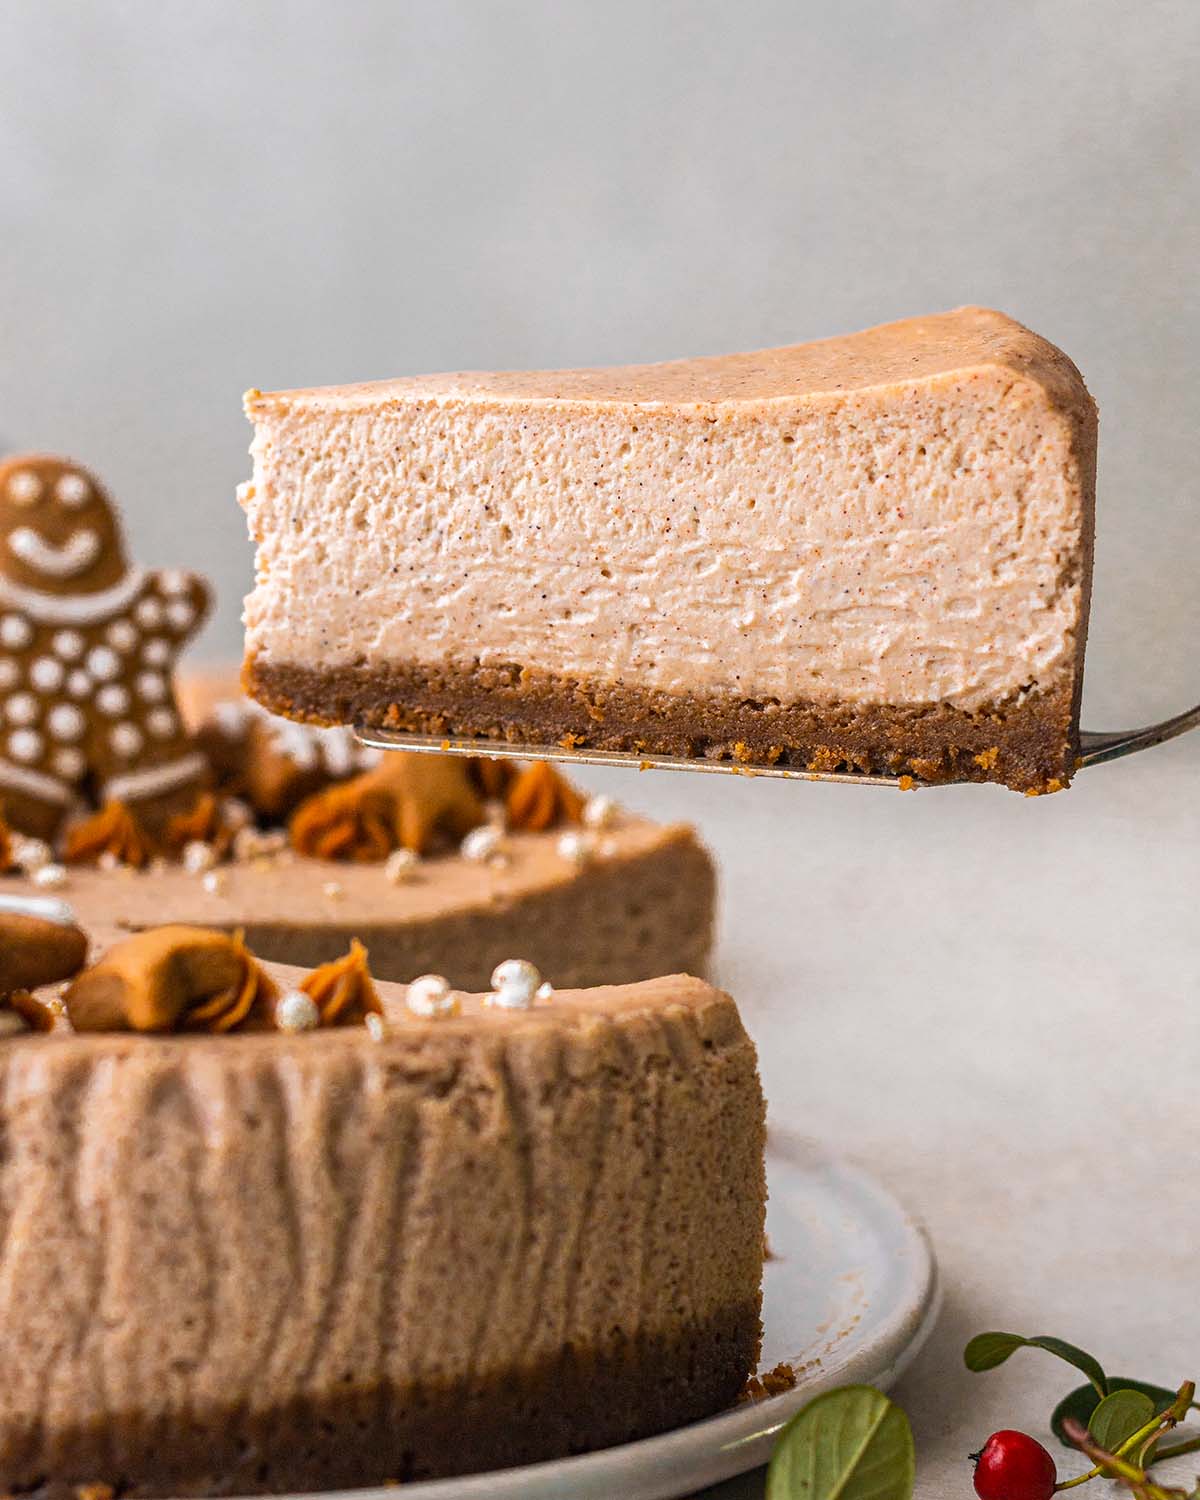
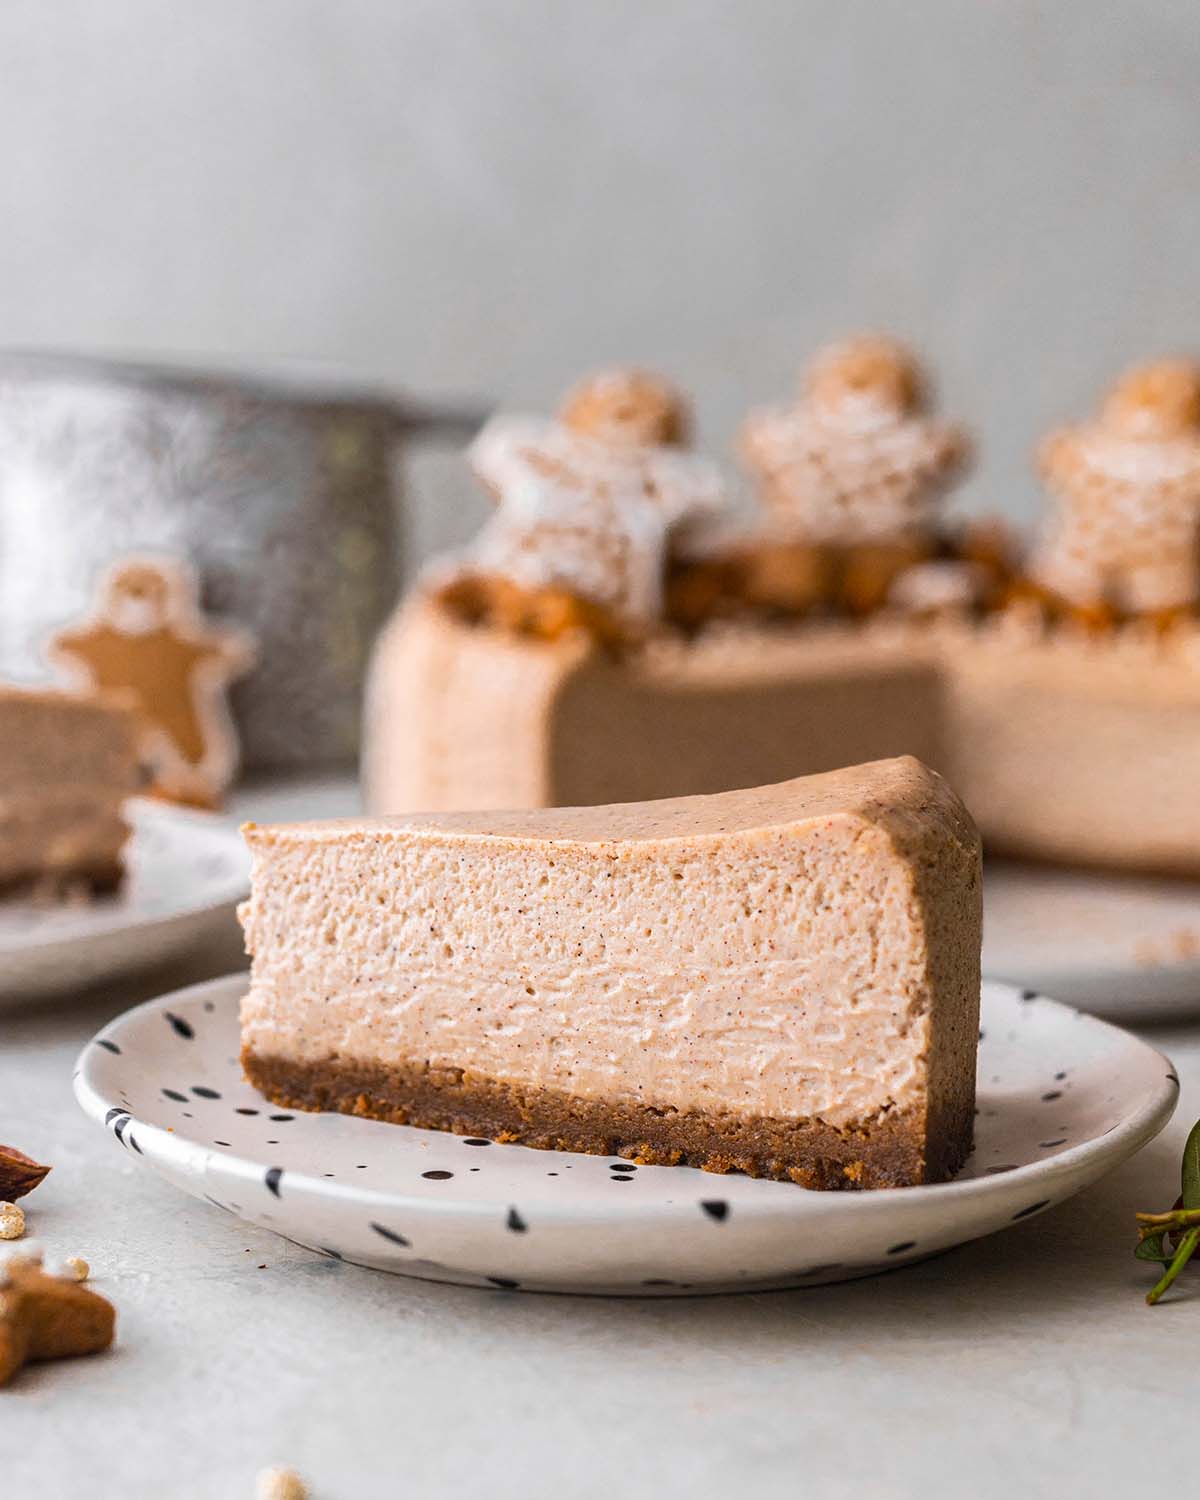
This baked vegan gingerbread cheesecake is so creamy, indulgent and perfect for sharing at Christmas. This festive dessert has no nuts or tofu and is perfect for using leftover gingerbread cookies (or even gingerbread houses)!
Ingredients to make vegan gingerbread cheesecake
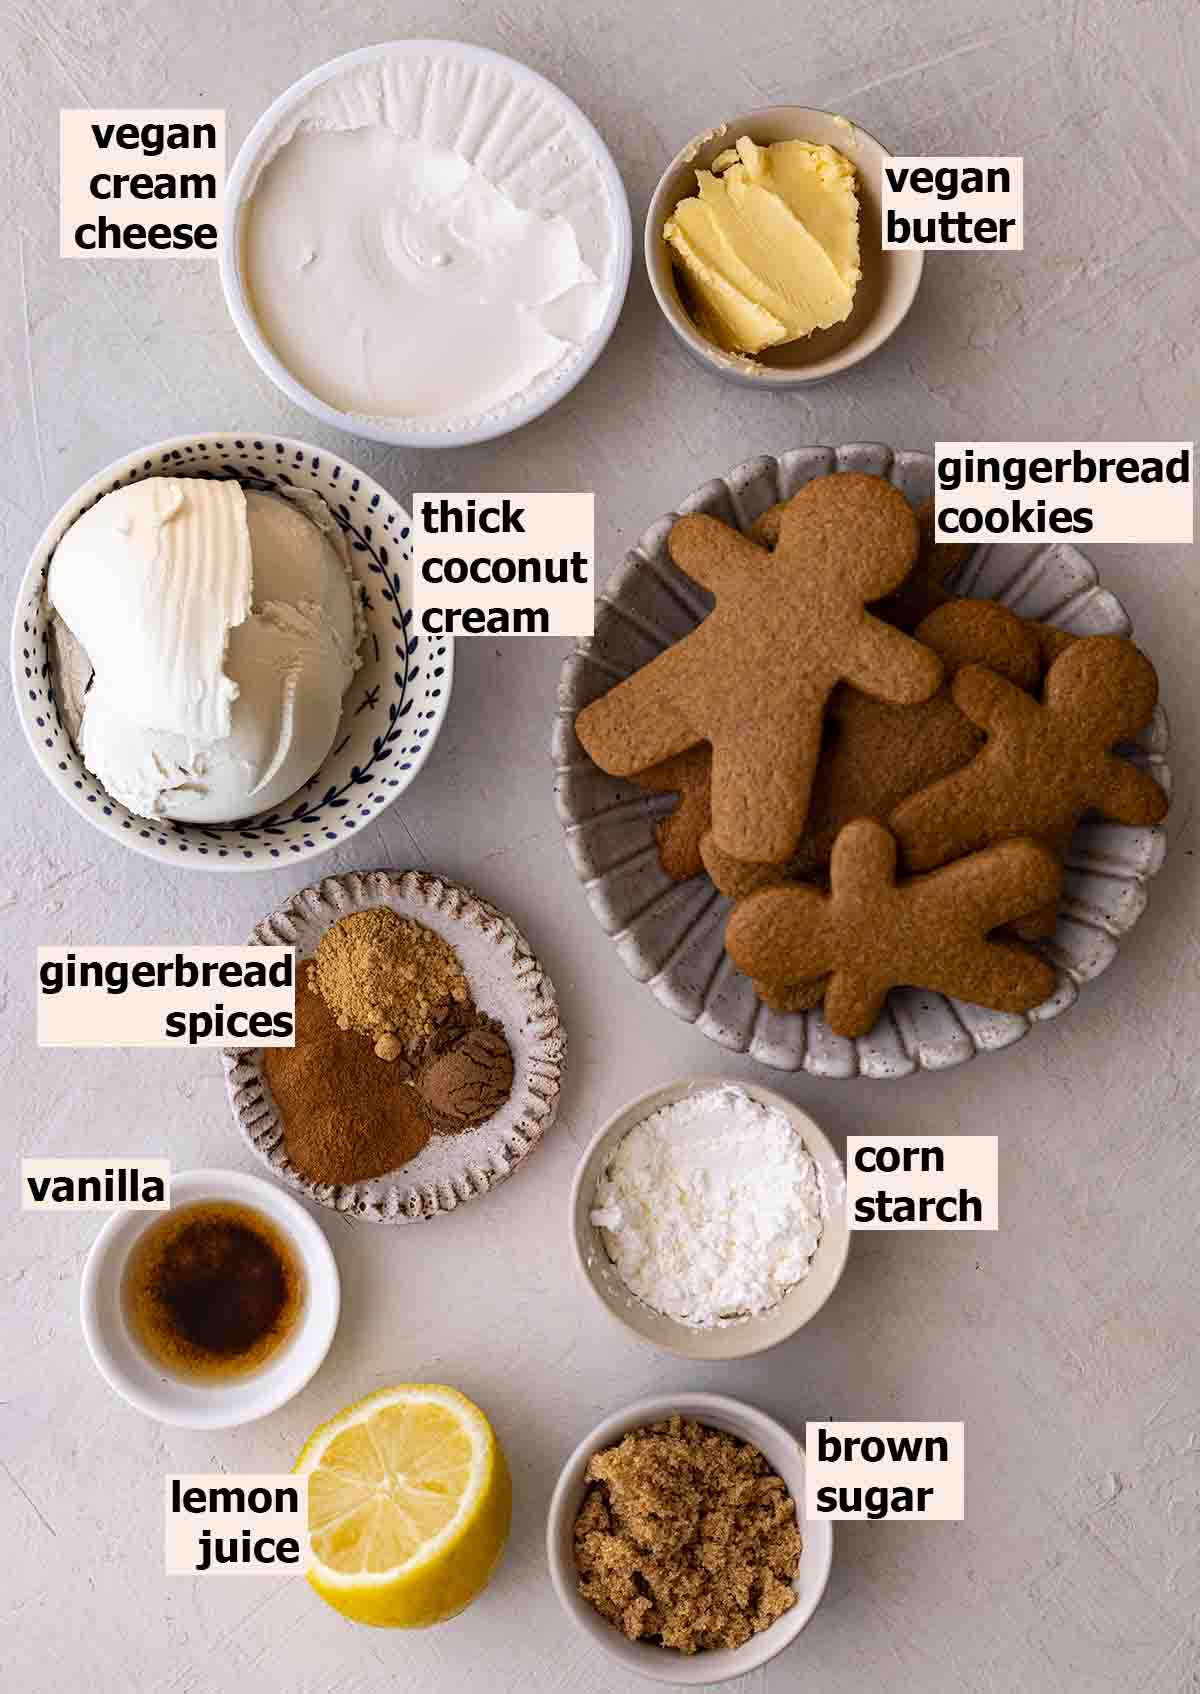
Notes about the ingredients
Gingerbread, ginger snaps, ginger nut, or leftover gingerbread house cookies. I used leftover slightly partially decorated stale cookies from my gingerbread cookie recipe. Alternatively, you can use Biscoff cookies or plain sweet cookies.
Vegan cream cheese is our main cheesecake filling ingredient. I tested this recipe with Tofutti and Sheese cream cheese and they both worked wonderfully. Please do not use Violife cream cheese as it’ll liquify in the oven. If you can’t access cream cheese, see my Baked Vegan Cheesecake with Berries.
Brown or coconut sugar sweetens the cheesecake and provides lovely caramel undertones. Alternatively, you can use cane sugar or a liquid sweetener of choice.
Gingerbread spices and a lot of it! This includes ground ginger, cinnamon and nutmeg.
Molasses (optional and not pictured) for extra flavor. This recipe is great for using the last bits of molasses in your jar at the end of the festive season! Note that it’ll make your cheesecake filling a little darker.
The full list of ingredient quantities and instructions are in the recipe card at the bottom of this post.
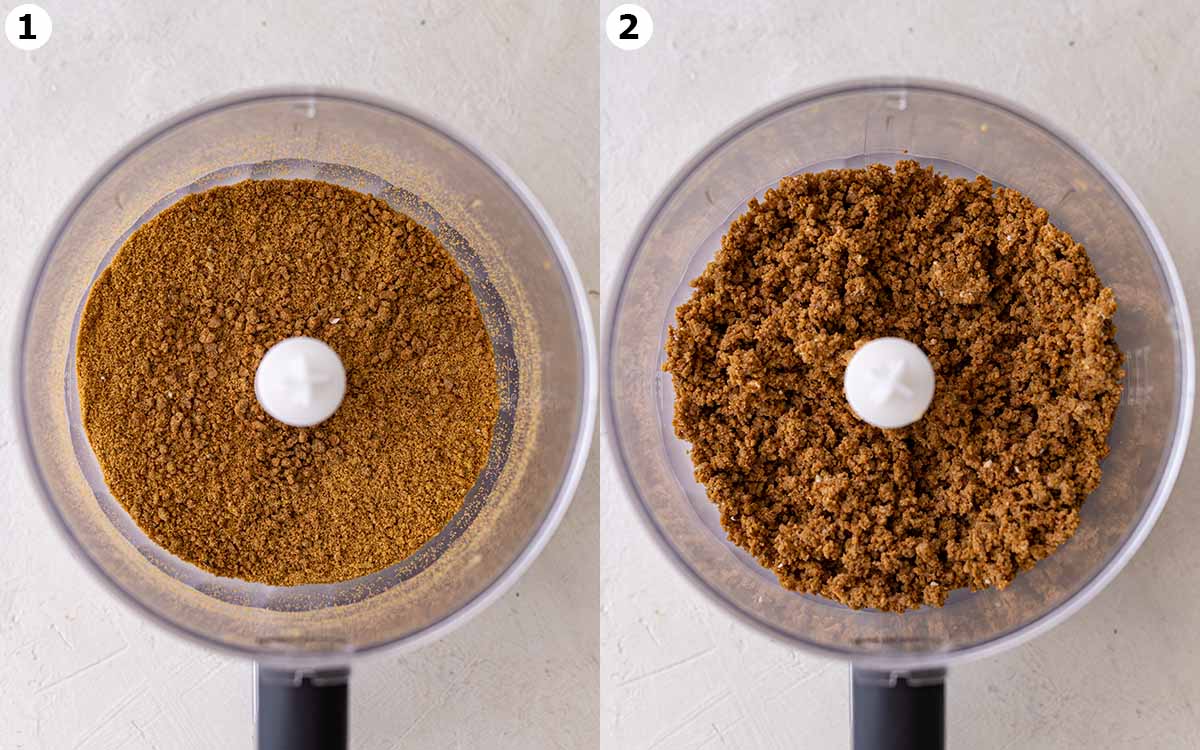
Making the ginger cookie crust
Simply add your ginger cookies to a food processor or blender and blitz until fine. My cookies were quite firm so processing them was very loud!
Add the melted butter (or alternative) and blitz until combined. It should resemble wet coarse sand!
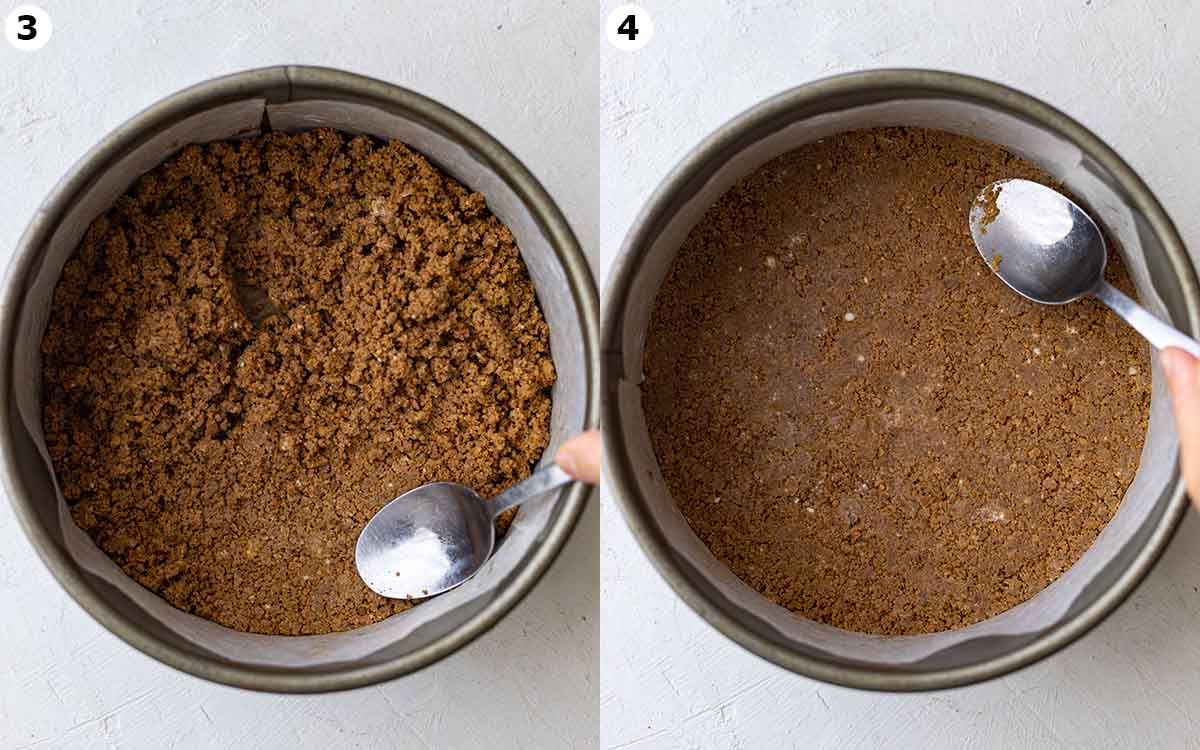
I used an 8-inch (20 cm) loose-bottom cake pan for this vegan gingerbread cheesecake. A springform pan will be great too! I’d recommend lining the bottom and sides of the cake pan for 2 reasons:
- Easy removal
- Lessens the chance of cracking. When baking, the cheesecake will naturally shrink and move away from the sides. With parchment paper, the cheesecake won’t stick to the sides and crack in the middle.
Scoop the crust mixture into your cake pan and press it down firmly with the back of a spoon or a spatula. Then set aside!
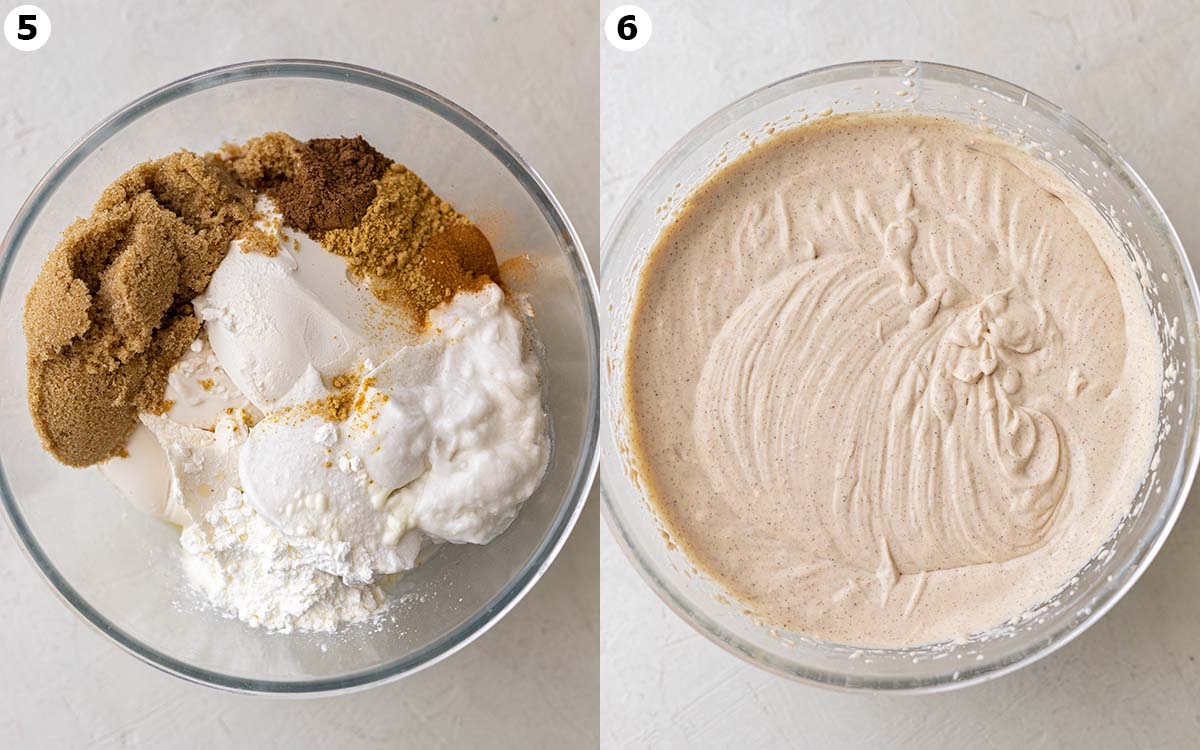
Making the cheesecake filling
First, make sure all your filling ingredients are at room temperature. This will make it easier to mix all the ingredients together (which reduces the chance of cracking)!
Simply add all the filling ingredients to a large bowl (if using an electric hand beater). The mixture also blends well in a food processor or blender!
With an electric hand beater, my cheesecake mixture came together in about 5-10 minutes including stopping and starting. For me, it was enough time for all the ingredients to break down but not long enough for the mixture to split.
Eventually, you’ll have a creamy and slightly thick that is free from lumps. The thickness of your unbaked cheesecake filling will absolutely depend on the temperature of your ingredients and how warm your home is!
Taste test the cheesecake mixture and feel free to add more sweetener or spices to taste. All the flavorings were enough for me, but everyone has different tastes.
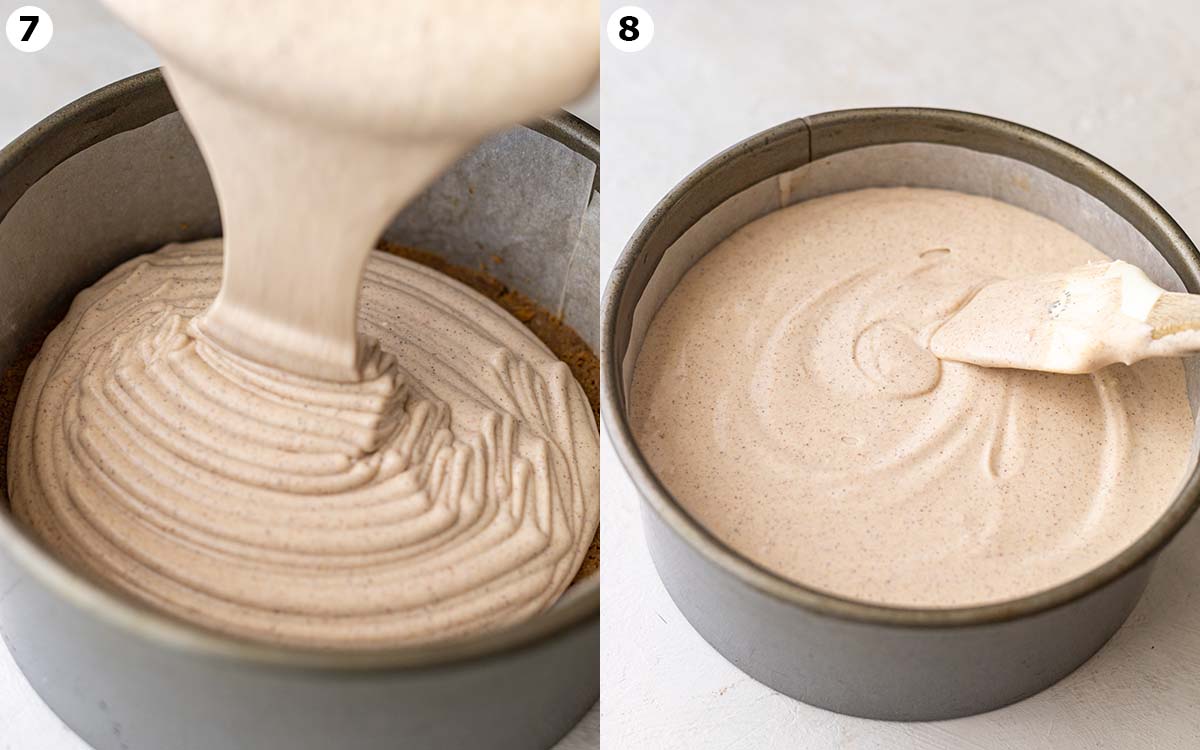
Pour the gingerbread cheesecake filling into your cake pan and smooth the surface. If there are any air bubbles in your filling, firmly tap the cake pan a few times on your kitchen bench.
Your cheesecake is now ready to bake!
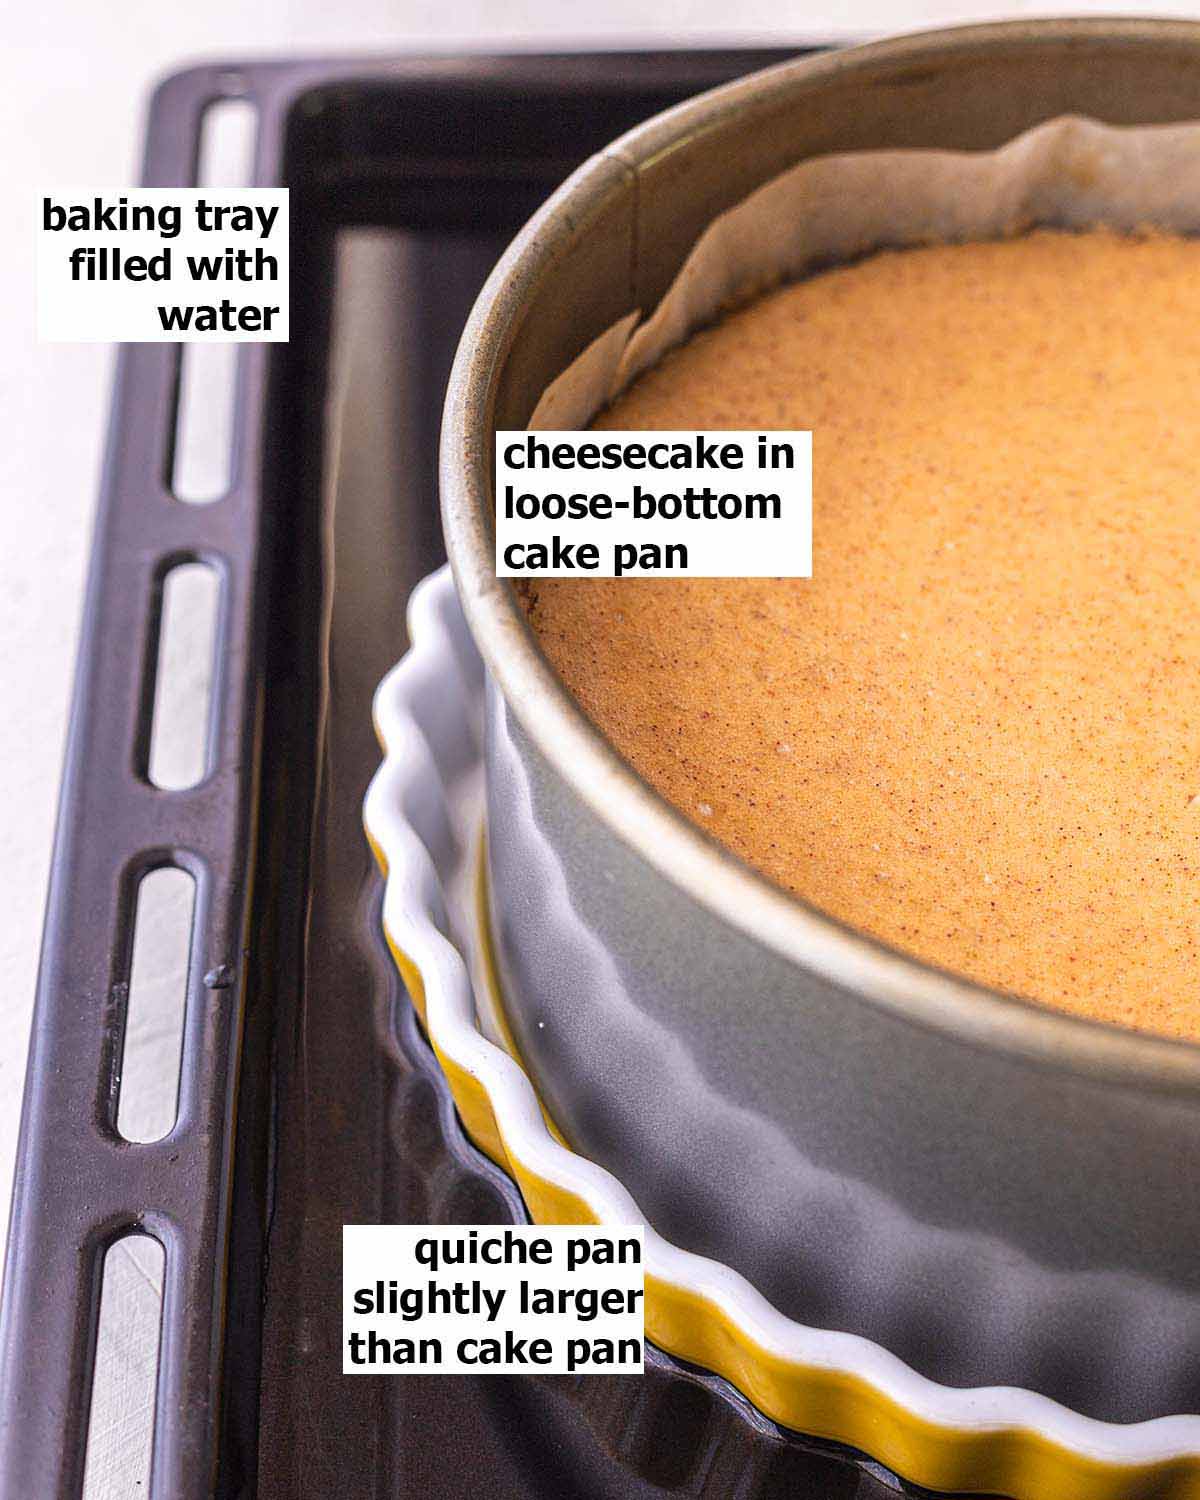
Cheesecake water bath tips and hacks
Traditionally, cheesecake pans are wrapped in aluminum foil, placed in a large tray of boiling water then transferred to a preheated oven.
However, I personally don’t enjoy moving a large tray of boiling water anywhere and don’t often have aluminum foil.
I’ve figured out a few ‘hacks’ to make a safe, easy and zero-waste water bath for your cheesecake!
Instead, simply place your cake pan in a slightly larger cake pan or tin. For example, if you have an 8-inch cake pan, place it in a 9 or 10-inch cake pan and place that in a tray of hot water! This is also demonstrated by Amy in the Kitchen.
How to tell if your cheesecake is ready
After around 50 minutes, slightly jiggle your vegan gingerbread cheesecake. The edges should look cooked (as they don’t jiggle) but the middle of the cheesecake should wobble a little. That’s when you can turn off the oven!
Leave the cheesecake in the oven with the door closed for 1 hour. This will continue to cook the cheesecake and will keep the cheesecake at a steady temperature. Sharp temperature changes can cause a cheesecake to crack!
Remove the cheesecake then leave it on your kitchen bench until it reaches room temperature. Then chill the cheesecake overnight.
In other words, just WALK AWAY from your cheesecake, forget about it and chill it when you remember.
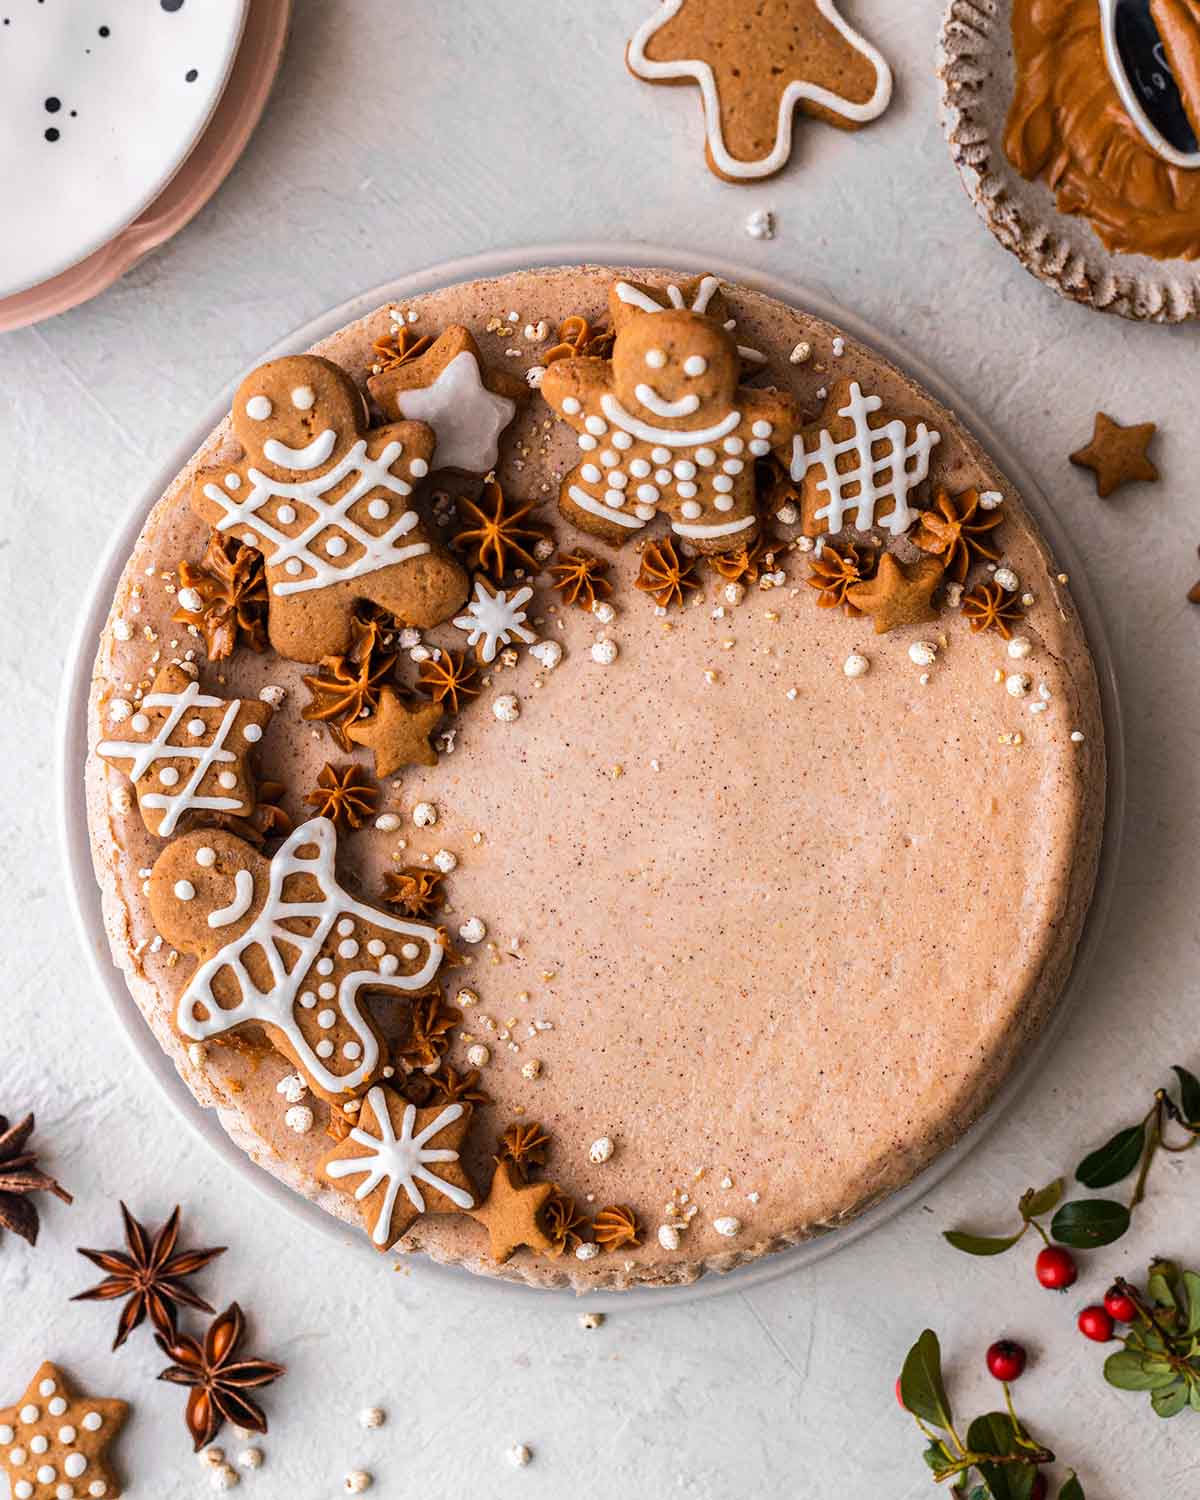
Decorating the cheesecake
Some cheesecake decoration ideas are:
- Vegan gingerbread cookies (or these slightly healthier gingerbread cookies)
- Biscoff spread
- Whipped dairy-free cream
- Drizzle of vegan chocolate
Customizing this vegan gingerbread cheesecake
Yes, use refined sugar-free cookies for the base. For the filling, you may use coconut sugar which will make the cheesecake darker. Alternatively, you can use maple syrup and bake the cake for around 10 minutes longer as maple syrup will make the filling more liquid.
You can substitute half of the cream cheese with firm silken tofu by weight. If you do this, your cheesecake filling will need to be blended in a blender or food processor. I also recommend adding more lemon juice and vanilla to balance out the flavor.
Alternatively, my baked vegan cheesecake recipe uses NO dairy-free cream cheese. Instead of topping it with berries, you can add gingerbread spices to the filling and base (or use the base from this recipe).
Yes, substitute it with firm silken tofu by weight and increase the amount of lemon juice and vanilla, to taste.
Yes, this will work if you add around 1/2 cup (120g) of coconut oil to the filling. You don’t need to bake the cookie crust either! Chill it in the fridge for 4 hours or until set.
I haven’t tested these tips for this exact recipe. My recommendations are based on my other no-bake cheesecake recipes.
More vegan gingerbread recipes


Follow Rainbow Nourishments on Instagram, Facebook, TikTok and Pinterest, and subscribe via email to receive all of our latest recipes!

Vegan Gingerbread Cheesecake (baked)
Ingredients
Gingerbread Cookie Crust
- ~2 cups (200g) ginger cookies, gluten free if needed (note 1 for alternatives)
- ⅓ cup (75g) vegan butter, margarine or coconut oil, melted
Gingerbread Cheesecake Filling
- 24 oz (675g) vegan cream cheese, room temperature (3 x regular tubs, note 2 for brands)
- 1 cup (240g) thick scoopable canned coconut cream, (note 3)
- 1 cup (190g) packed brown sugar, or cane sugar to taste
- ¼ cup (30g) cornstarch / corn flour
- 3 tablespoons (45g) lemon juice and zest, to taste (around ½ lemon)
- 2 ½ tablespoons gingerbread spice, or 1 ½ tablespoons ground ginger, 2 teaspoons ground cinnamon and 1 teaspoon ground nutmeg (note 4)
- 1 teaspoon vanilla extract or vanilla bean powder
- Pinch of salt
To decorate (optional)
- Gingerbread cookies
- Whipped dairy free cream, or biscoff spread
Instructions
- Preheat your oven to 160°C (320°F). Place a deep and large baking tray in your oven (or use the one that comes with your oven). Pour enough water into the tray so the water is about 1 inch (2 cm) deep.
- Line the bottom and sides of an 8 inch (20 cm) spring-form or loose-bottom cake tin with baking paper. Wrap your cake tin with foil OR place your cake tin in a 9 or 10 inch cake tin (pictured in the post above).
To make the crust:
- Add the ginger cookies to a food processor and pulse until fine crumbs. Add the melted butter and pulse until combined. Firmly press the mixture into the bottom of an 8 inch (20 cm) lined cake tin. Set aside.
To make the cheesecake filling:
- Add all the filling ingredients to a large mixing bowl and use electric hand beaters to mix until very smooth. Make sure there are no lumps of cream cheese! Alternatively, add all ingredients to a food processor and process until very smooth.
- Pour the cheesecake filling into the cake tin. Bake the vegan gingerbread cheesecake for 50 minutes to 1 hour. The cheesecake is ready when the the edges are set but 2 to 3 inches (5 to 7 cm) of the middle is still jiggly (when you slightly shake the pan).
- Turn off the oven and leave the cheesecake inside with the door closed for at least 1 hour. Remove the cheesecake from the oven and allow it to come to room temperature. Cover the cheesecake and set it aside in the fridge overnight.
To decorate (optional):
- Just before serving, pipe some whipped cream or Biscoff spread on top of the cheesecake and decorate with gingerbread cookies, as desired (note 5). Enjoy!
- Leftovers can be stored in an airtight container in the fridge for up to 5 days or in the freezer (without the whipped cream) for up to 1 month.
Notes
- If you don’t have ginger cookies, you can use plain sweet cookies and add 1 tablespoon of gingerbread spices (1/2 tablespoon ground ginger, 1/2 tablespoon ground cinnamon), to taste.
- I tested this recipe with Tofutti and Sheese cream cheese and they both worked wonderfully. Please do not use Violife cream cheese as it’ll liquify in the oven.
- I was able to get this amount of cream from just 1 can of coconut cream. I recommend buying full fat coconut cream for this recipe as they contain more thick scoopable coconut cream than cans of coconut milk.
- If you’d like a stronger gingerbread flavor, you may add a pinch of cloves powder and add up to 4 tablespoons (1/4 cup) of spices. However, it’ll make the cheesecake much darker in color!
- The gingerbread cookies will soften after a couple of hours of being placed on the cheesecake. Most cookies won’t collapse but if you’d like crunchy cookies, I’d recommend placing them on the cake just before serving!
This post may contain affiliate links. As an Amazon Associate, I may earn a small commission from qualifying purchases at no additional cost to you.

I am having trouble getting coconut cream that is scoopable due to the almost 40° weather here in Australia. Can I still use it if it’s part liquid?
Hi, if it’s a good brand of cream, it’ll become scoopable if you chill the cream in the fridge overnight. I use the Woolies brand green can of coconut cream and most of it is good to use for this recipe.
Hi there!
I tried this recipe with bio cheese – it’s been in the oven for 70 minutes and still looks like soup hahaha I will see what happens after letting it sit in the oven as per method instructs and then fridge overnight, stay tuned!!! The mix was absolutely delicious though, I licked my entire food processor until it was basically clean!!!
Hi Ally, oh that’s interesting! I know biocheese cream cheese tends to be softer (and more liquidy) than Tofutti which may explain your longer cooking time. I hope your cheesecake set the next day? Glad that the pre-baked batter tasted great thougH!
Can this be frozen?
Yes, but just without the whipped cream on top!
Great recipe. I thought it wouldn’t firm up because it was very jiggly coming out of the oven, but after cooling and sitting in fridge over night, it turned out perfect.
Hi Kristi, I’m so glad that you enjoyed this cheesecake! Thanks for letting me know how it worked for you 🙂
I made this and it liquified in the oven! I kept cooking it and waiting for it to get solid! After more than an hour I finally decided to take it out. I now have it sitting in the freezer to see if it might set up but unfortunately I think it is a puddle! I am so so sad!
Hi Pamela, what brand cream cheese did you use? Unfortunately, there are some brands of vegan cream cheese that are too oil based and will just liquify in the oven. I’m sorry that this happened to yours!
I instantly knew I had to make this gingerbread cheesecake when I was browsing your blog. Well, I made the cheesecake and it was WONDERFUL! I prefer baked cheesecakes over no-bake cheesecakes and I love that this recipe has no nuts and lots of gingerbread flavor. I’ll be making this for Christmas, thank you!
Hi Teagan, aw I’m stoked that you loved this cheesecake! And I’m in the same boat with baked cheesecakes! I hope you and your guests enjoy this at Christmas x
Hello Anthea
I LOVE cheesecakes, and this cake does look delicious.
I recently tried a cheesecake recipe from a different website which asked for coconut milk as well, and I didn’t really like it – the cake tasted too coconutty for me. So I’m a bit reluctant to try coconut cream in a cheesecake again.
Could you please suggest a substitute ingredient for me?
Thank you 🙂
Nora
Hi Nora, yes you can substitute the coconut cream with a combination of tofu and yogurt! Try replacing it with 200g tofu and 100g yogurt. The combined amount is greater than the quantity of coconut cream because tofu and yogurt contain more water than coconut cream and a lot of it evaporates during baking. I’d also recommend firm silken tofu but, if you can’t find it, silken is fine too. I hope that helps!