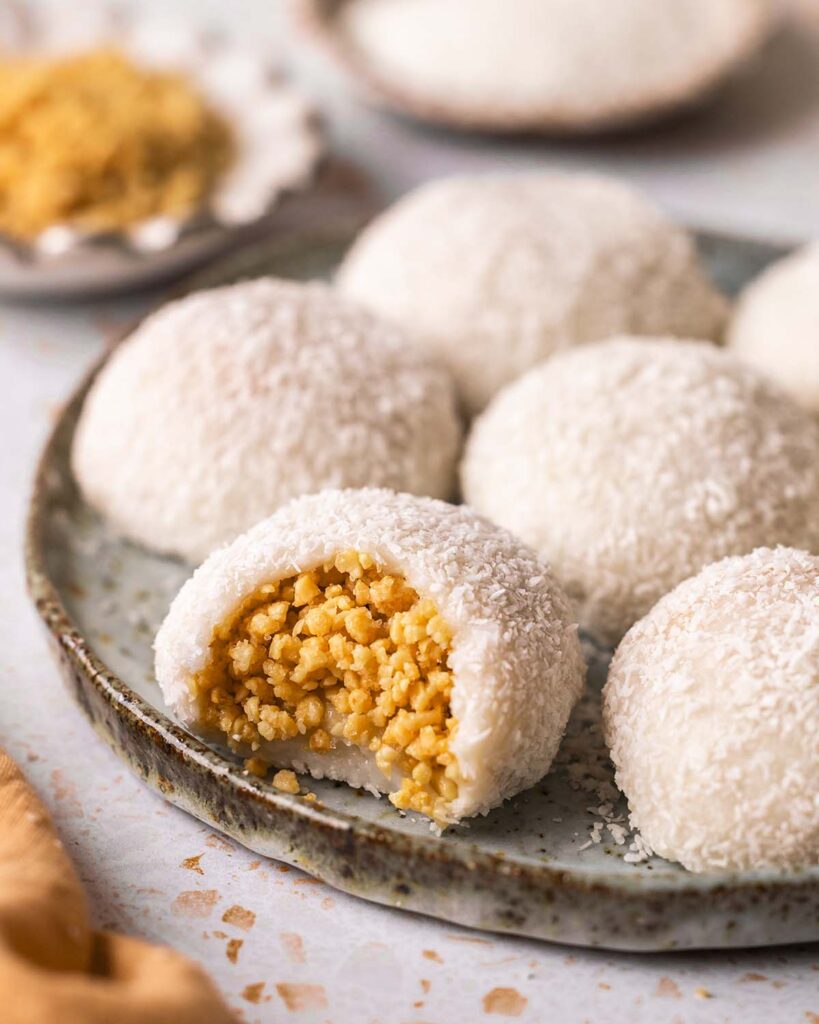
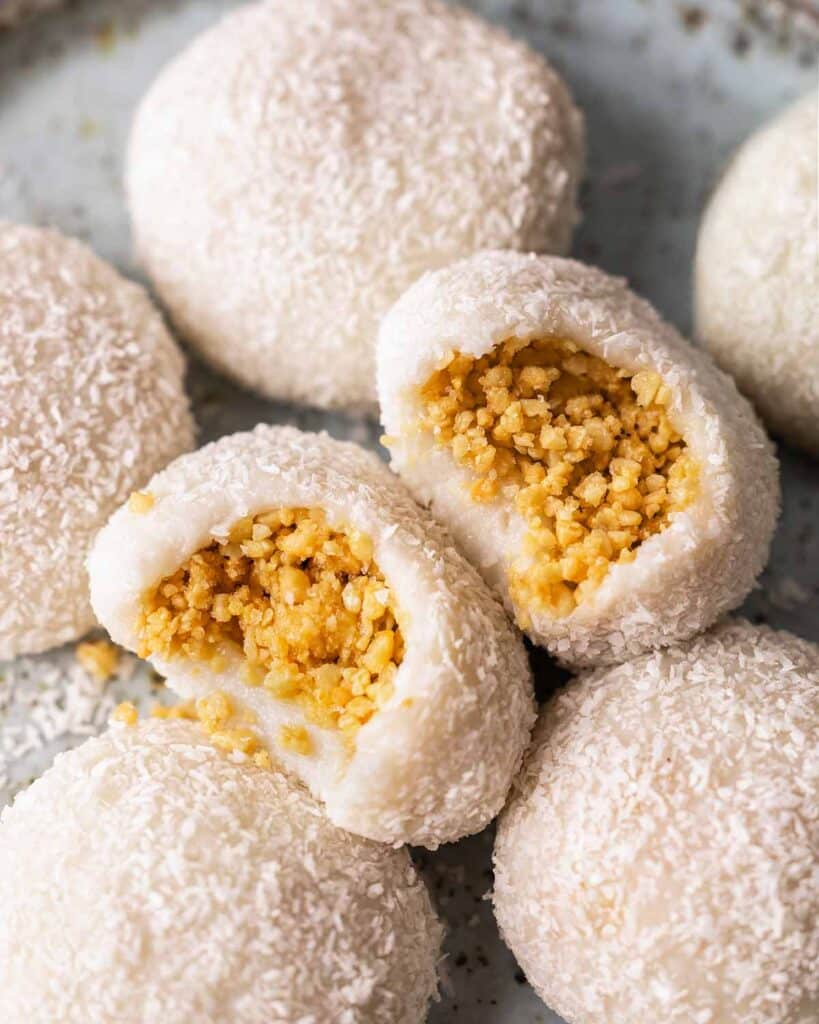
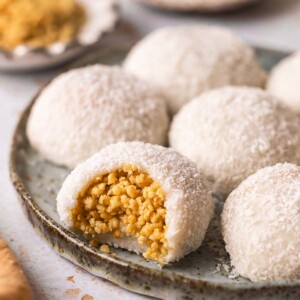
Coconut Peanut Mochi (lo mai chi)
Soft and bouncy coconut peanut mochi made from only 5 key ingredients! These mochi contain a sweet crumbly peanut filling and are coated in dried coconut. They’re called Lo Mai Chi in Cantonese or Nuo Mi Ci in Mandarin.
What is lo mai chi?
These chewy glutinous rice dumplings are a popular Chinese bakery treat, just like egg tarts. They’re usually naturally vegan and gluten-free (although, some people use honey in the filling).
Chinese mochi are similar to Japanese mochi but tend to be a little softer, stickier and less sweet. However, this will depend on how you prepare them!
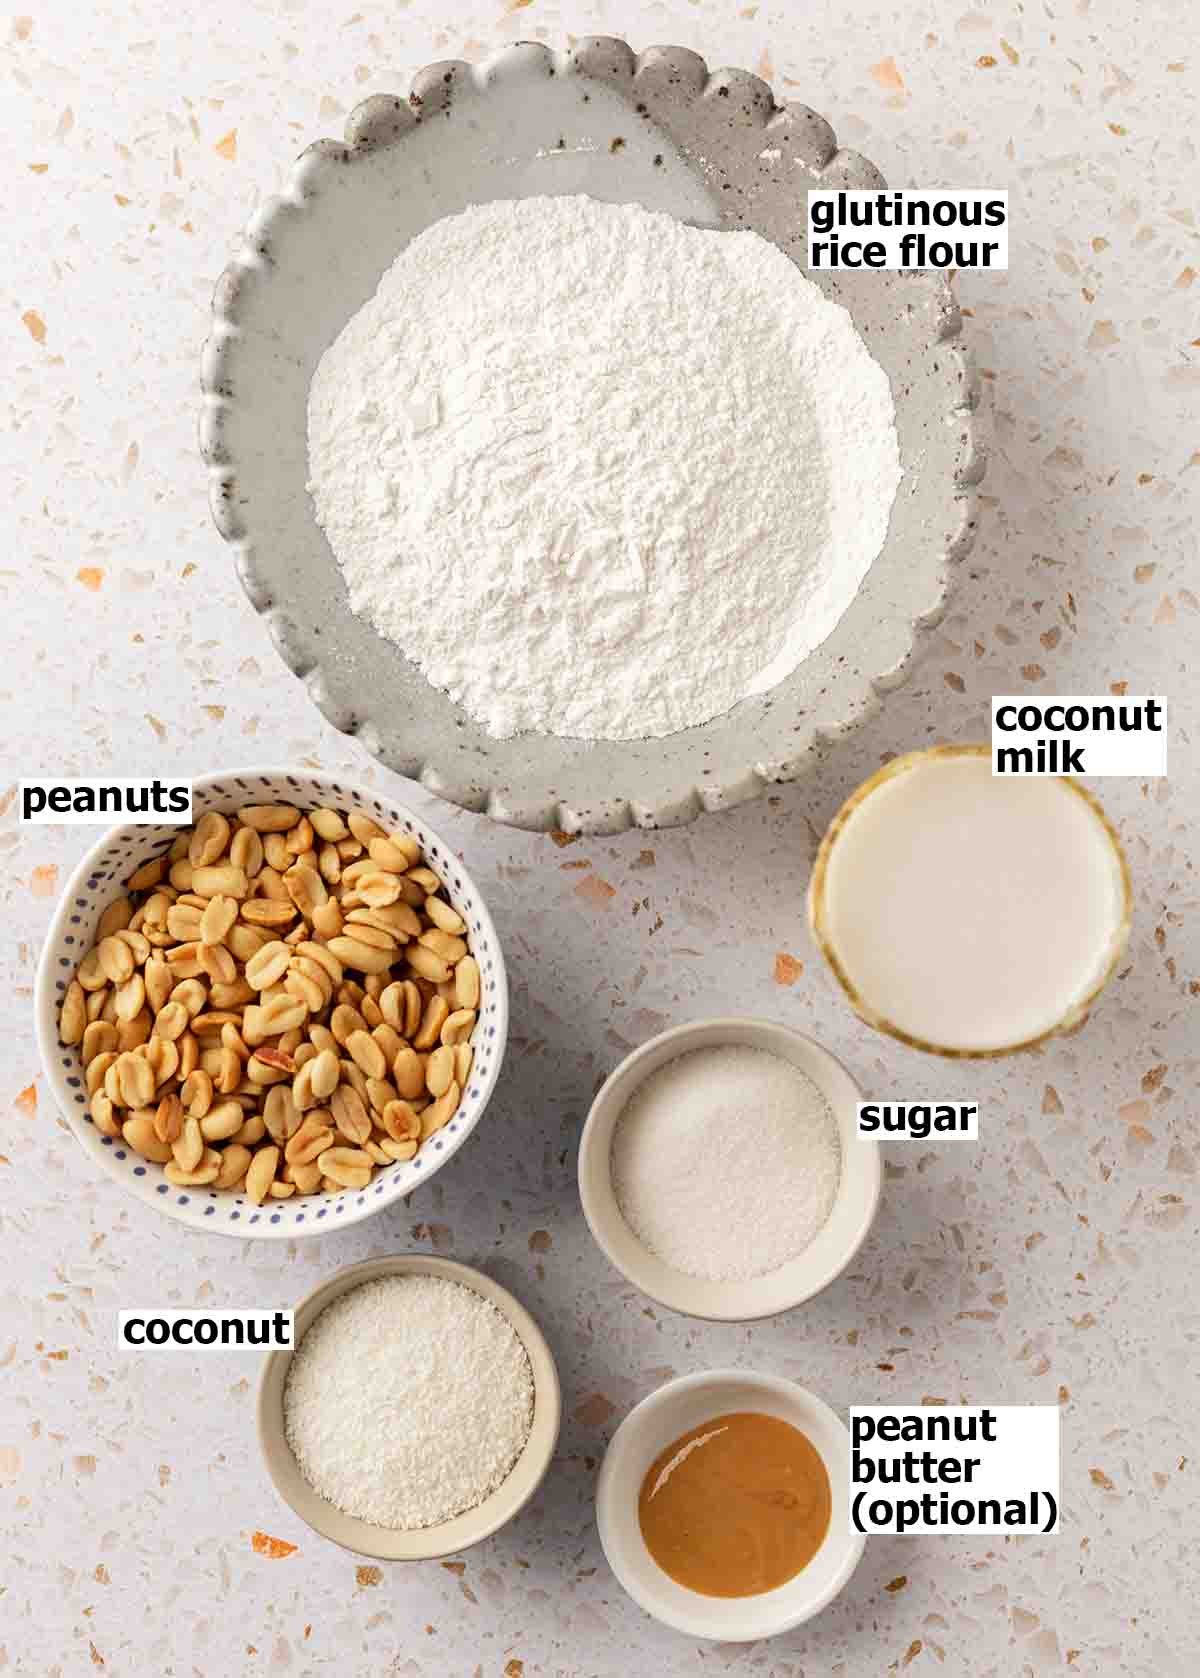
Ingredients you’ll need
The full list of ingredient quantities and instructions are in the recipe card at the bottom of this post.
Sweet glutinous rice flour OR mochiko flour. I bought mine from an East Asian shop. Unfortunately, regular rice flour will not work in this recipe.
Unsweetened coconut milk (canned, not the beverage variety). This is where most of the coconut flavor comes! It also makes the mochi delightfully soft and tender.
Peanuts. I used roasted unsalted peanuts but you can use salted, or unroasted (just make sure you roast them before using).
Peanut butter (optional). This isn’t used in traditional lo mai chi but it adds moisture to the filling and partially binds it. Alternatively, you can use coconut oil or even maple syrup.
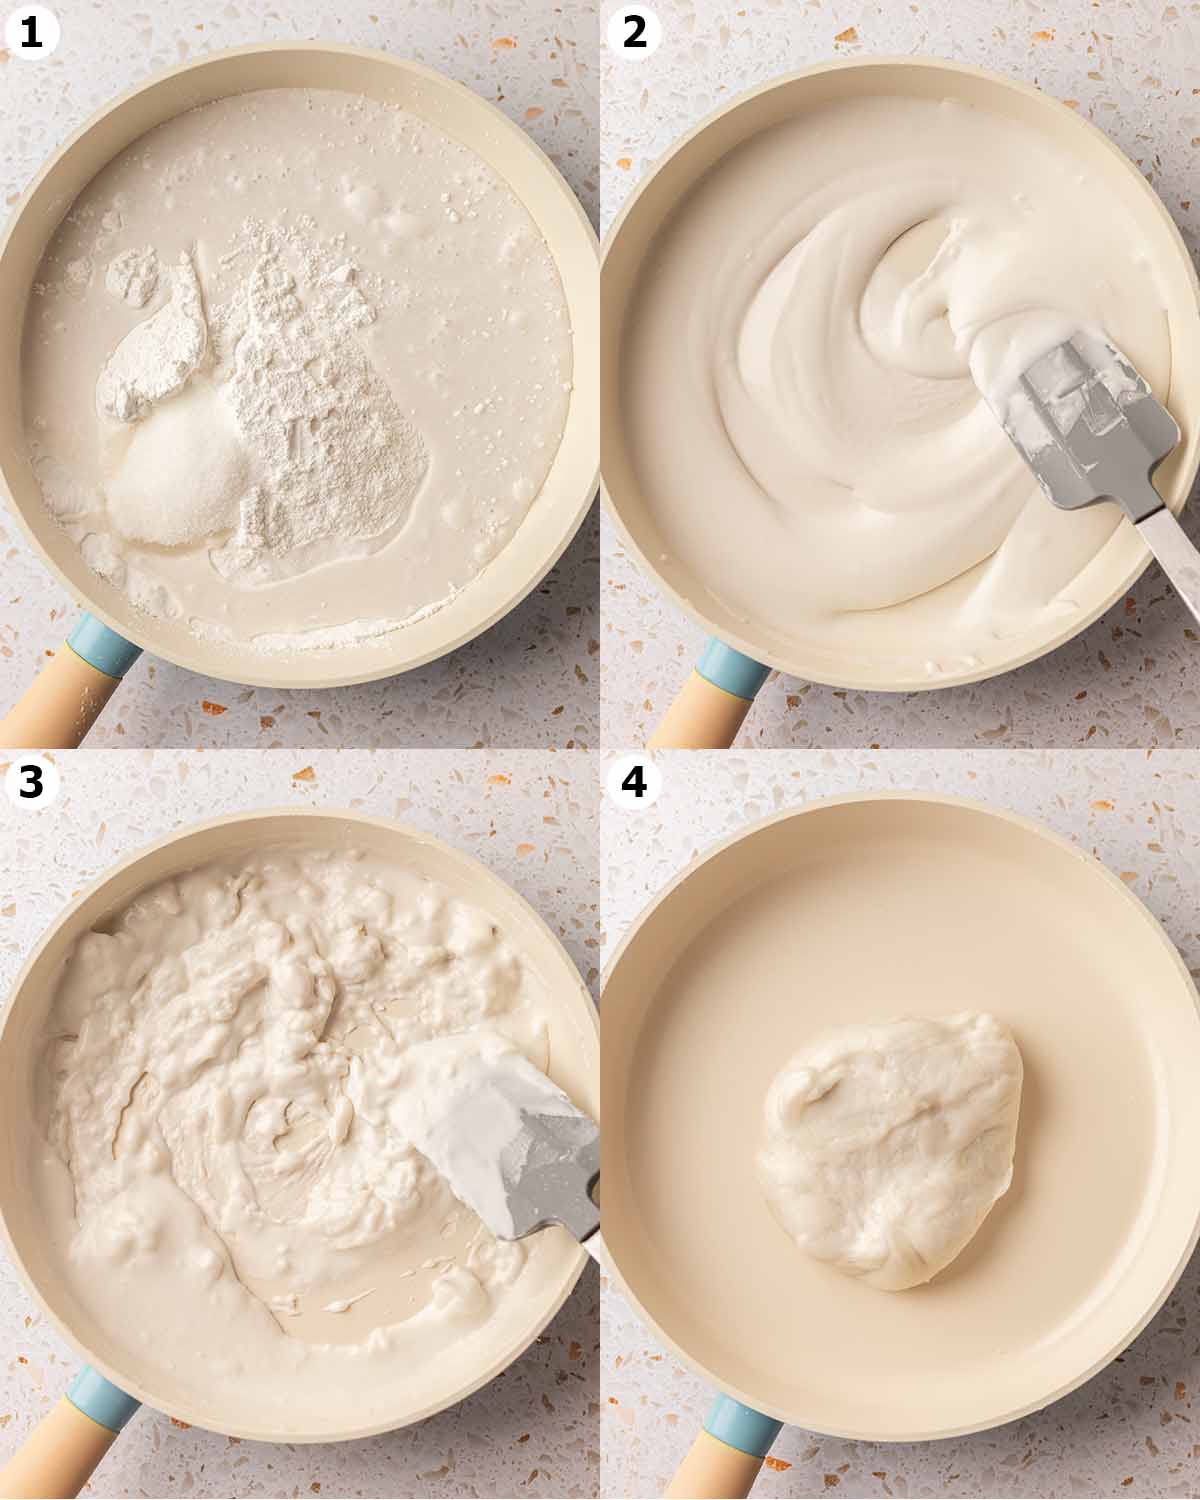
Prepare the mochi dough
The coconut mochi dough can be prepared in a non-stick saucepan, in a steamer or microwave. If using a pan, it definitely needs to be non-stick!
First, combine all ingredients in a bowl (or your saucepan) and mix until it’s smooth. The batter should resemble a thick yogurt drink.
If you’re cooking your dough on the stovetop, consistently stir your mixture for around 8-13 minutes. It’ll become lumpy but with enough mixing, you’ll eventually have a smooth dough.
If you want to use the microwave, check out the instructions in my strawberry mochi ice cream post. Alternatively, you can steam the mixture for 15 minutes, mixing the dough halfway through.
Once you have a ball of dough, let it cool!
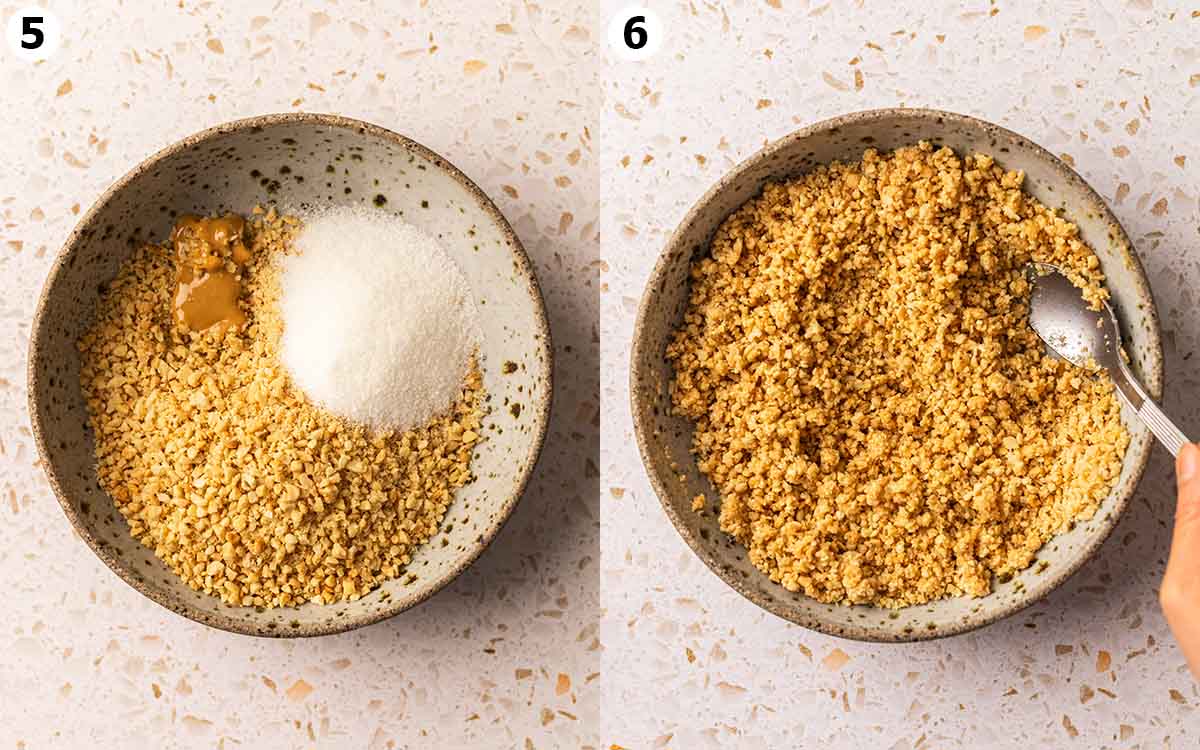
Filling tips and customizations
The peanut mochi filling is super easy to make. If you’re using peanut butter, you may have to use your fingertips to rub it into the ground peanuts.
Some Chinese bakeries also add sesame seeds and coconut to the filling of lo mai chi. I’ve added some ingredient quantities in the recipe box at the bottom of this post).
And of course, any type of nuts will work for these mochi!
Tips for assembling mochi
Once your mochi dough has cooled, knead the dough until it’s soft and stretchy. Mochi dough tends to be extremely sticky! Here are my top tips for handling the dough:
- Generously coat any surfaces, utensils and your hands with corn starch OR oil.
- Use a silicone or plastic surfaces/utensils (for example a pastry mat, spoon and rolling pin). Mochi sticks to wooden surfaces and utensils more easily.
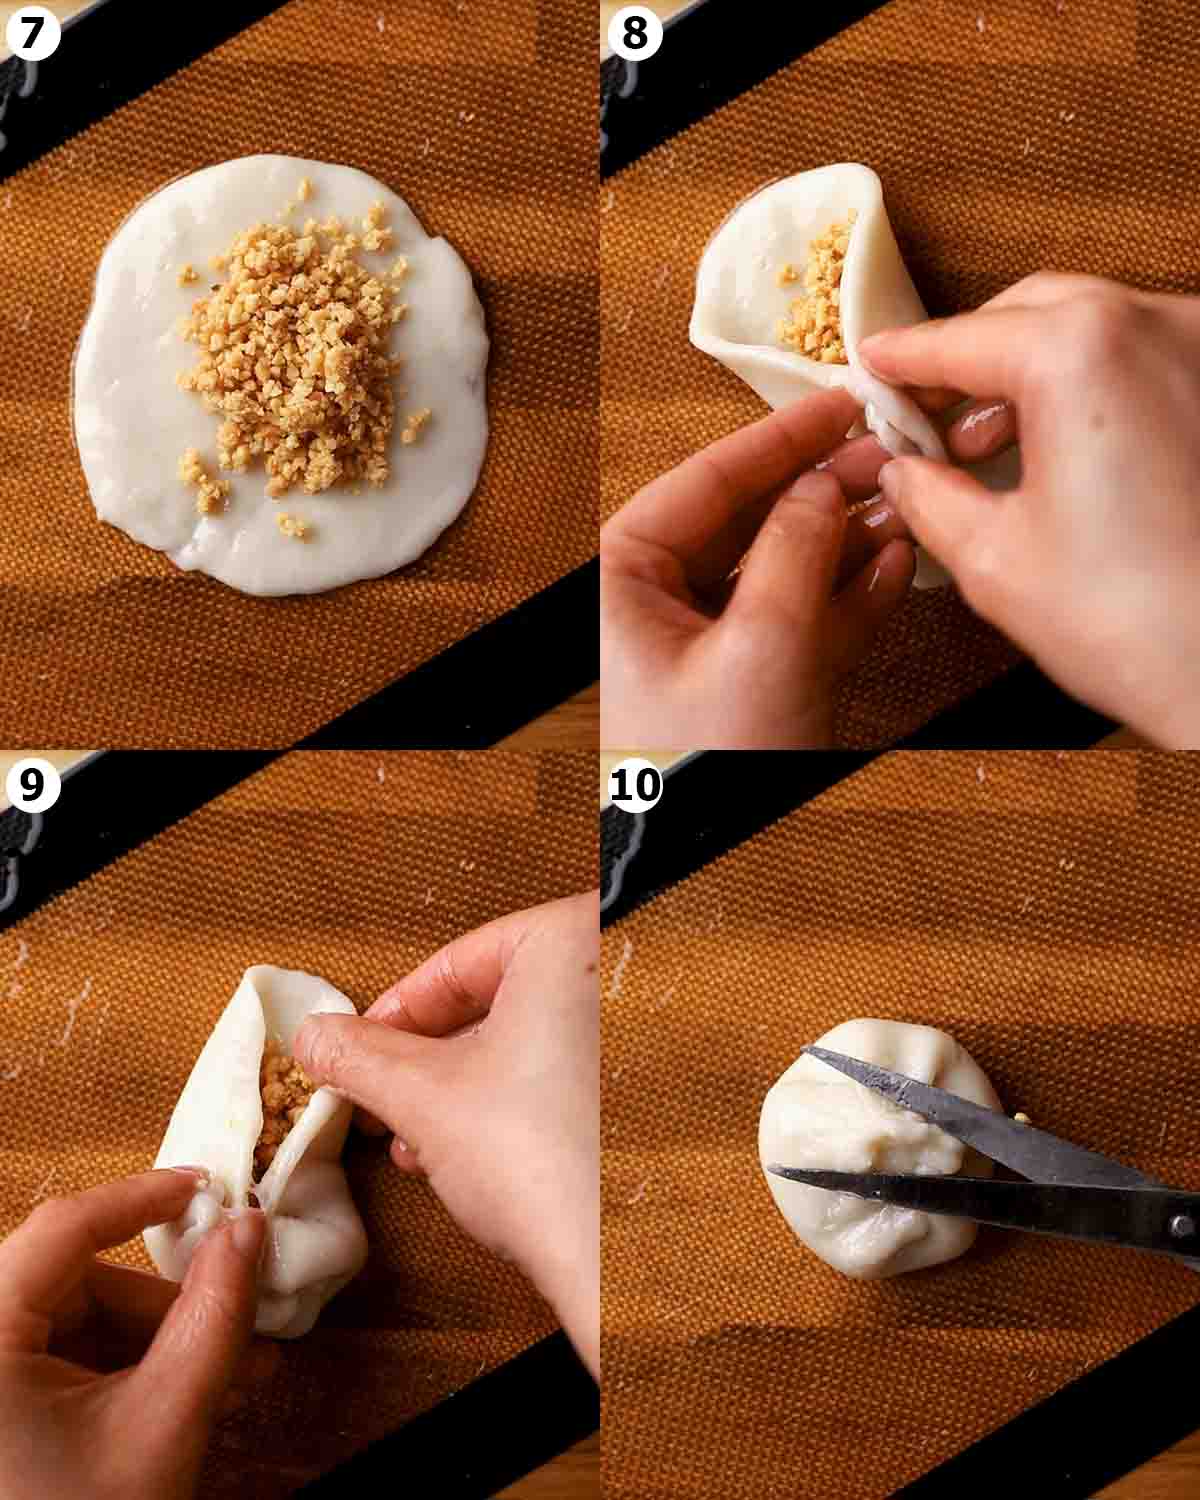
It can take a little practice to flatten and wrap the mochi. Here are some tips:
- For 9 medium-sized mochi with a generous peanut filling, I rolled my dough into 4-inch circles. If you’d like a thicker mochi dough, roll your mochi into smaller circles and use less filling.
- There are so many different ways to wrap your filling. I wrapped each piece of dough like a taco then brought the ends in. Find a method that you like and don’t stress!
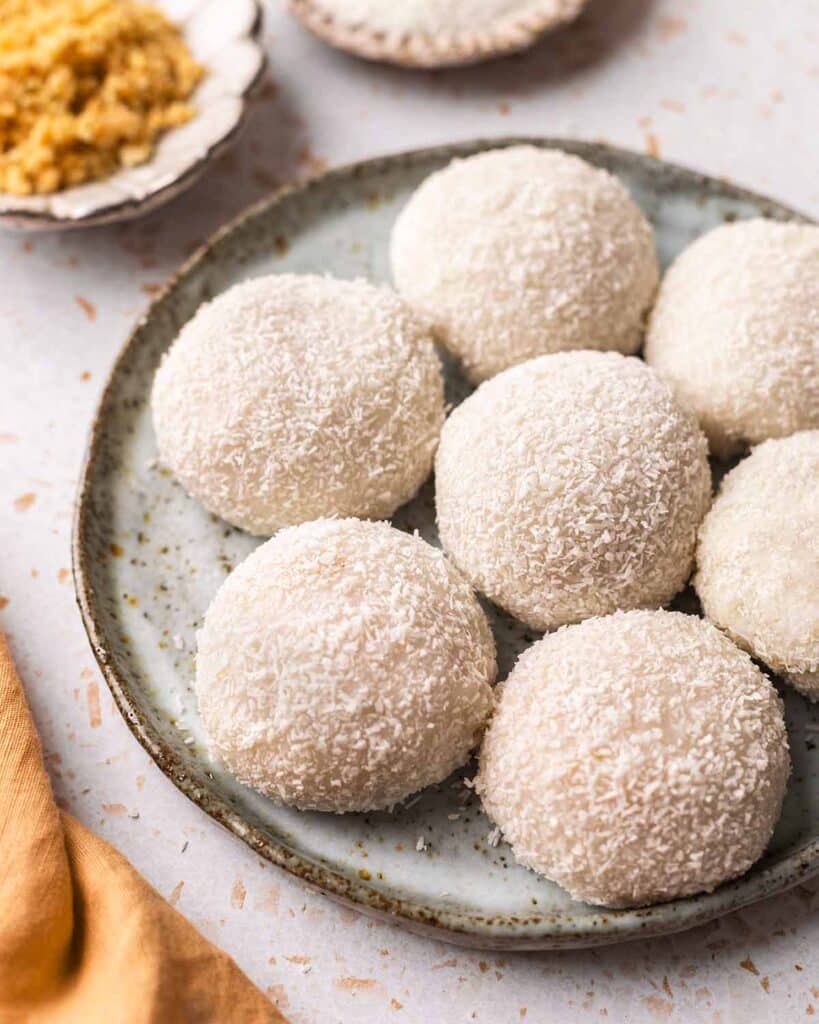
Once you’ve wrapped your mochi balls, gently toss them in coconut. If you used oil when assembling your mochi, the coconut will easily stick to the surface. If you used cornstarch, you may need to brush your mochi with oil before coating them in coconut.
Additional Tips
Without preservatives, mochi is best eaten the day you make it. On the day of making, you can store it at room temperature.
If you must store the mochi, it’s best kept in an airtight container or tightly wrapped in the fridge or freezer. When the mochi has been chilled, it often firms up and loses its chewy texture. To salvage the mochi, warm it up in the microwave for a few seconds or steam it for a few minutes.
Instead of shaping the mochi into dumplings, you can chop the mochi dough into rough balls and toss it in the peanut mixture, just like traditional Muah Chee!
Yes, the mochi dough is a great foundation for other fillings! Red bean paste and black sesame are also popular.
More vegan Asian desserts


Follow Rainbow Nourishments on Instagram, Facebook, TikTok and Pinterest, and subscribe via email to receive all of our latest recipes!
Coconut Peanut Mochi (lo mai chi)
Ingredients
Mochi dough
- 1 ¼ cup (150g) sweet glutinous rice flour, or mochiko sweet rice flour
- 1 cup (240g) coconut milk, canned, not the beverage variety
- ¼ cup (50g) granulated sugar
- cornstarch / corn flour, potato starch or neutral-flavored oil, for assembling as needed
Peanut Filling
- ½ cup (75g) roasted peanuts, salted or unsalted (note 1 for adding sesame seeds and coconut)
- 2 tablespoons 25g granulated sugar
- 1 tablespoon peanut butter, optional (note 2)
- ¼ teapsoon salt, if using unsalted peanuts
To decorate
- ¼ cup (25g) fine shredded coconut / desiccated coconut
Instructions
Prepare the mochi dough (see note 3 if you want to steam or microwave your dough):
- Add the glutinous rice flour, coconut milk and sugar to a large non-stick saucepan. Mix until combined and there are no lumps.
- Over medium heat, stir your mochi mixture for 6-8 minutes. The mixture will turn lumpy and eventually form a soft ball that will come away from the saucepan. Once your mochi is a soft ball, reduce the reduce the heat to low and mix the dough ball for 2-5 minutes until it is smooth and stretchy.
- Remove the dough from the saucepan and let it cool.
Prepare the peanut filling:
- Add the peanuts to a food processor or blender. Pulse until the peanuts turn into coarse to fine crumbs.
- Add the peanuts, sugar and peanut butter to a bowl. Mix until combined. You may need to use your fingertips to mix the peanut butter into the mixture.
Assemble the lo mai chi:
- Generously coat your work surface, hands and any utensils with a neutral oil OR cornstarch. Divide the mochi dough into 9 equal portions (or more portions for smaller mochi).
- Use a rolling pin or your hands to flatten each mochi ball into flat round circles around 1/4 inch (6mm) thick. If the mochi dough sticks to anything, add more oil or cornstarch.
- Place around 1 tablespoon of the peanut mixture in the center of the dough circle. Gently wrap the dough around the filling pinching the seams to seal. If there's any excess mochi dough, cut it off with a pair of scissors.
- Place the coconut in a large shallow bowl. Gently toss the mochi in the coconut. If you dusted your mochi with cornstarch, you may need to brush the surface with oil before tossing it in coconut.
- Enjoy the coconut peanut mochi immediately. If your mochi are very soft, chill them in the fridge for a couple of hours until they've firmed up.
Serving and storing the mochi:
- Lo Mai Chi is best eaten the day you make them. On the day of making, store them in a container at room temperature. If you need to keep them overnight, store them in a container or individually wrapped in the fridge or freezer. Keep in mind that their texture usually changes overnight (see 'Additional Tips' in the post above).
Notes
- Alternatively, use 1/3 cup (50g) peanuts, 2 tablespoons (10g) coconut and 1 tablespoon (10g) sesame seeds in the filling.
- Peanut butter adds moisture to the filling. Alternatively, you can omit it or use coconut or maple syrup.
- To microwave the dough, whisk all ingredients in a bowl and cover it with a plate. Microwave the mixture for 2 minutes then stir the mixture. Microwave the dough for 1 minute then mix again. Repeat 2-4 times until your dough comes away from the side of a bowl. For a visual guide, see my strawberry mochi recipe. Alternatively, you can steam your mixture. Boil a pot of water and place the mochi dough in a greased steaming tray (or flat bowl). Steam the mixture for 15-20 minutes, stirring 1-2 times with an oiled spatula.
This post may contain affiliate links. As an Amazon Associate, I may earn a small commission from qualifying purchases at no additional cost to you.

Just made – very easy and great results. My family loved it. Good coconut flavor. Great peanut flavor.
Thanks so much! We’re happy you enjoyed the flavours and that your family was a fan too!
I’m excited to try this recipe!!! Thank you, it looks delicious!
Do you have a recommendation for another sugar that can be used other than white sugar?
How do you think coconut sugar or granulated date sugar would work?
Hi Hana! Yes, you can definitely replace the sugar with coconut sugar or granulated date sugar. It’ll just make the mochi slightly brown in colour. I hope that helps and that you love them as much as we did!