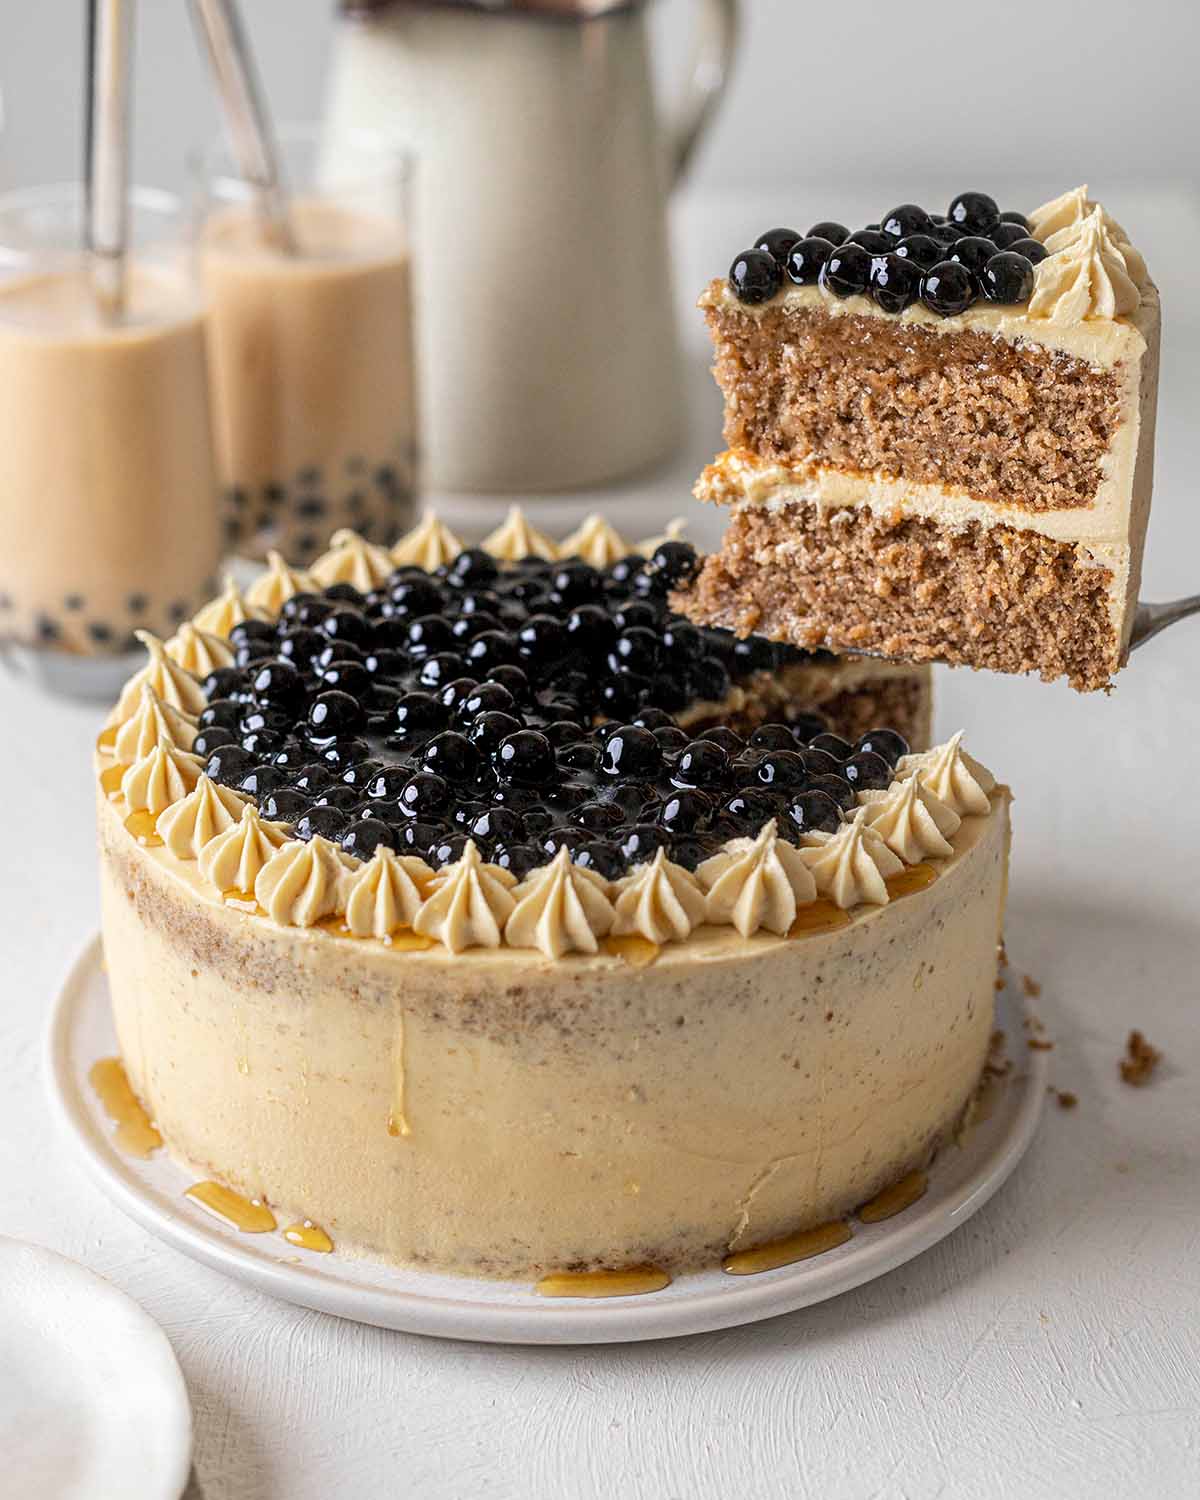
Vegan Boba Cake
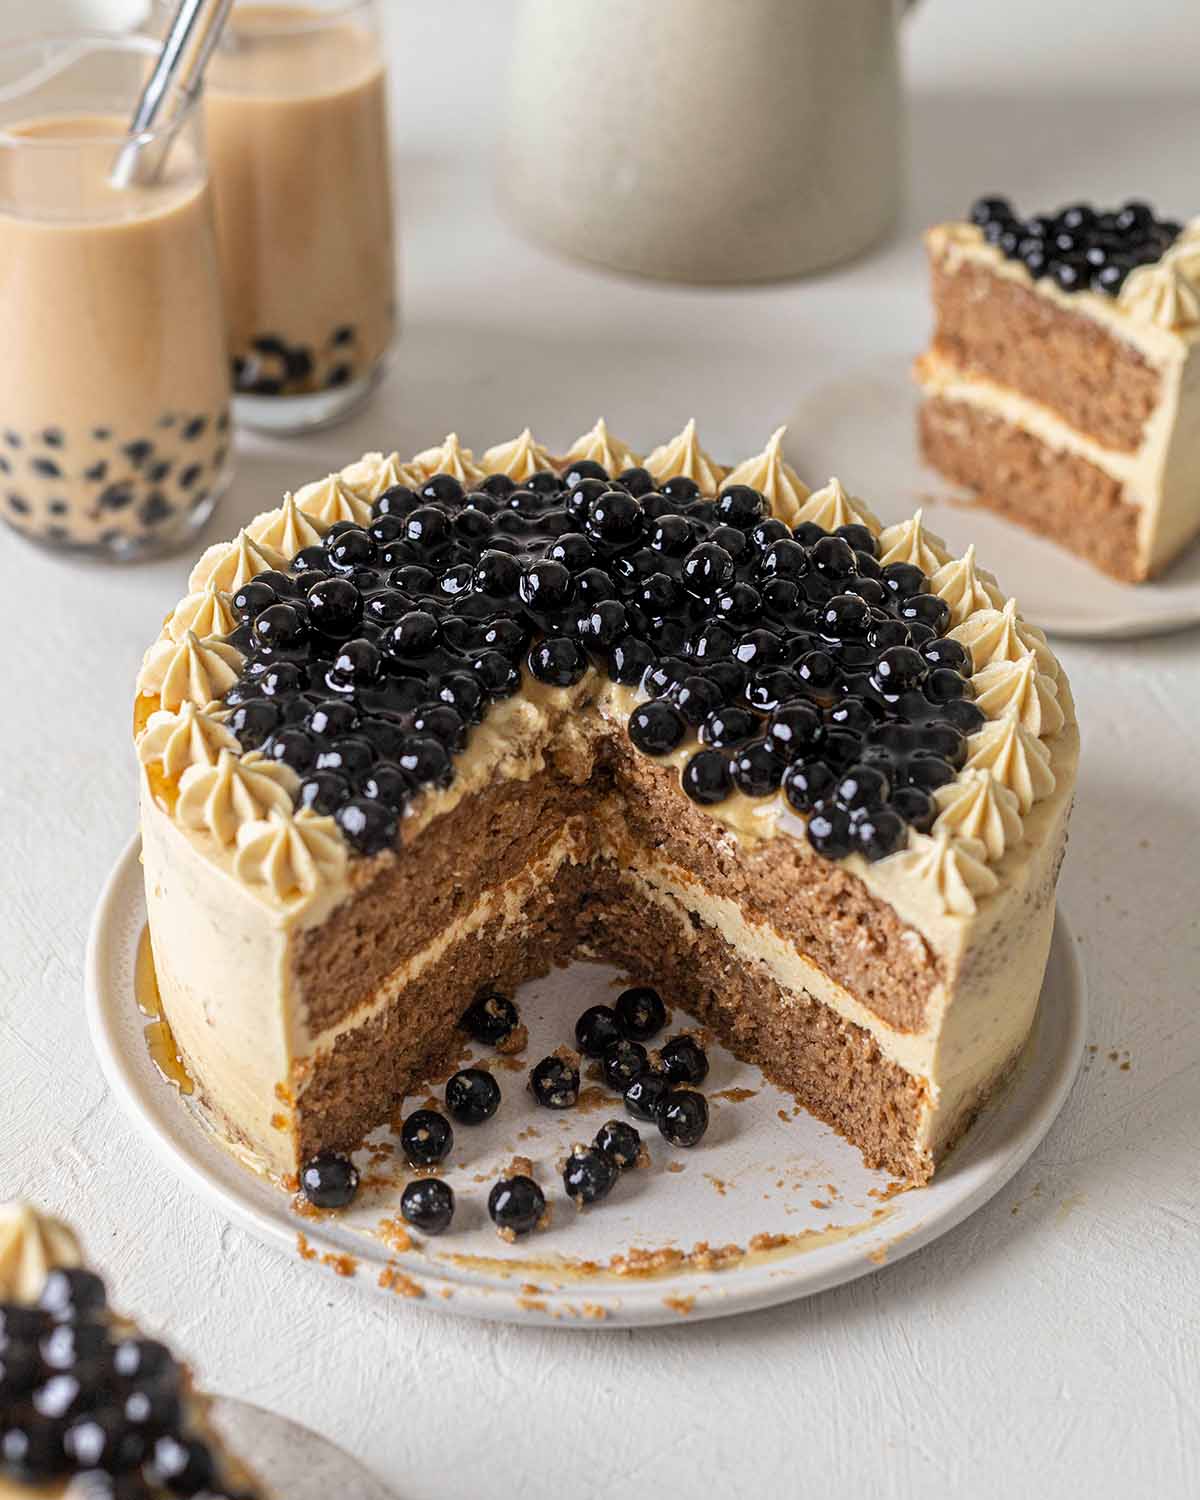
This vegan boba cake is just like the trendy and fun Asian dessert but without all the eggs and dairy! This dessert has a fluffy milk tea sponge cake, milk tea buttercream and of course fresh brown sugar tapioca pearls.
What to expect from this cake
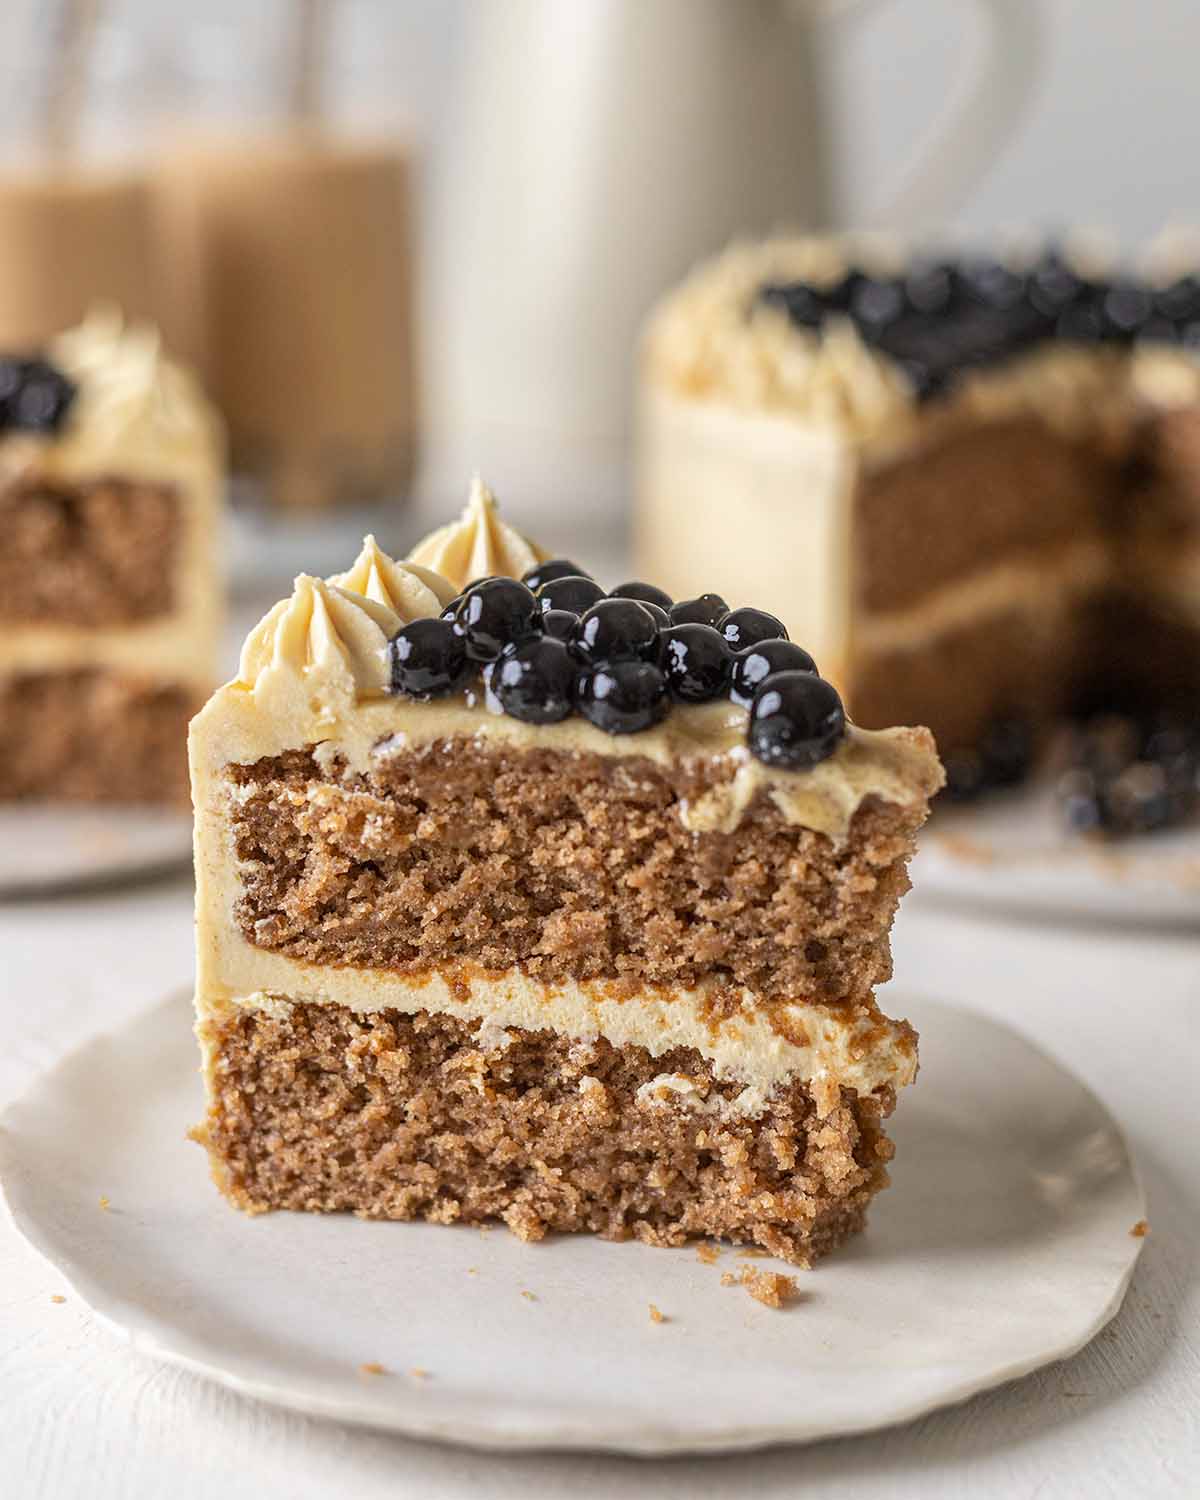
FLAVOR & TEXTURE: The boba cake is light and fluffy and has been adapted from my popular vegan lemon cake recipe. It has lots of milk tea flavor and is sweet like regular bubble tea!
DIFFICULTY: I tried to make this cake as simple as possible but boba cakes always have a lot of components! I’d recommend this recipe if you have experience with baking and decorating layer cakes.
For a simpler Asian dessert, check out my Hong Kong style egg tarts (made vegan).
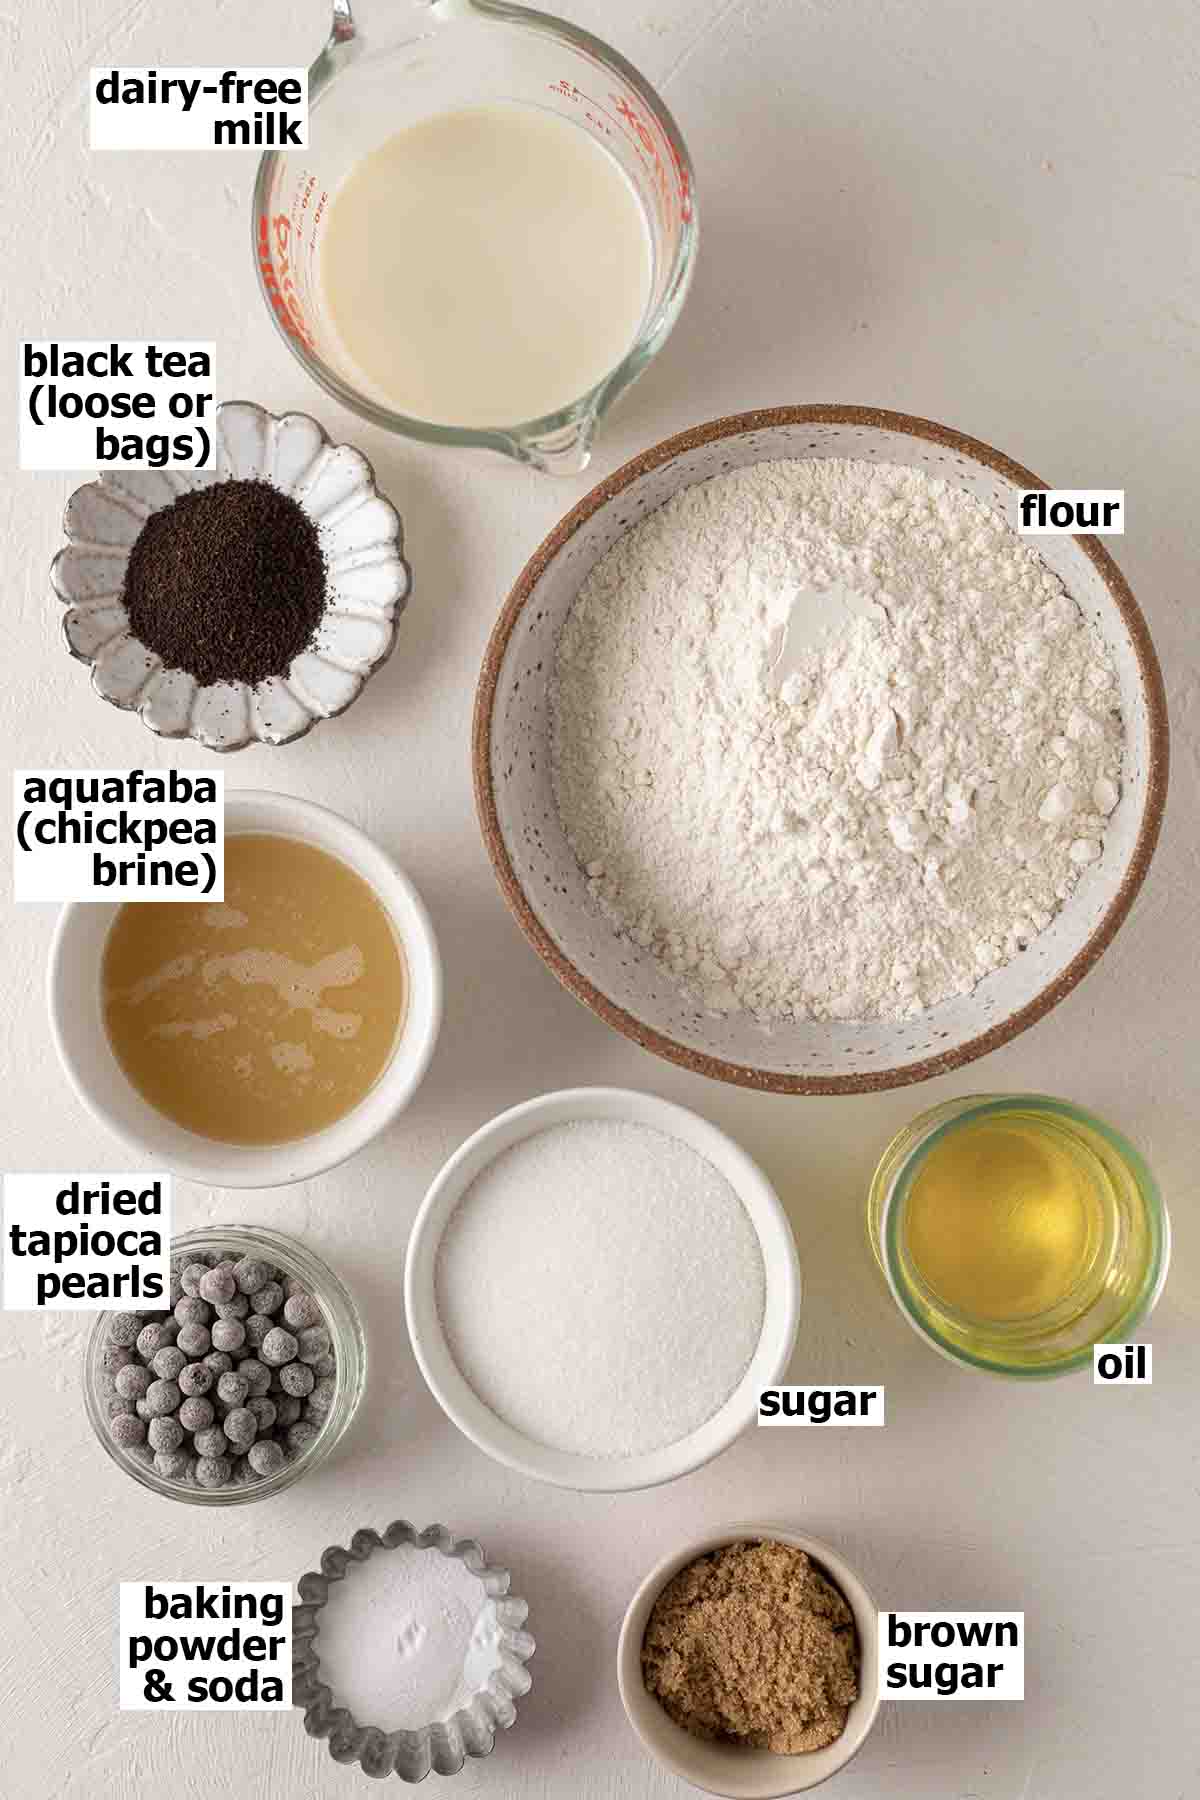
Ingredients to make boba cake
This recipe basically consists of a vegan sponge cake and buttercream but with black tea, brown sugar and tapioca pearls!
Notes about the ingredients
Aquafaba is the brine from a can of chickpeas or cooked chickpeas. We’re making this cake with aquafaba so it can be as light and airy similar to a conventional boba cake! Aquafaba is sometimes used in vegan cakes and desserts to replace egg whites. You can read more about aquafaba in this useful post by King Arthur Baking.
Dairy-free milk. For the best flavor, I recommend a robustly flavored milk such as oat milk.
Black tea. I used loose black tea leaves that you get from your everyday supermarket. Alternatively, you can use the same quantity of loose black tea bags or a Chinese black tea blend from an East Asian shop.
Tapioca pearls (aka brown sugar boba), either dried or homemade. I used dried (it’s sooo much easier) and purchased it from my local East Asian shop. It takes just 5 minutes to cook them!
The full list of ingredient quantities and instructions are in the recipe card at the bottom of this post.
How much tea should I use?
Tea bags and loose tea leaves vary in strength depending on the type and brand. In addition, loose tea leaves could be anywhere from large leaves to a gritty powder (which is what I used).
I recommend adding 2-4 tea bags or 2-4 teaspoons of tea leaves and keep an eye on the color of your milk. Once it has reached your desired color and intensity, remove the tea. This can take anywhere from 10 minutes to 30 minutes!
My milk tea was definitely on the stronger side. However, it imparted a lovely flavor and I love how the dark color contrasted with the buttercream!
How to prepare the cake batter
With this sponge cake, we’re making a classic vegan cake batter but adding whipped aquafaba!
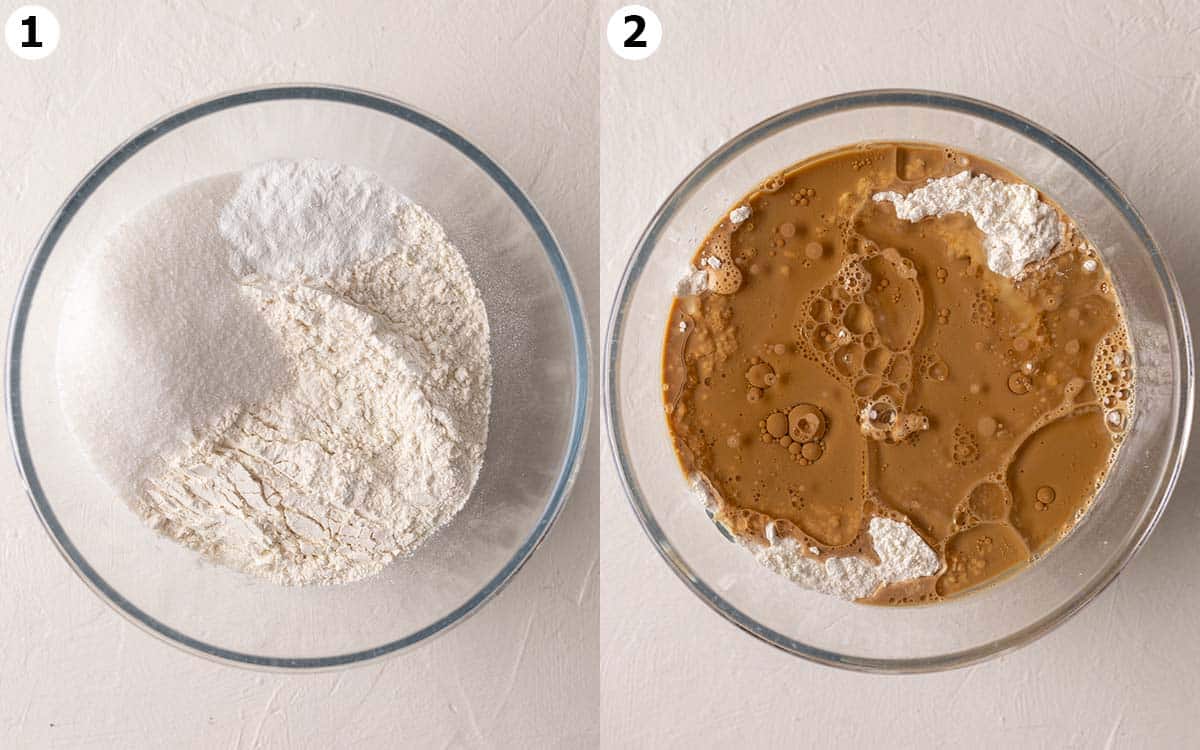
First, mix all the dry ingredients in a bowl. We’re using only some of the sugar as the rest will be used for the aquafaba. Then add your cooled milk tea and liquid ingredients then mix until combined.
At this stage, you’ll have a thick lumpy batter (you can see some of it in Image 3). Don’t worry, we’re mixing it more later! Set aside your cake batter – if it’s a hot day, cover your bowl and place it in the fridge.
Whipping aquafaba and folding the cake batter
Next, we need to whip the aquafaba. With a stand mixer, it takes me anywhere from 5-10 minutes to get firm peaks. With a hand mixer, it may take a little longer.
Remember that sugar that we set aside? We need to gradually add that into the aquafaba. This helps stabilize the aquafaba and turn it into a meringue-like consistency!
TIP: If you’ve been whipping the aquafaba for a while and can only get soft peaks, you can still use it. Your cake will just have a larger crumb, rather than the finer crumb of a sponge cake!
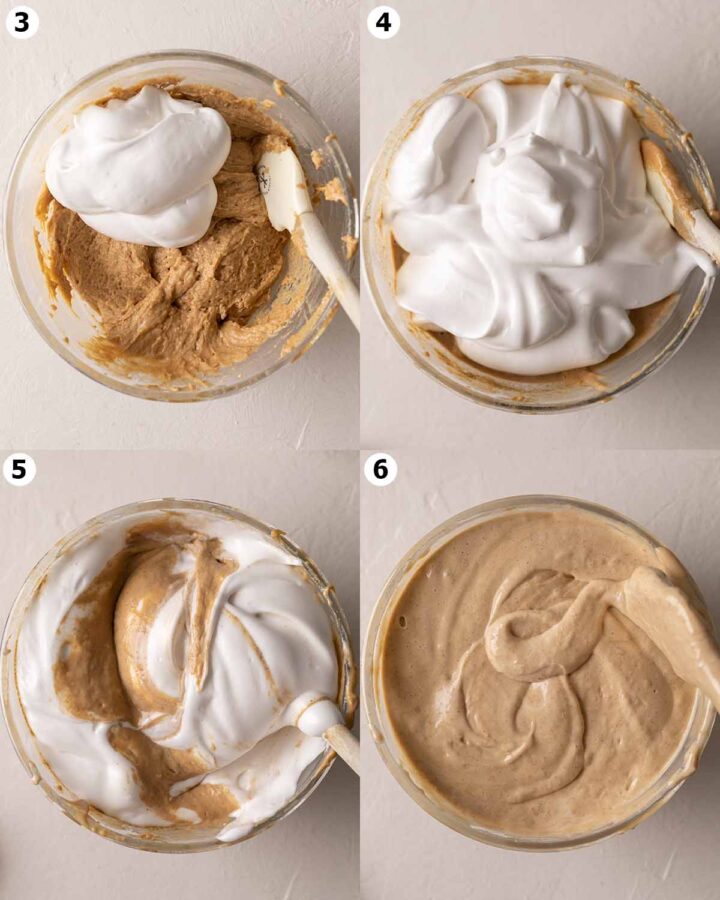
Next, add around 1/4 of your whipped aquafaba into your cake batter and gently fold through. Here, we’re sacrificing a small amount of aquafaba to help loosen the cake batter.
Finally, add all the aquafaba to your cake batter and fold through. Use a very large bowl as it’ll be easier to fold the batter and your aquafaba is less likely to deflate (my bowl was a little too small). Try not to overmix the cake batter as it will deflate the aquafaba. I mixed my batter for a little too long but it still produced a fluffy cake with a smaller crumb!
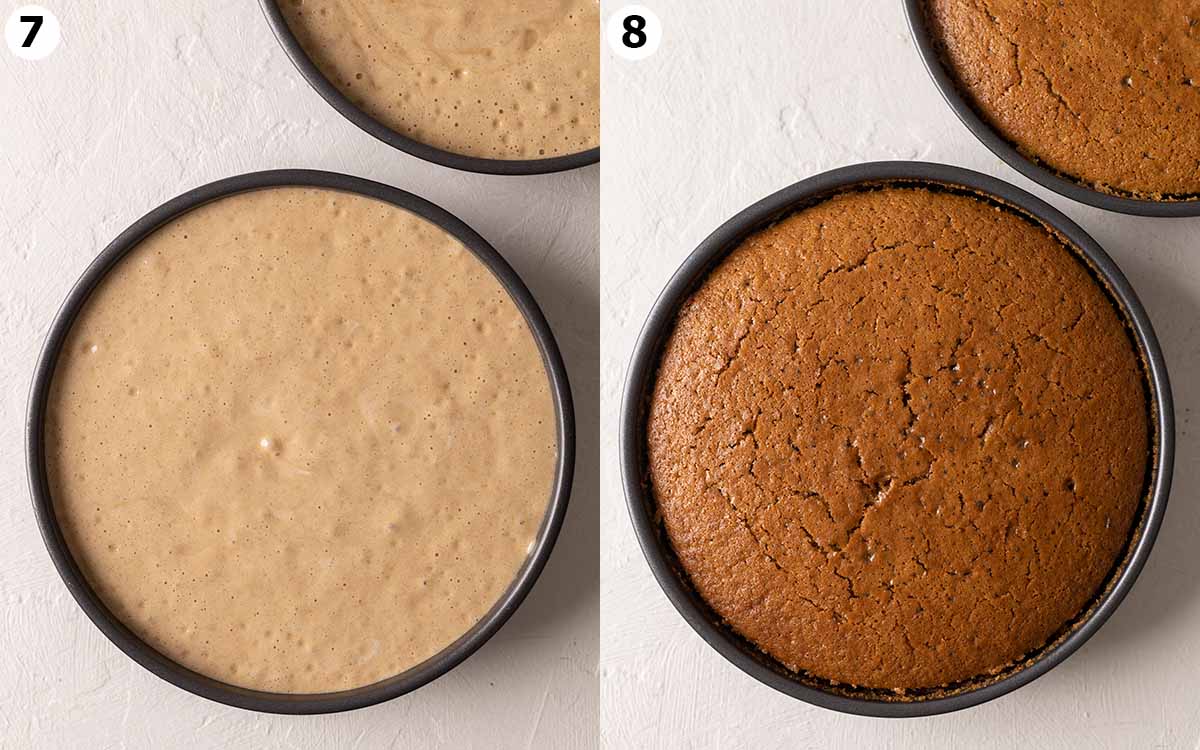
Your final cake batter should be slightly fluffy and a beautiful pale milk tea color!
Baking the boba cake
The baked cakes are a little delicate. I always find that the fluffier a cake, the more delicate it is!
To overcome that, I recommend cooling the cake in their cake tins for 30 minutes then cool them on a wire rack. The cakes won’t dome that much which is perfect for stacking the layers.
TOP TIP: As the cakes are a little delicate, I recommend covering them in food wrap (or storing them in an airtight container) then chill them in the fridge before you decorate them. This makes the cakes a lot easier to handle!
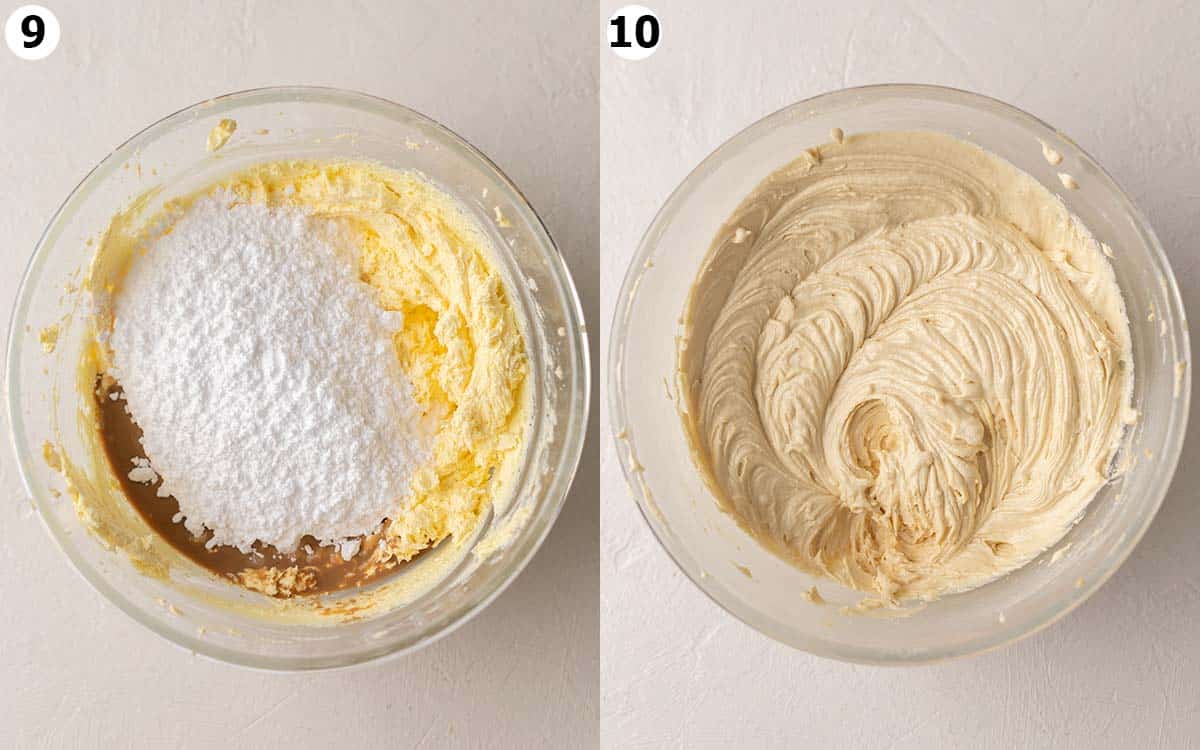
Making the milk tea buttercream
The milk tea buttercream is made like any regular buttercream but we’re adding milk tea for color and flavor. Adding liquids to buttercream can cause it to split so I recommend starting with just 1 tablespoon and adding more if your buttercream is keeping together.
If your buttercream splits, I usually heat up a portion of the buttercream and mix it in again. Baking Butterly Love talks about how to fix broken buttercream in this helpful post.
Assembling and decorating the bubble tea cake
If you’re serving the cake immediately, I’d recommend cooking the tapioca pearls first, letting them cool then decorating the cake. By the time you’ve finished frosting your cake, the pearls will have cooled down and will be good for topping the cake! I topped my cake with boba when they were very slightly warm which melted some of the frosting. However, I liked the melty look of it!
If you’re serving the cake in a few hours or the next day, I’d recommend frosting and stacking the cake then chilling it. A few hours before serving, cook your tapioca pearls! They only keep for around 4 hours before they start to harden so it’s best to prepare them a few hours away from serving.
In saying that, apparently you can cook tapioca pearls and store them in a simple syrup for 72 hours However, I haven’t tried this myself so can’t vouch for results!
What else can I add to this boba cake?
In case you really want to make this cake extra-extravagant, you can also make:
Milk tea pastry cream (custard). In between the layers, you can pipe some pastry cream in the middle. Just make sure you create a ‘dam’ of frosting so the pastry cream doesn’t ooze out! Try Addicted to Dates’ pastry cream recipe but make only 1/2 of the quantity and infuse the milk with black tea.
Whipped cream cheese topping. Combine 4 parts whipped dairy-free cream with 1 part cream cheese and a sweetener to taste to make a cream cheese topping. For boba cakes, this is normally runny and mousse-like!
I do not recommend using a cream cheese buttercream frosting as it’s already a soft frosting and shouldn’t be mixed with extra liquids (milk tea)!
Expert Tips
The sponge cake and frosting can be prepared 1-2 days in advance! Here’s a rough guide:
Day 1: Make the sponge cakes and chill them in the fridge
Day 2: Make the buttercream and decorate your cake as desired.
Day 2 or 3 (event day): Cook the tapioca pearls and use them to top your cake!
I do not recommend placing the pearls on the cake any earlier as they will dry out.
For 3 x 8-inch layers rather than just 2 layers, multiply the recipe by 150% and divide the cake into 3 cake pans. If you have a large oven, this will take around the same amount of time to bake.
Alternatively, you can use the recipe as is and bake it in 3 x 6-inch (15 cm) cake pans. This will take around 40 minutes to bake. A 6-inch cake will be as tall as my vegan pink champagne cake.
Yes! Instead of making a sponge cake using aquafaba, you can make a one-bowl milk tea cake. I’ve listed quantities in the notes of the recipe card below.
More vegan cakes


Follow Rainbow Nourishments on Instagram, Facebook, TikTok and Pinterest, and subscribe via email to receive all of our latest recipes!

Vegan Boba Cake
Ingredients
Milk Tea
- 1 ½ cups (375g) dairy-free milk
- 3-4 black tea bags, or 3-4 teaspoons of black tea leaves (note 1)
Milk Tea Cake (see note 2 for a simplier version)
- 3 cups (375g) all-purpose plain flour, (note 3)
- 1 ¼ cups (250g) granulated sugar
- 3 teaspoons baking powder
- ⅛ teaspoon baking soda
- Pinch of salt, optional
- ½ cup (125g) neutral flavored oil
- 1 tablespoon apple cider vinegar, optional
- 1 teaspoon vanilla extract, optional
- ~3/4 cup (180g) aquafaba (brine from a can of chickpeas), (note 4)
Milk Tea Vanilla Buttercream
- 1 cup (225g) vegan block butter, room temperature (note 4 for vegan spreadable margarine)
- 4 cups (400g) powdered sugar / icing sugar, to taste
- 1 teaspoon vanilla extract
To decorate
- ¾ cup (90g) dried black tapioca pearls
- ½ cup (95g) packed brown sugar
Instructions
Make the milk tea:
- Add the dairy-free milk to a small saucepan and bring to a gentle boil. Remove from the heat.
- Add your tea bags or loose tea leaves to the milk. Infuse for 15-30 minutes or until it reaches your desired flavor/intensity. Keep in mind the flavor will be diluted in the cake.
- Remove the tea bags or strain away the tea leaves. Squeeze the bags or tea leaves to remove any excess milk. Measure the remaining milk tea and add more milk so you have 375g (1 1/2 cups) of liquid. Set aside 30g (2 tablespoons) of the milk tea for the buttercream. Allow the milk tea to come to room temperature.
To make the cake:
- Add the flour, only 125g of sugar (we're using the rest for the aquafaba), raising agents and salt to a very large mixing bowl. Mix until combined.
- Add the milk tea, oil and optional vinegar/vanilla to the bowl. Mix until just combined (the batter should be thick and lumpy). If in doubt, err on the side of undermixing as we'll be mixing it more later. Set aside.
- Preheat your oven to 180°C (355°F). Grease or line 2 x 8 inch (20 cm) round cake pans with parchment paper.
- Add the aquafaba to a clean large bowl (if using hand beaters) or the bowl of a stand mixer (with the whisk attachment). Beat the aquafaba until soft peaks form. Gradually add the remaining 125g of sugar. Beat until the mixture is glossy and you get firm or stiff peaks (note 5).
- Add around 1/4 of your aquafaba meringue mixture to your cake batter and fold through. This helps loosen up the cake batter.
- Add the remaining aquafaba mixture to your cake batter. Use a spatula to gently fold the mixtures together. Try not to overmix your batter.
- Evenly divide the cake batter into your prepared cake pans.
- Bake the cakes for around 30-35 minutes. The cakes are ready if they spring back when you gently press the top or you can insert a toothpick in their center and it comes away clean.
- Allow the cakes to cool in their pans for 15 minutes then completely cool on a wire rack.
To make the milk tea buttercream:
- Add the vegan butter to a large bowl or stand mixer. Beat until light and pale.
- Add the sugar, reserved milk tea and vanilla extract and beat until fluffy. Add more powdered sugar for a firmer frosting or more milk for a smoother frosting.
Preparing the tapioca pearls:
- Cook the tapioca pearls according to packet instructions, drain and rinse them.
- In the saucepan you just used, add the brown sugar and a dash of water. Cook the mixture over medium heat until the sugar has dissolved. Add the cooked tapioca pearls and mix until combined. Allow the mixture to cool.
To assemble the cake:
- Place one cake layer on a serving plate. Spread around 3/4 cup of buttercream on top of the cake and place the remaining cake layer on top.
- Spread the remaining frosting on the top and sides of the cake. If you have excess frosting, use it for piping on top of your cake. Top the cake with the cooked tapioca pearls and brown sugar syrup.
- Serve the cake within 4 hours. If you'd like to make this cake in advance, I recommend that you decorate the whole cake in advance (without the pearls). On the day of serving, cook the pearls and top the cake just before serving. The pearls will quickly dry out and become hard (and inedible) when they're exposed to air for too long.
- Store cake leftovers in an airtight container in the fridge but consume or dispose of the remaining tapioca pearls. Allow the cake to come to room temperature around 30 minutes before serving.
Notes
- Black tea bags and leaves vary in strength a lot! I recommend keeping an eye on the color and intensity of your milk tea and removing your tea when ready.
- For a simpler cake, you can a one-bowl vegan cake without the aquafaba. In a large bowl, mix together 375g all-purpose plain flour, 250g sugar, 3 teaspoons baking powder, 1/8 teaspoon baking soda and salt. Add the remaining milk tea, 125g oil, 1 teaspoon vanilla and mix until combined. Use the batter as is. The final cake is fluffy but denser than the above sponge cake.
- I have not tested this recipe with gluten-free flour.
- I got 180g of aquafaba from just one 400g (15 oz) can of chickpeas.
- If using spreadable margarine, your buttercream will be softer. You may need to add more sugar or a little corn starch to firm up your buttercream.
- It can take anywhere from 5-10 minutes to whip your aquafaba until firm or stiff peaks form. The fluffier your aquafaba, the fluffier your final cake will be! However, the cake will still work if you can only get soft peaks.
This post may contain affiliate links. As an Amazon Associate, I may earn a small commission from qualifying purchases at no additional cost to you.

Hi Anthea, love the idea of a milk tea cake, but do you have suggestions for different flavours if I wanted to make this for a child’s birthday (caffeine free)? Do you think it would work if I infuse vanilla with the milk instead of tea and make a vanilla cake?
Hi Erica, I totally get that! A vanilla-infused cake would be lovely. Some other ideas are a caffeine-free chai cake, coconut milk cake (use beverage-style coconut milk without any infusion) and maybe even a pandan coconut milk cake. A taro milk tea cake would also be delicious but I don’t know how taro behaves in baking. Hope that helps!
Love this recipe!
How long can this cake be refrigerated?
Thanks Sam! The cake, without the boba, can be refrigerated for up to 3-5 days. I hope that helps!