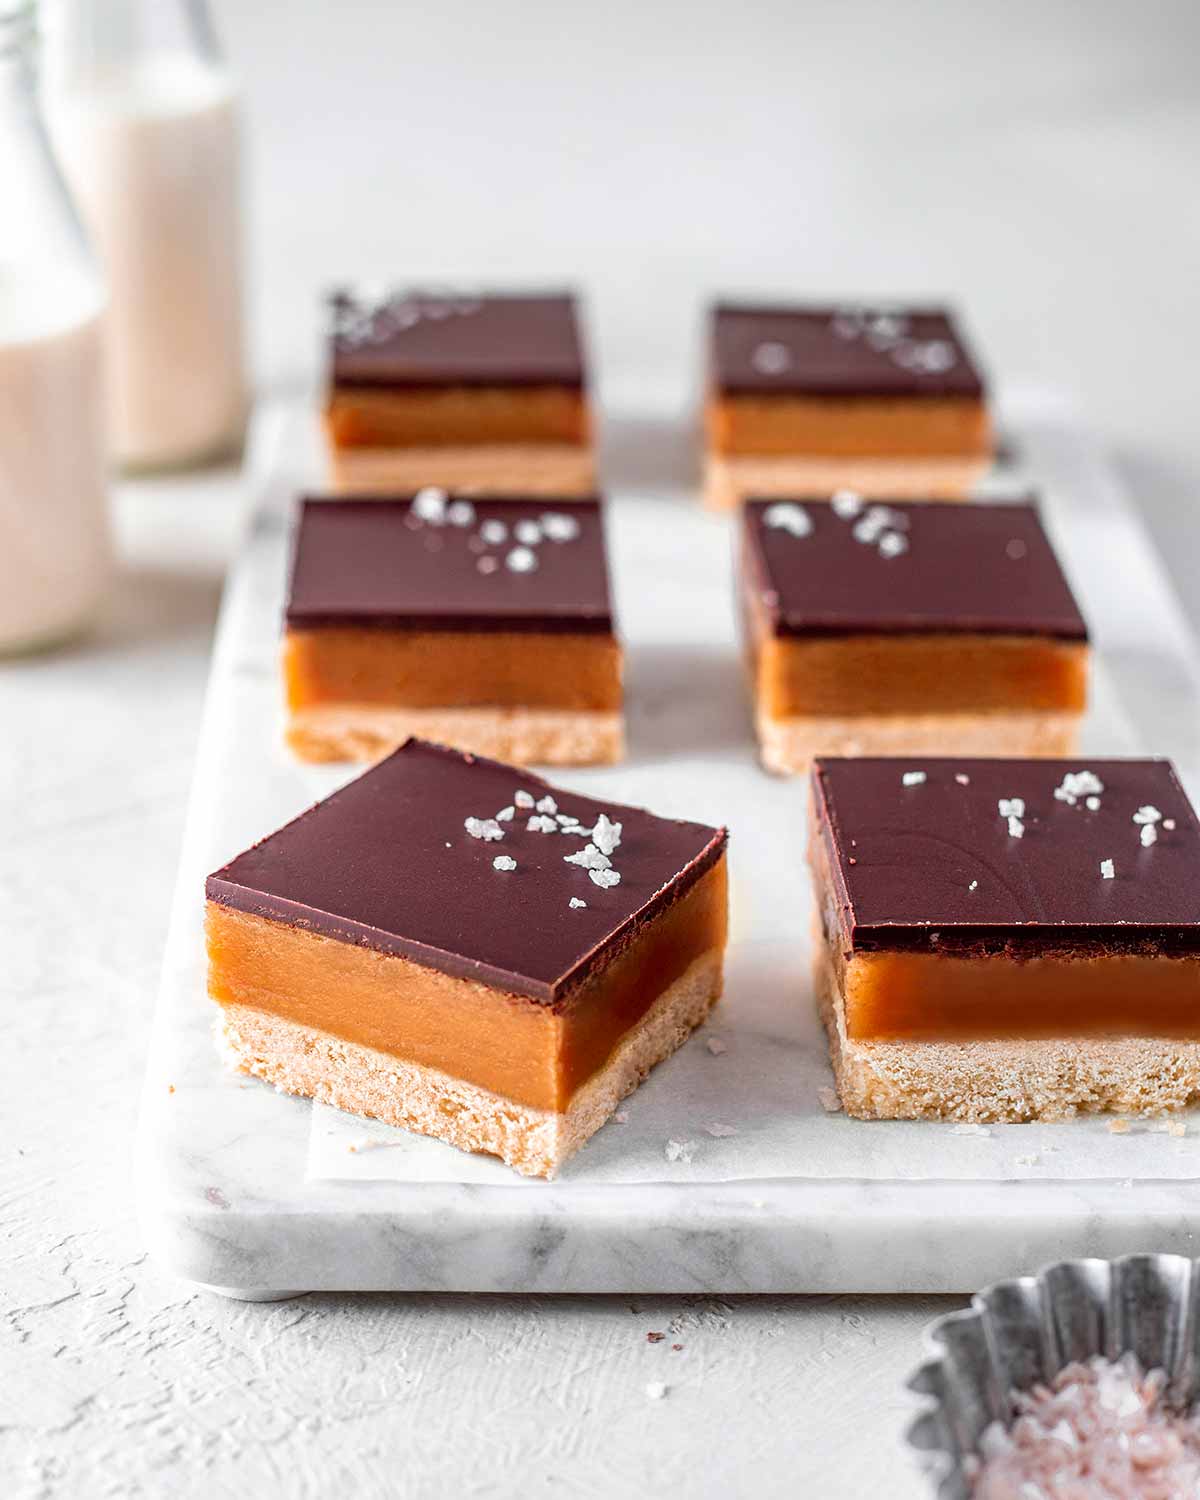
Classic Vegan Caramel Slice (no dates)
Classic vegan caramel slice or vegan millionaire bar, just like your corner bakery without the animal products! Just like the traditional treat, these have no dates, a buttery shortcrust base and are made with vegan condensed milk!
What you can expect from this vegan caramel slice
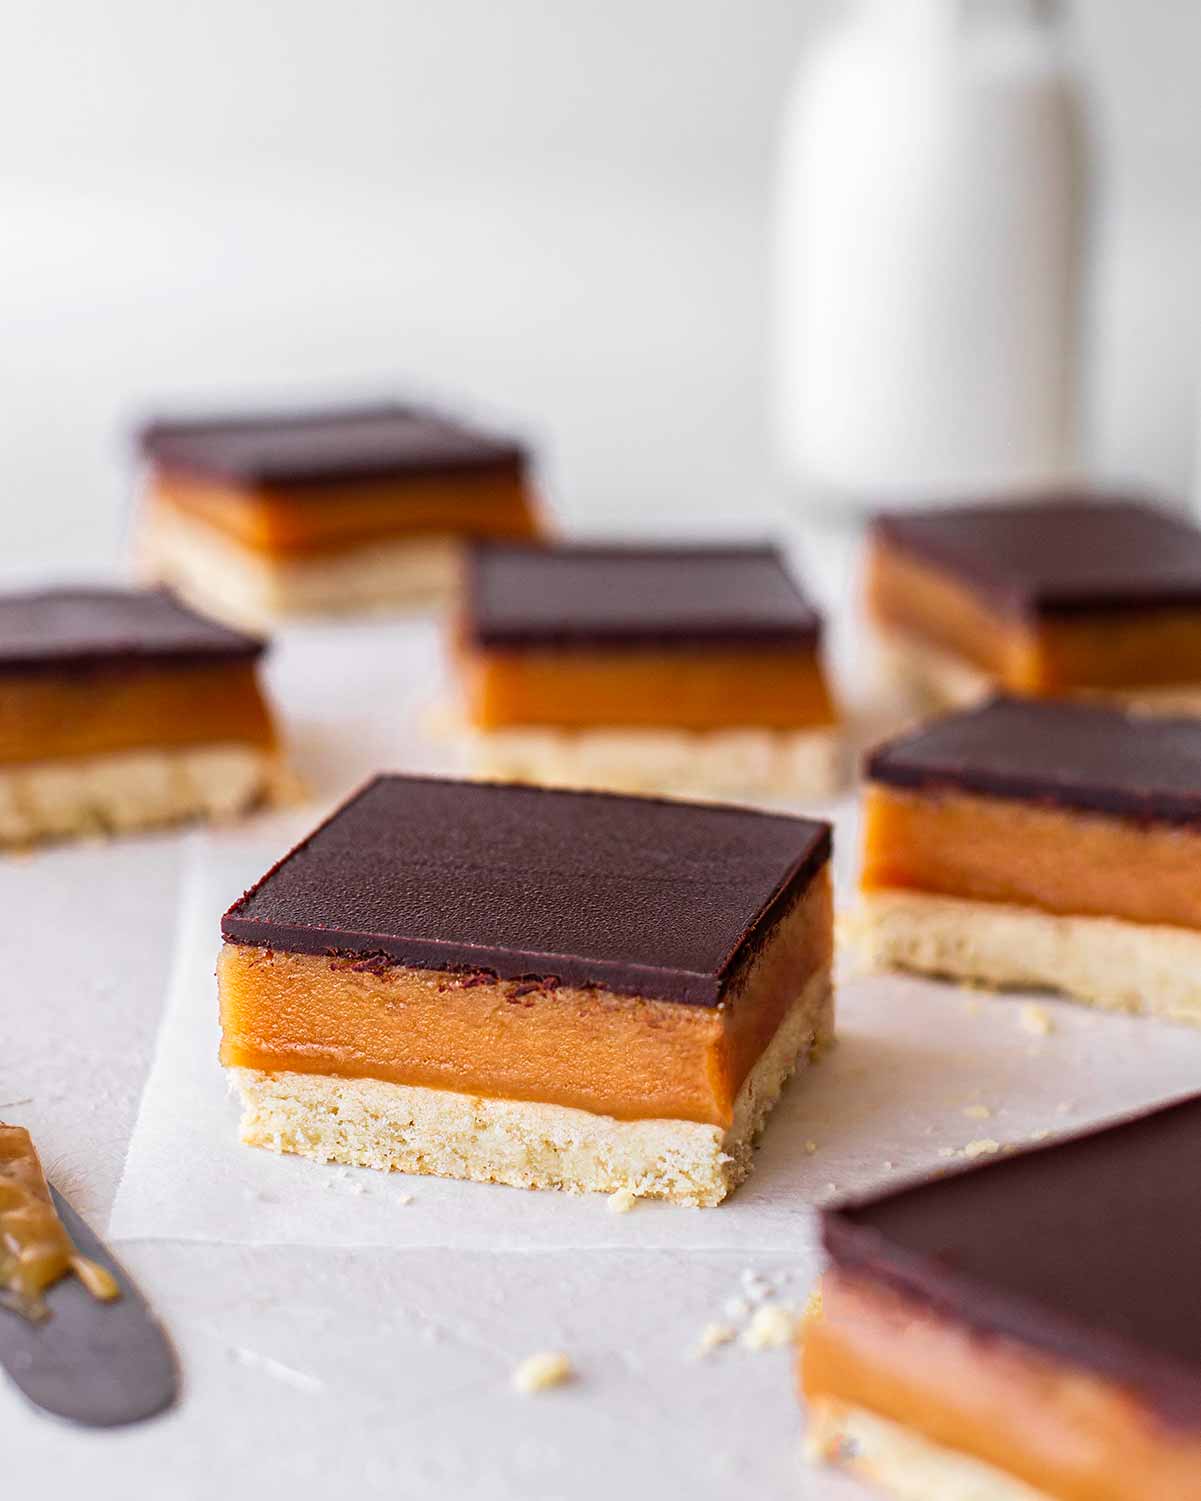
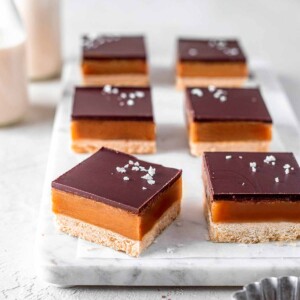
These caramel slice are also known as vegan millionaire bars (UK) or caramel shortbread bars (USA). They all have slight variations but these caramel slice have a:
- Crumbly shortcrust cookie base,
- Gooey fudge-like caramel filling
- Firm chocolate topping
Most vegan caramel slice recipes using coconut condensed milk are TOO gooey and runny and cannot be kept out of the fridge for very long. However, this recipe is stable at room temperature for at least a few hours, thanks to the high amount of butter.
This isn’t the most healthy caramel slice recipe but we’re going for tradition here. If you’re after a healthy vegan caramel slice packed with nuts and dates, check out the caramel slice recipe from my cookbook.

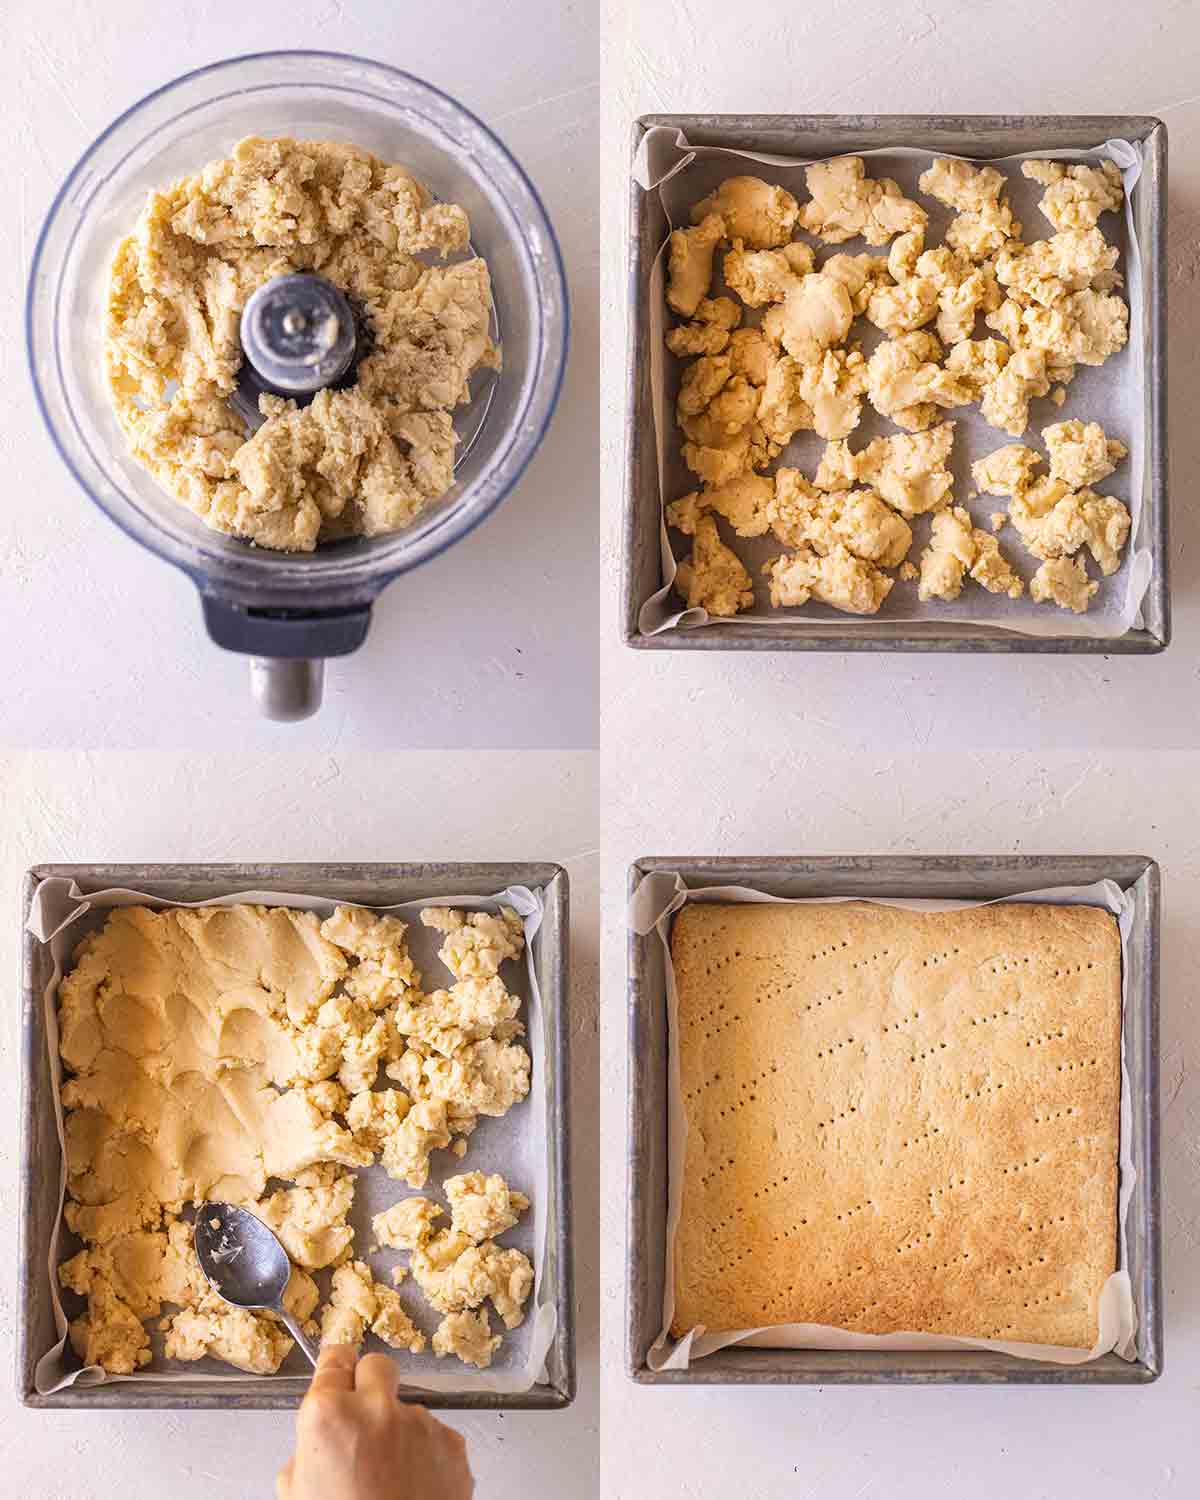
Making the shortcrust base
This is the easy part! Add all ingredients to a food processor and blitz until combined. Depending on your ingredients, you may need to add a little more flour or water to get that ideal cookie texture. Alternatively, you can use a bowl and a pastry cutter (or your hands).
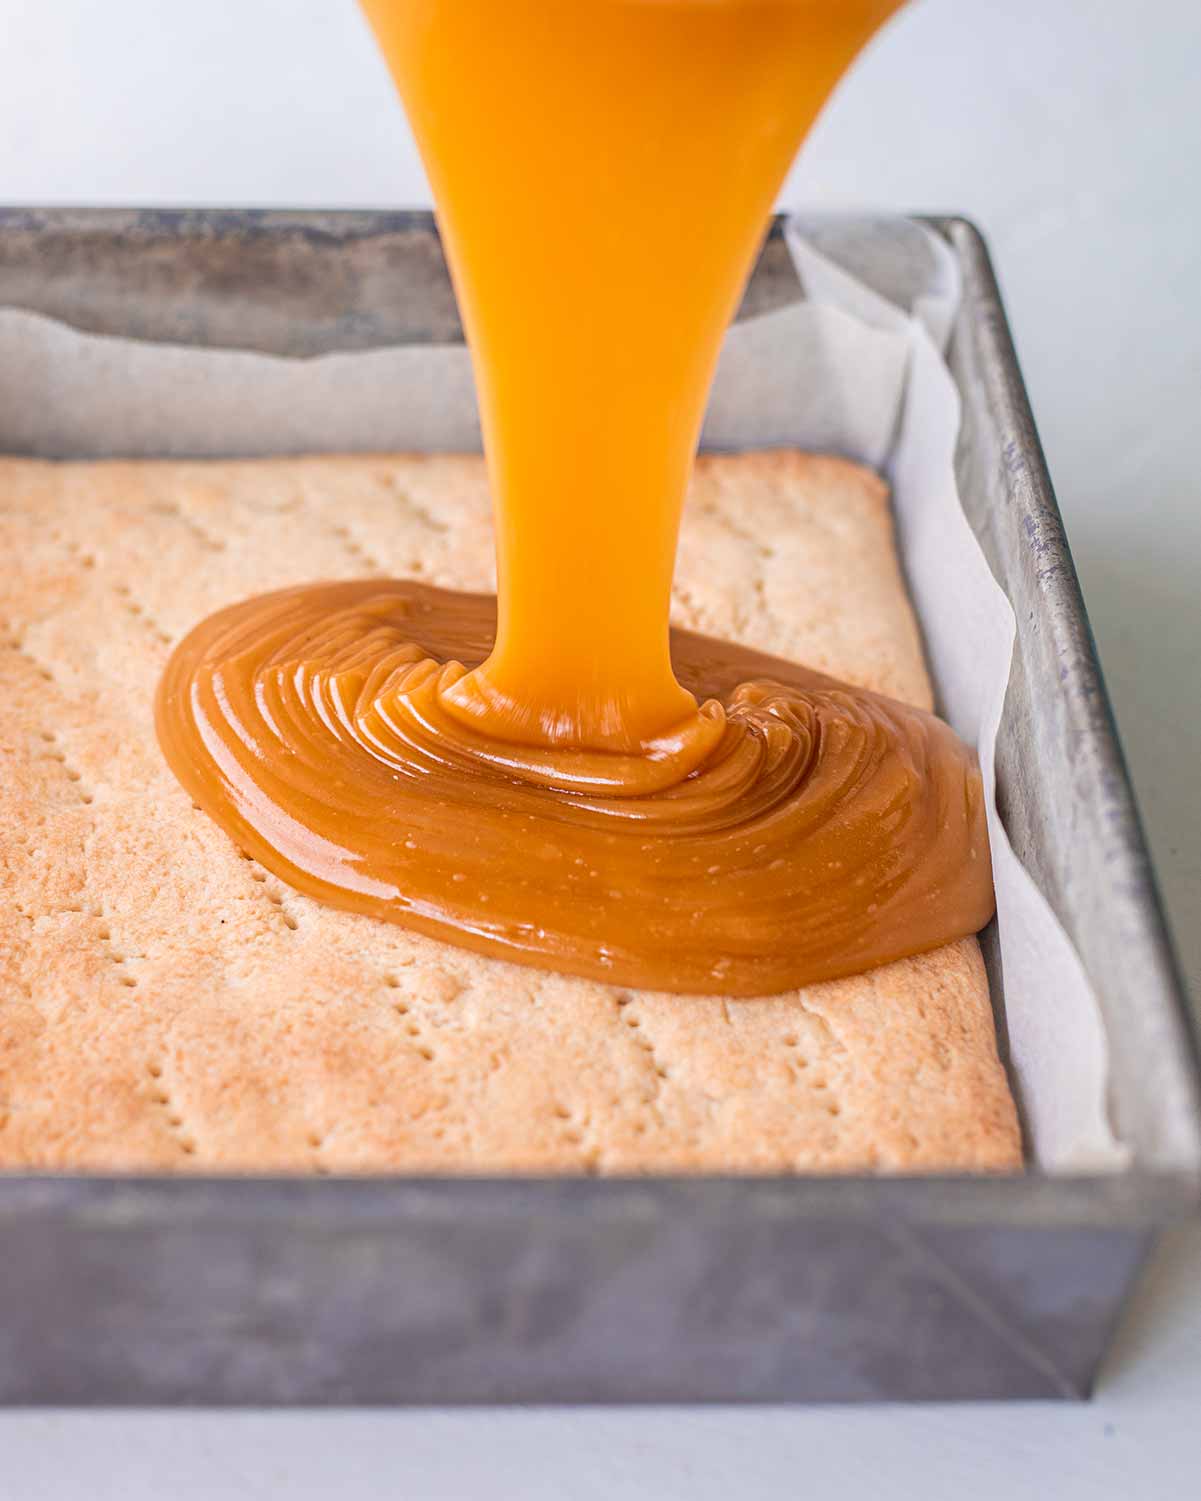
Press the mixture into a square baking tin and press it down. Prick it with a fork (to allow air to escape when baking).
Then bake the crust until slightly golden brown. It’s normal for the base to shrink a little.
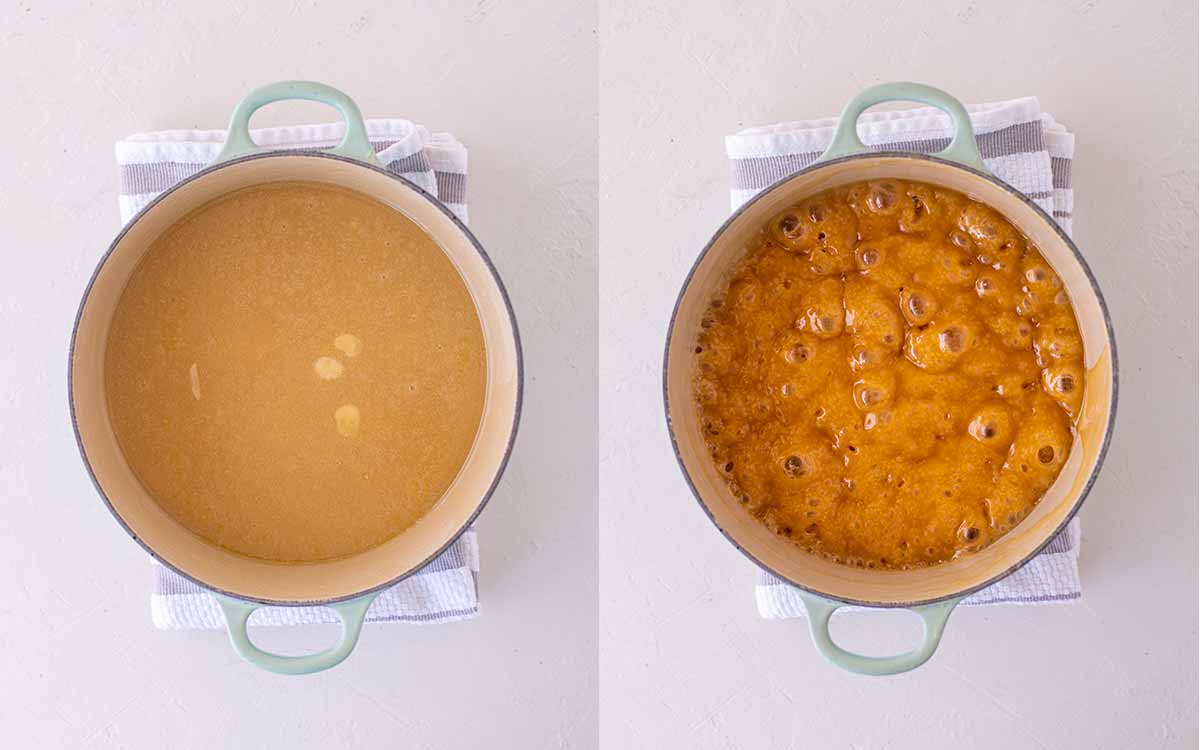
Making VEGAN caramel using condensed milk
I won’t lie – making caramel (vegan or not) is an art as temperatures and consistencies are particular. I’ve tried making caramel over 20 times, half of the time without using a thermometer or the ‘soft / hard ball’ method.
Condensed milk is traditionally used to make caramel slice. However, vegan or coconut condensed milk is also a lot more runny than non-vegan condensed milk. That means vegan caramel slice needs a lot more butter to set.
Traditionally, caramel slice is made by pouring the caramel mixture on a shortbread base and baking it in the oven. However, vegan condensed milk can seperate when it stays at high-ish temperatures in the oven or stove-top. Unless you want to cook your caramel for 2 hours, I would not recommend it.
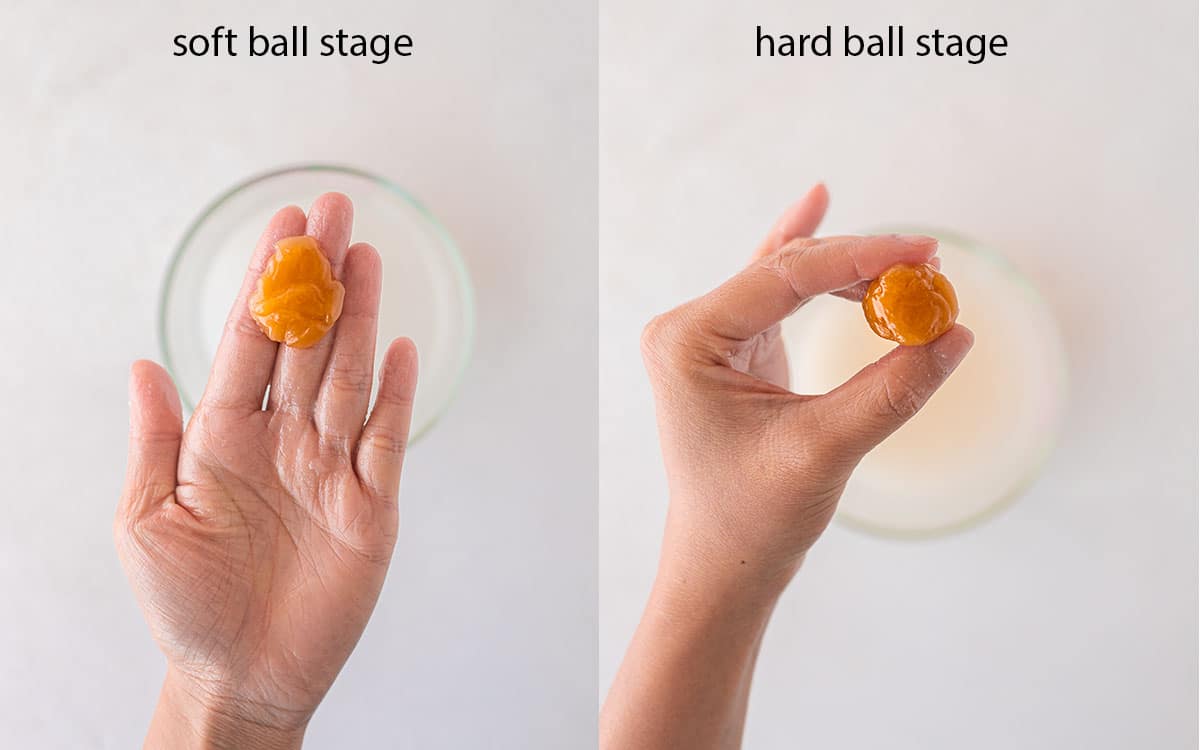
How to tell when your caramel is ready
If you cook your caramel for too short, it will be too gooey. If you cook it for too long, it’ll be a toffee texture. I always aim to make recipes as easy as possible but traditional caramel is very precise. For that reason, traditional methods/tests are the best way to tell whether your caramel is ready or not.
Using a candy thermometer (recommended)
To make the caramel, add all ingredients to a heavy-based saucepan and boil over high heat. On a candy thermometer, your caramel needs to reach 118-121°C (244-249°F).
A caramel which has only reached 112-116°C (234-240°F) will be too soft and gooey. If the caramel reaches 121-130°C (250-266°F), the caramel will be too firm and toffee-like.
Using the cold water method
If you don’t have a candy thermometer, you can try the soft ball / hard ball stage typical in candy making. However, this can be a bit of a guessing game. For this method, you’ll need to drop some of the hot caramel is dropped into a bowl/glass of ice cold water and allow it to solidify for around 10-30 seconds.
Initially the caramel won’t form a ball at all in the ice water. Eventually it’ll form a soft ball when it can be collected but doesn’t maintain its shape.
When you boil the caramel for a little longer, the caramel solidfies and reaches the firm ball stage. This is where a ball is formed, the exterior is firm but the ball collapses when pressed. When it reaches this stage, your caramel is ready!
If you’ve boiled the caramel for TOO long, it’ll reach the soft crack stage where it’ll be firm but pliable threads will appear when removed from the water. This will result in a toffee-like caramel. This Spruce Eats post shows all the different stages of caramel making.
This caramel sets quickly so I’d recommend immediately pouring it on top of your shortcrust base. Then pop it in the fridge to chill!
If you succeeded with the caramel, making the chocolate layer will be a breeze in the park :).
Ingredient substitutions
BASE: To make a gluten free vegan caramel slice, substitute the flour for 50% almond meal and 50% gluten free flour blend (with xantham gum) by weight.
CARAMEL: Using vegan margarine instead of vegan block butter is possible but it creates a slightly softer caramel. Margarine has a higher water content than block butter so there’s not as much fat to help keep it stable at room temperature.
If you prefer a refined sugar free vegan millionaire bar, I’d recommend using coconut sugar in the base and caramel. However, this recipe is inevitably sweet (just like the traditional version) so if you prefer something A LOT less sweet, I’d recommend my healthier caramel slice from my cookbook.
Unfortunately the vegan condensed milk (coconut, soy or oat) cannot be substituted in this recipe. It’s a core ingredient so replacing it will change the whole structure of the caramel.
More vegan desserts


Vegan Caramel Slice (no dates)
Ingredients
Base
- 2 cups (250g) all-purpose plain flour
- ⅔ cup (150g) vegan butter or margarine
- ½ cup (50g) powdered sugar / icing sugar
- 1 tablespoon water, or as needed
Caramel filling
- 2 x 320g cans dairy-free sweetened condensed milk
- 1 ¼ cups (280g) vegan butter or margarine
- ½ cup (100g) packed light brown sugar
- 2 teaspoons liquid sweetener, such as rice malt syrup, (note 1)
Chocolate topping
- 1 ¼ cups (210g) roughly chopped vegan chocolate
- 3 tablespoons (45g) coconut oil, or liquid vegetable oil
Instructions
- Preheat the oven to 180°C (350°F). Line a 20 cm or 23 cm (8 inch or 9 inch) square cake tin with baking paper.
Base:
- Add all the ingredients to a bowl or food processor and mix until combined. The mixture should stick together when it is pinched between two fingers. Add a little more water if the mixture is too crumbly or a tablespoon of flour if the mixture is too soft.
- Firmly press the base mixture into the tin. Bake in the oven for 10 minutes.
Caramel filling:
- Add all ingredients to a saucepan over medium-high heat. Simmer for 15 minutes while constantly stirring or until the caramel is a deep golden brown colour and has reached 118-121°C (244-249°F) or the 'firm ball' stage (note 2). Pour the caramel into the tin and set aside in the fridge for at least 2 hours.
Chocolate layer:
- When the caramel is firm to the touch, start making your chocolate layer.
- Add all ingredients to a small saucepan or double boiler over low heat. Mix until melted. Pour the melted chocolate on top of your caramel layer and return the slice to the fridge to set for at least 1 hour.
To serve:
- Remove the caramel slice from the fridge and pull the baking paper to remove it from the tin. Use a sharp knife to cut the slice into squares or rectangles.
- Store the caramel slice in an airtight container in the fridge for up to 2 weeks or in the freezer for up to 1 month.
Notes
- Do not omit the liquid sweetener as it helps prevent the caramel from crystallising. Apparently maple syrup does not work as it as a too high water content.
- To see if the caramel has reached a ‘firm ball’, drop a little caramel into a glass of iced water and wait for 10 seconds. It’s ready when it turns into a ball which has a firm exterior but softens a little when pressed. This is a rough way to predict the texture of your final caramel. If the caramel is too soft, cook it for a little longer. If the caramel is a very firm ball which doesn’t ‘give’ when pressed, it has been cooked for too long. If so, add some water to the mixture and heat again.
This post may contain affiliate links. As an Amazon Associate, I may earn a small commission from qualifying purchases at no additional cost to you.

This is a great caramel slice recipe. My daughter’s Fiancé is vegan and I have been trying different recipes to find one that is close to the one I make that is gluten free. It is the best one I have tried so far!
Hi Tania, I’m sooo glad you all enjoyed this caramel slice! Thanks for taking the time to let me know, I appreciate it a lot.
tried the recipe and it was yum, only thing is that the caramel sort of tastes like the butter a bit which is slightly off-putting. other than that this was a fun recipe to do and otherwise a satisfying end product.
Hi Sapphira, glad you enjoyed this slice and found it fun to make! With the butter flavour, I find this can be hugely affected by the brand of butter you use. For example, some brands such as Nuttelex have a more off-putting flavour that can come through in the caramel. Nevertheless, thanks so much for your feedback!
What brand of dairy-free condensed milk do you use. I’ve tried pandaroo coconut condensed milk without success?
Hi Cat, I used Nature’s Charm’s condensed milk (both coconut and oat). I’m sorry Pandaroo didn’t work for you! I haven’t tested this recipe with Pandaroo – was your can very thick? Nature’s Charm tends to be thick and scoopable which seems to help this slice set.
Hi, I used Pandaroo condensed milk and mine worked perfectly! I substituted golden syrup instead the other sweetener . I also used a digital thermometer.
I just made this and it’s delish! I got scared to overdo the caramel though and it’s very runny on the inside still delicious but! I popped it into the freezer to maybe help lol.
Thank you for trying the recipe and sharing your feedback! Caramel can definitely be tricky with timing, but we’re so glad you still enjoyed it 🥰 Fingers crossed the freezer trick helps!
AMAZiNG!
thank you for sharing recipe.
I did not add liquid sweetener to caramel filling, added to the slice and was perfect!
Tried this recipe, having never made caramel or using a candy thermometer and it came out really well!
– I did use Maple syrup (hadn’t read the note) but it didn’t crystallise and tasted great
– I took it to 119°c and not a degree higher, but it still came out a little like toffee. Straight out of the fridge it’s certainly edible, but slightly tougher than you’d expect. When it sat out at room temp it was perfect! It was out for a few hours at a party and didn’t melt or become too oozy. Definitly like a soft, sticky toffee texture but this to me felt more traditional. It wasn’t difficult to eat by any means.
– I accidentally overbaked the crust (by 35 minutes…) and was terrified it would turn out bad, but instead it was crumbly and firm, but still soft to bite through like a shortbread biscuit and I’ve discovered that this is inadvertently actually a delicious and fun texture and I’ll do it intentionally next time.
I took these to a house warming party and they were a big hit! Those that didn’t know I’d made them had no idea they were vegan. Everyone loved them. So glad I used the thermometer because In hindsight, I wouldn’t have been able to get the texture right. Thanks for an amazing recipe!
This is a great recipe thank you!
I thought I had managed to do everything right, however when cutting it, I found the caramel too tough, more like toffee:(
Did I overcook the caramel?
Hi Amy, yes a tough toffee-like caramel is always from overcooking the mixture and too high heat! It sounds like your caramel reached the ‘soft crack’ stage which is only 10°C (20°F) degrees above where it needs to be! Have a look at this guide to see all the stages of caramel: https://www.thespruceeats.com/illustrated-candy-temperature-guide-520322
SO DELICIOUS! Definitely more of a traditional caramel slice then a healthier alternative, probably why it tastes so good!
I only had one can of condensed milk, so I cut down the measurements for the filling. I over cooked the caramel so it set more like a toffee and the chocolate didn’t stick well.
Will definitely make it again! Yum.
Haha, yes, it’s definitely a traditional caramel slice! Yep, that’s completely understandable with the caramel – it can be easy to overcook! Thanks so much for your feedback 🙂
I made this recipe… everything went well until I cut it up snd squashed everywhere. I just kept going snd scooped moshed caramel into a small jug to put over icecream 🙁
Oh I’m sorry to hear that! It sounds like your caramel wasn’t cooked for long enough. When it’s cooked for long enough, the caramel is very firm when it comes out of the fridge! Did you test the caramel using the ‘hard ball’ method or use a candy thermometer?
This recipe calls for white chocolate. Is that what you’ve used? It looks like dark chocolate in the picture. Can’t wait to try it!
Oh it does! Thanks for letting me know – just updated 🙂