Vegan Mango Cheesecake Bars (no-bake)
Creamy vegan mango cheesecake bars that are no-bake, packed with wholesome ingredients and are coconut-free! These bars are perfect for Summer or when you want to feel like you’re on a tropical island!
Why you’ll love this recipe
This no-bake cheesecake is on the ‘healthier’ side but isn’t your typical ‘raw vegan cheesecake’ because there’s no coconut milk, cream or oil! I used to own a cake business where I made thousands of raw desserts and I’m officially over the flavor of coconut.
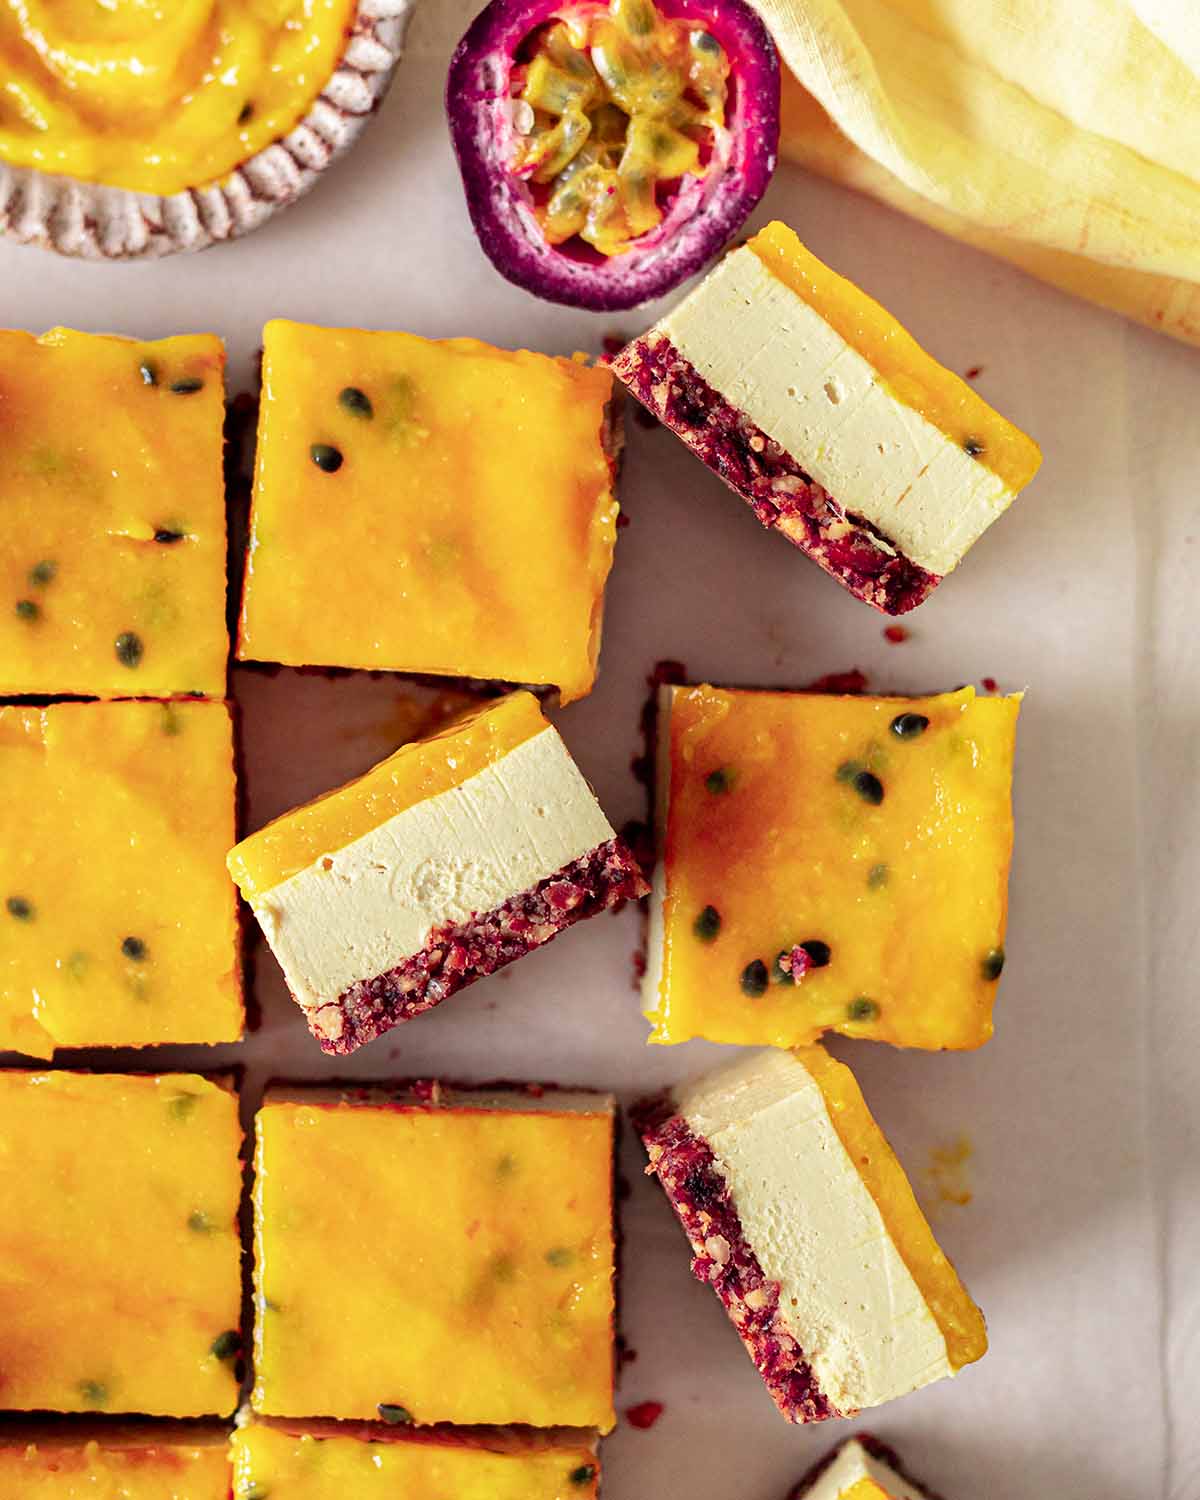
This cheesecake contains the following dreamy layers:
- Easy date-nut crust
- Creamy cheesecake-like mango filling
- Sweet and tart mango and passionfruit topping
And the cheesecake is naturally gluten-free and refined sugar-free! If you prefer a more classic cheesecake that is nut-free and uses cream cheese, check out my baked vegan mango cheesecake or papaya vanilla cheesecake.
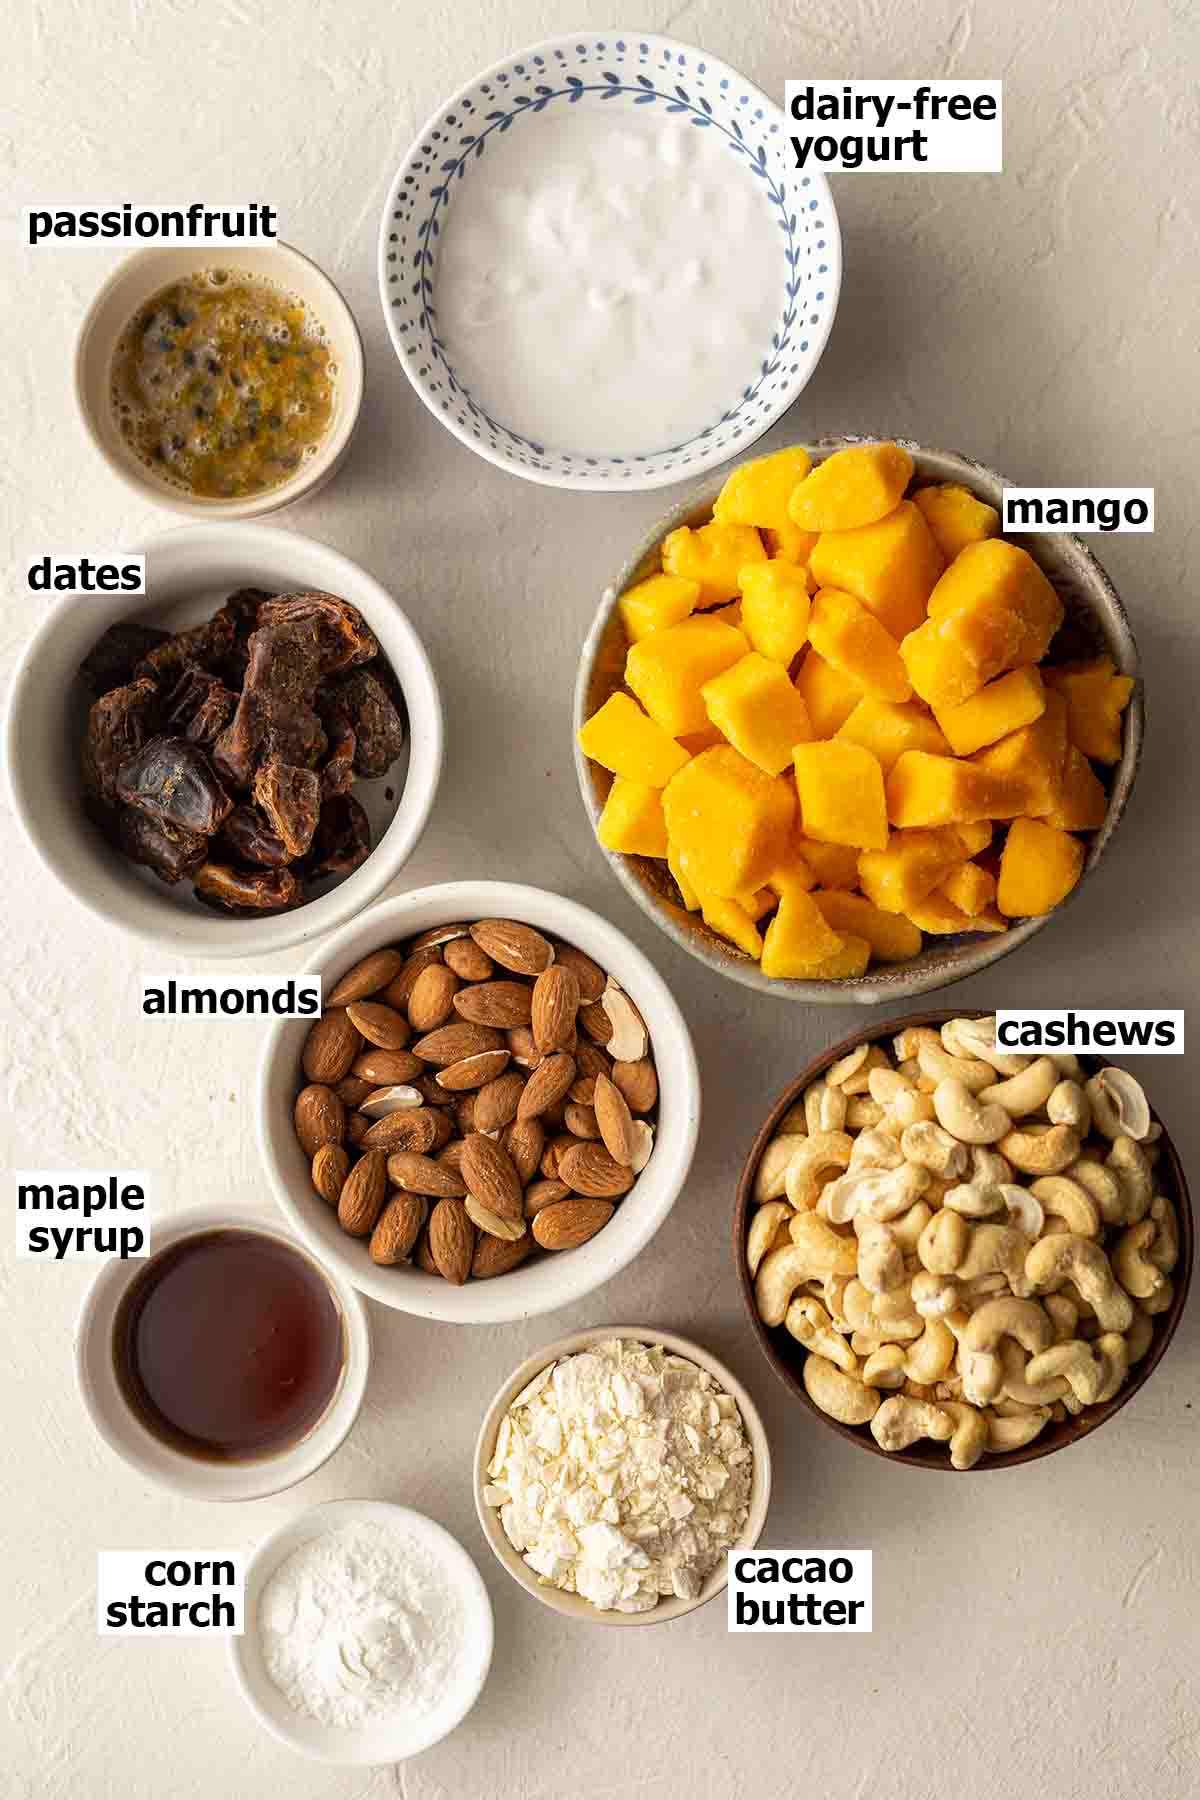
Ingredients you’ll need
Ingredient notes and substitutions
Mango, either fresh or frozen and defrosted. I haven’t tried this recipe with canned mango puree but I imagine it will work. Canned mango often has added sugar so you may want to reduce the maple syrup.
Almonds or any other nut will work! I like using hazelnuts, walnuts and pecans in cheesecake bases. If you’re allergic to nuts, you can substitute them for a mixture of sunflower seeds and dried coconut.
Dried dates, although fresh medjool dates will work. If you use the latter, you may need to add fewer dates (soaked dried dates have a lot of moisture). If you can’t have dates, you may use a liquid sweetener such as maple syrup. However, I’d recommend adding only 60g and increasing the amount if needed.
Raw cashews are the best nut for the cheesecake filling as they are soft and break down easily. Alternatively, you may use blanched almonds (try soaking them for a little longer) or even macadamia nuts. If you’re allergic to nuts, sunflower seeds will work but they have a very earthy flavor so you may need to balance it out with other ingredients.
Cacao butter which helps the filling set and adds a white chocolate flavor. Alternatively, you may use store-bought vegan white chocolate or coconut oil (they’re slightly less firm than cacao butter but your cheesecake will still set).
Maple syrup. However, any liquid sweetener such as agave nectar or rice malt syrup will work. You can even use granulated sugar!
The full list of ingredient quantities and instructions are in the recipe card at the bottom of this post.
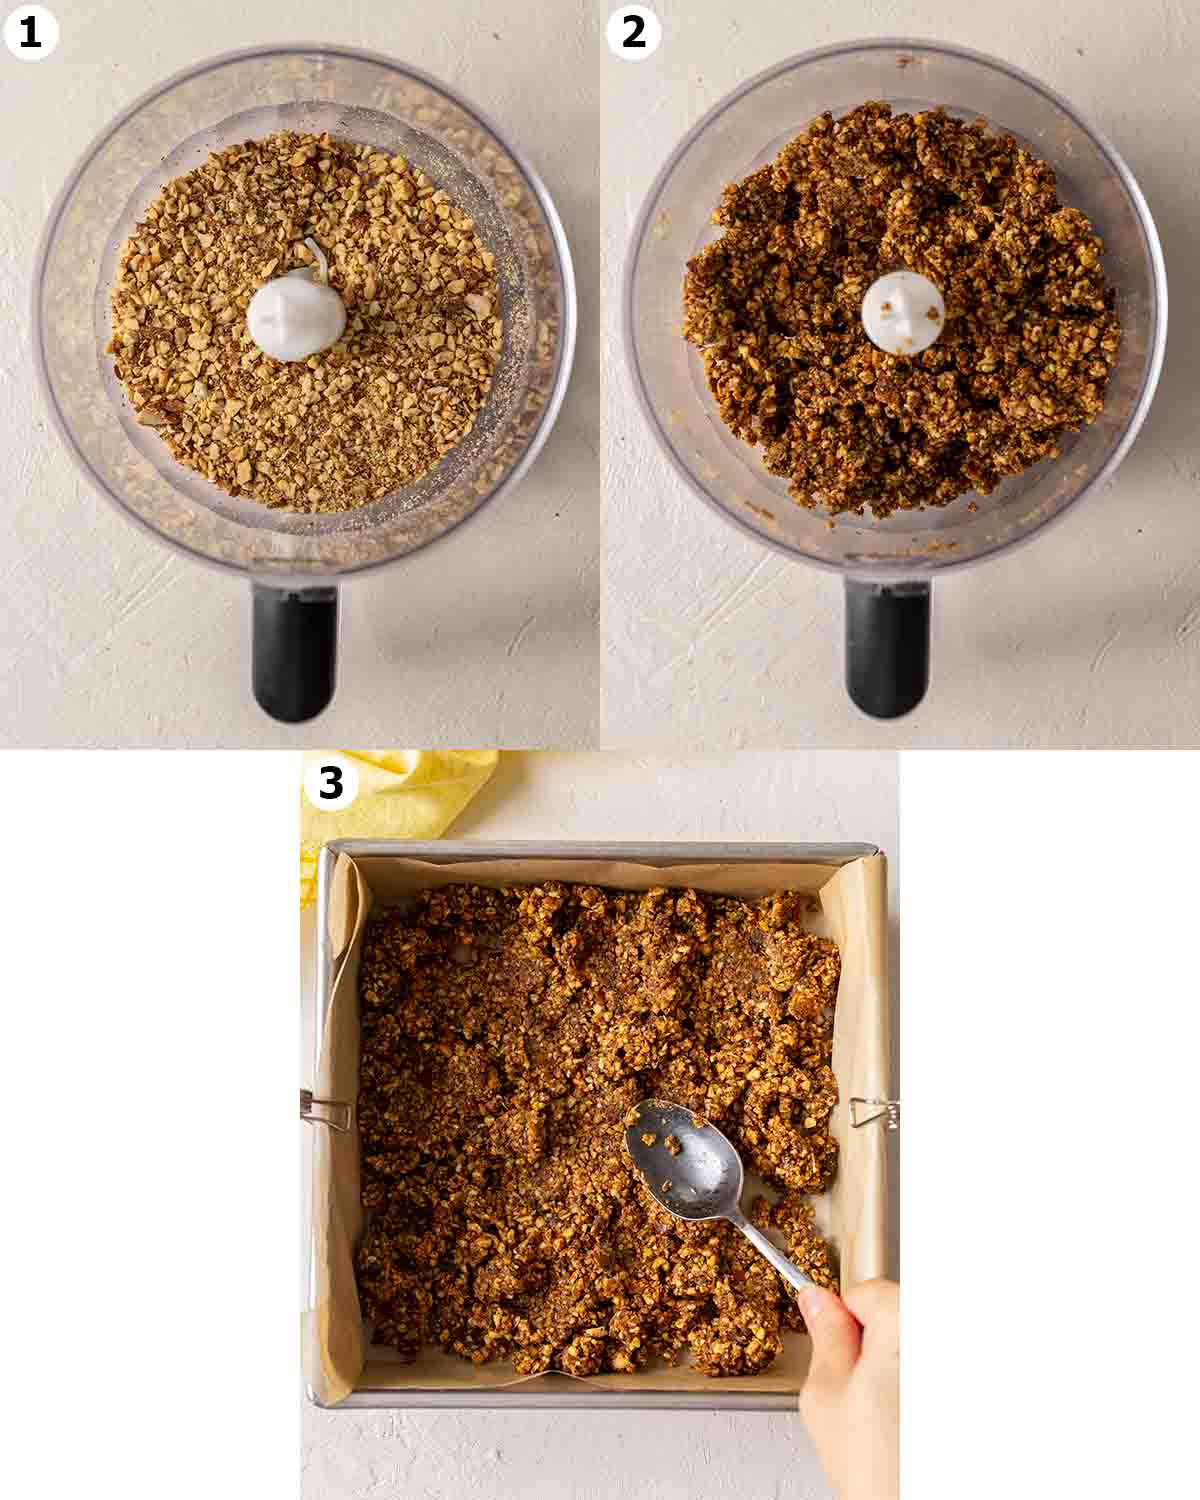
Preparing the base for the vegan mango bars
Nut-date bases are really easy to prepare if you have a food processor or blender! First, process your almonds into coarse crumbs. I like leaving them coarse for a little texture.
Next, add your drained dates and process again. The mixture should be a little tacky. If you grab some of the mixture and pinch it, it shouldn’t crumble.
Then press the mixture in your lined baking pan. You may use your fingers, a spoon or the flat side of a measuring cup. It’s a small tin so it won’t take much effort/time to press!
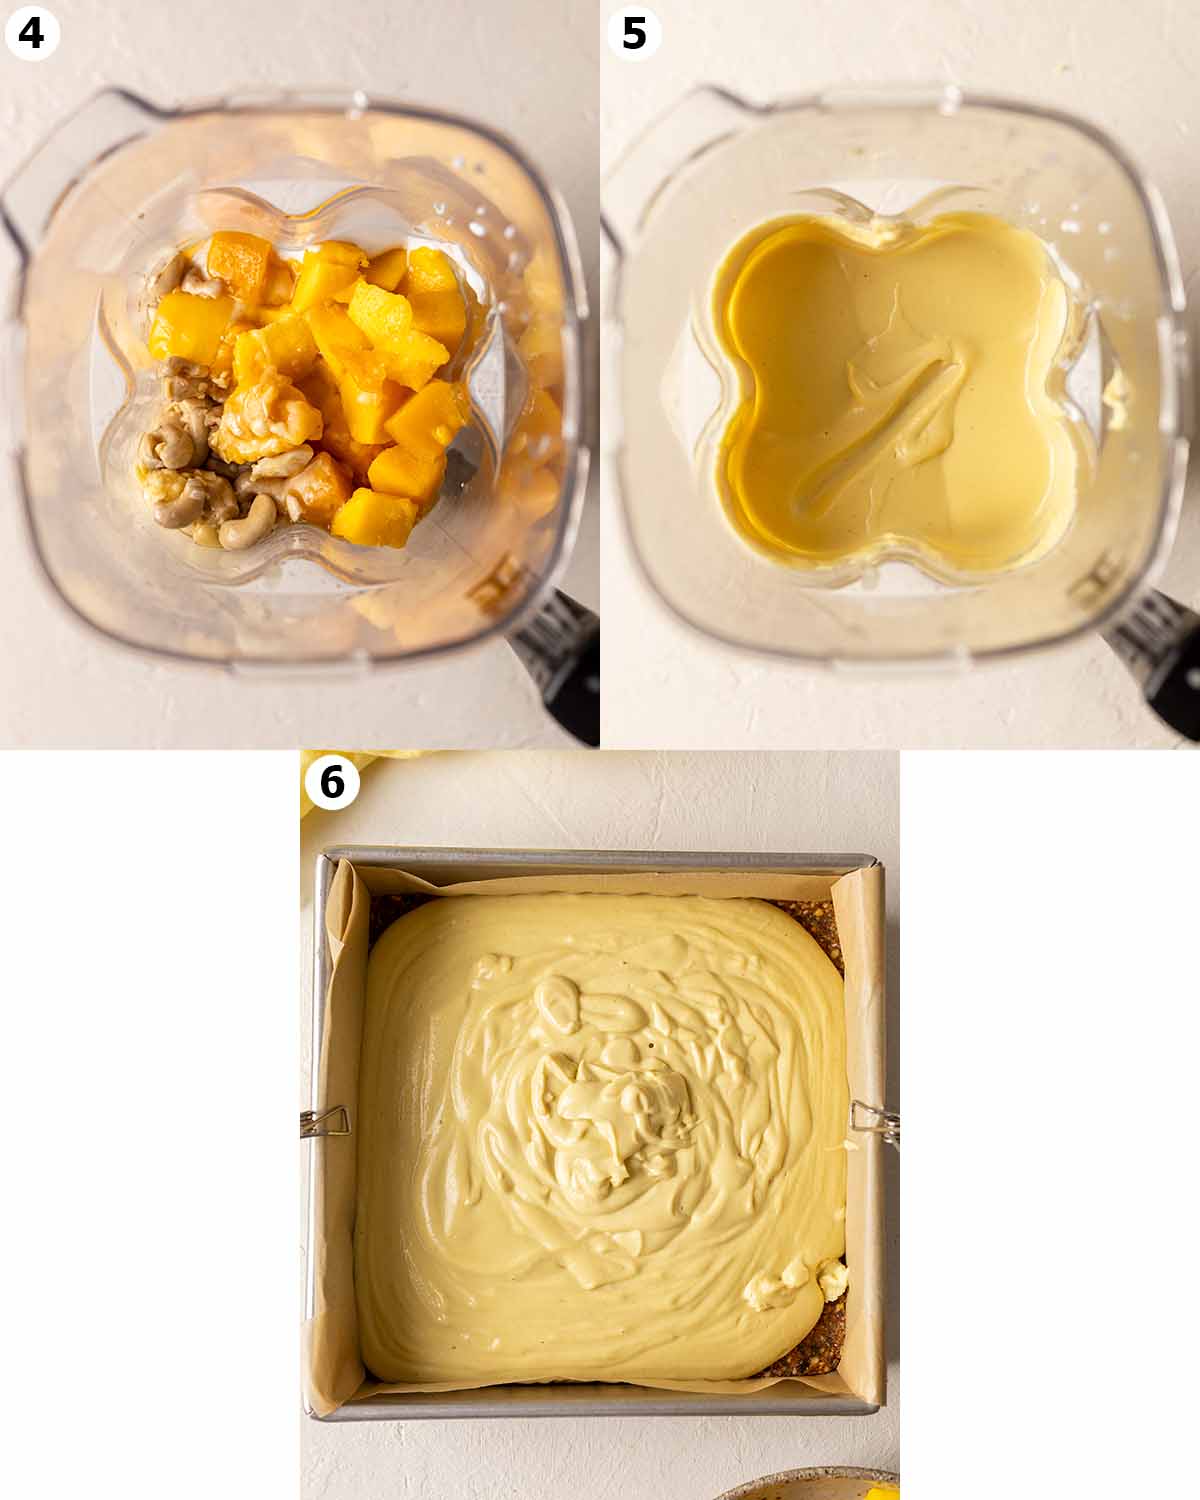
Preparing the cheesecake filling
The vegan mango cheesecake filling is also very easy to prepare! Simply add all ingredients to a high-powered blender and blend until as smooth as possible. It will start off as a very thick mixture but will become runnier over time.
I’d recommend taste testing the final mixture and adjusting it to taste as you may prefer a little more sweetness or acidity. However, try to not add too much many liquid ingredients as it’ll make the filling runnier.
The final mixture should be:
- creamy
- have a slight white chocolate flavor from the cacao butter
- mildly sweet from a small amount of maple syrup and mango
- slightly tangy from the yogurt and lemon juice or passionfruit.
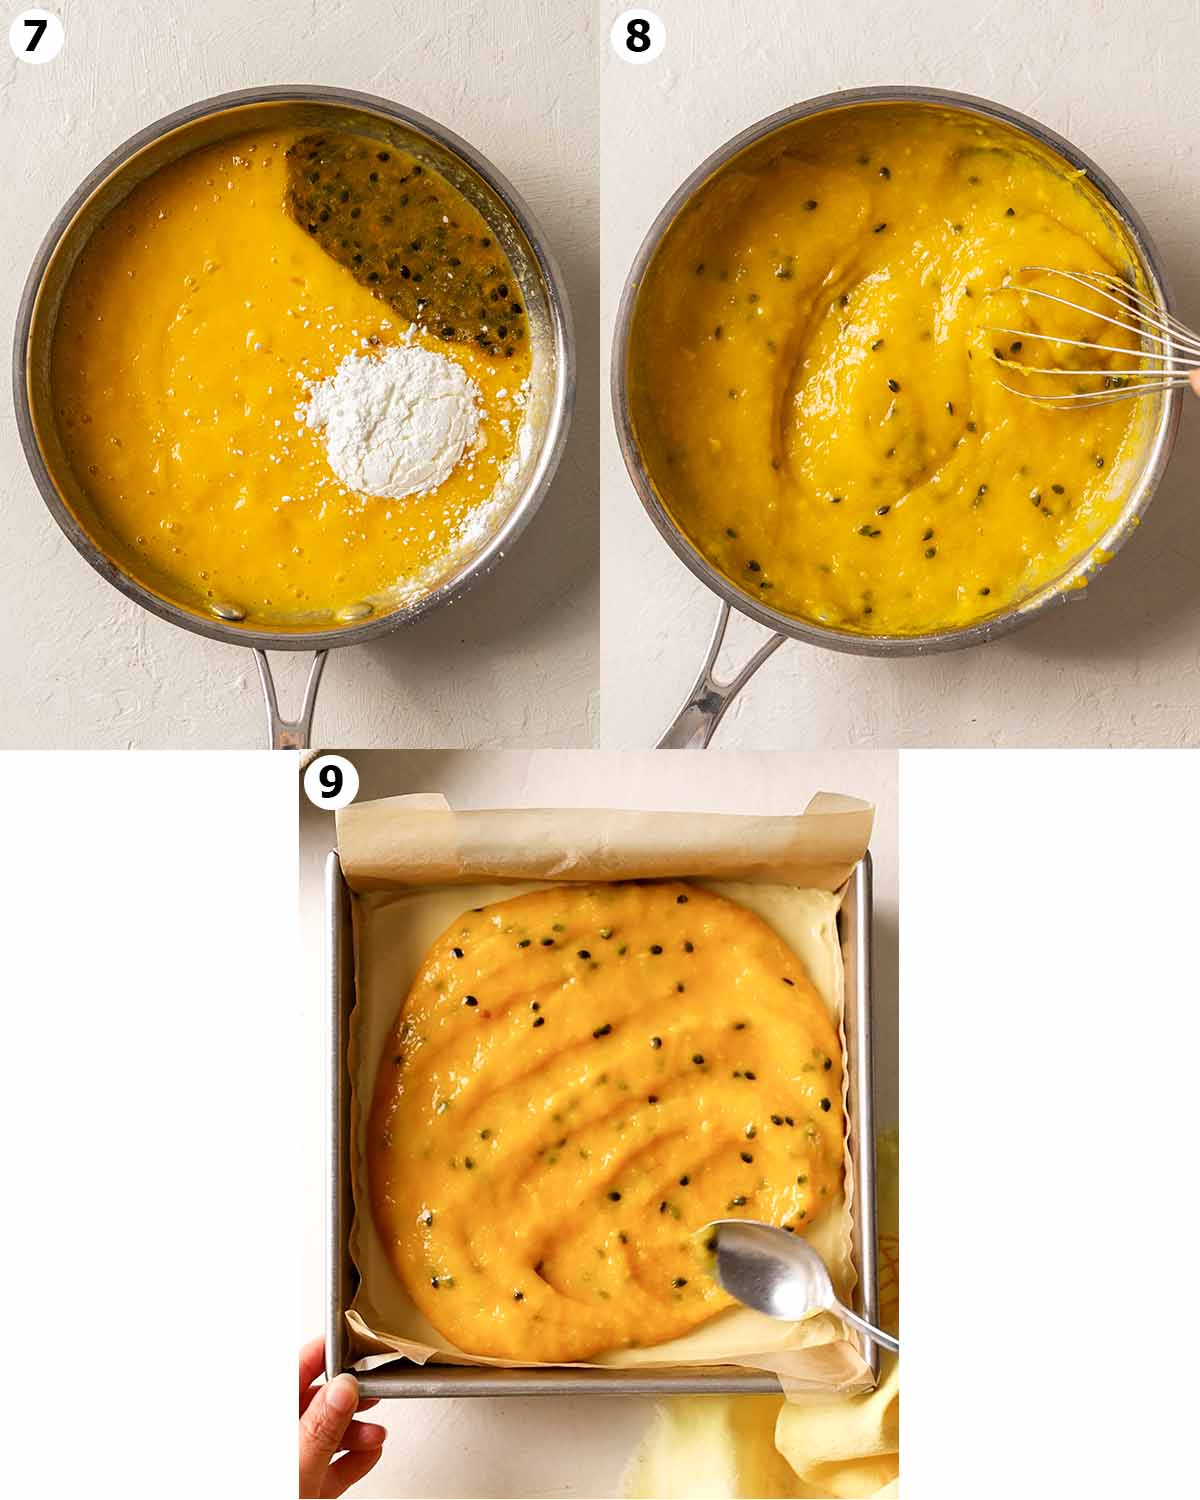
Preparing the fruity mango curd topping
The topping is super easy to make and doesn’t require any uncommon ingredients such as agar agar powder (vegan gelatine)!
To make the mango curd topping, simply mix the mango puree and passionfruit and cornstarch in a small saucepan and cook it over medium heat.
If you prefer to keep this recipe ‘no-cook’, you can skip the cornstarch and mix the fruit puree with a little melted cacao butter or coconut oil. The mixture can be used as-is.
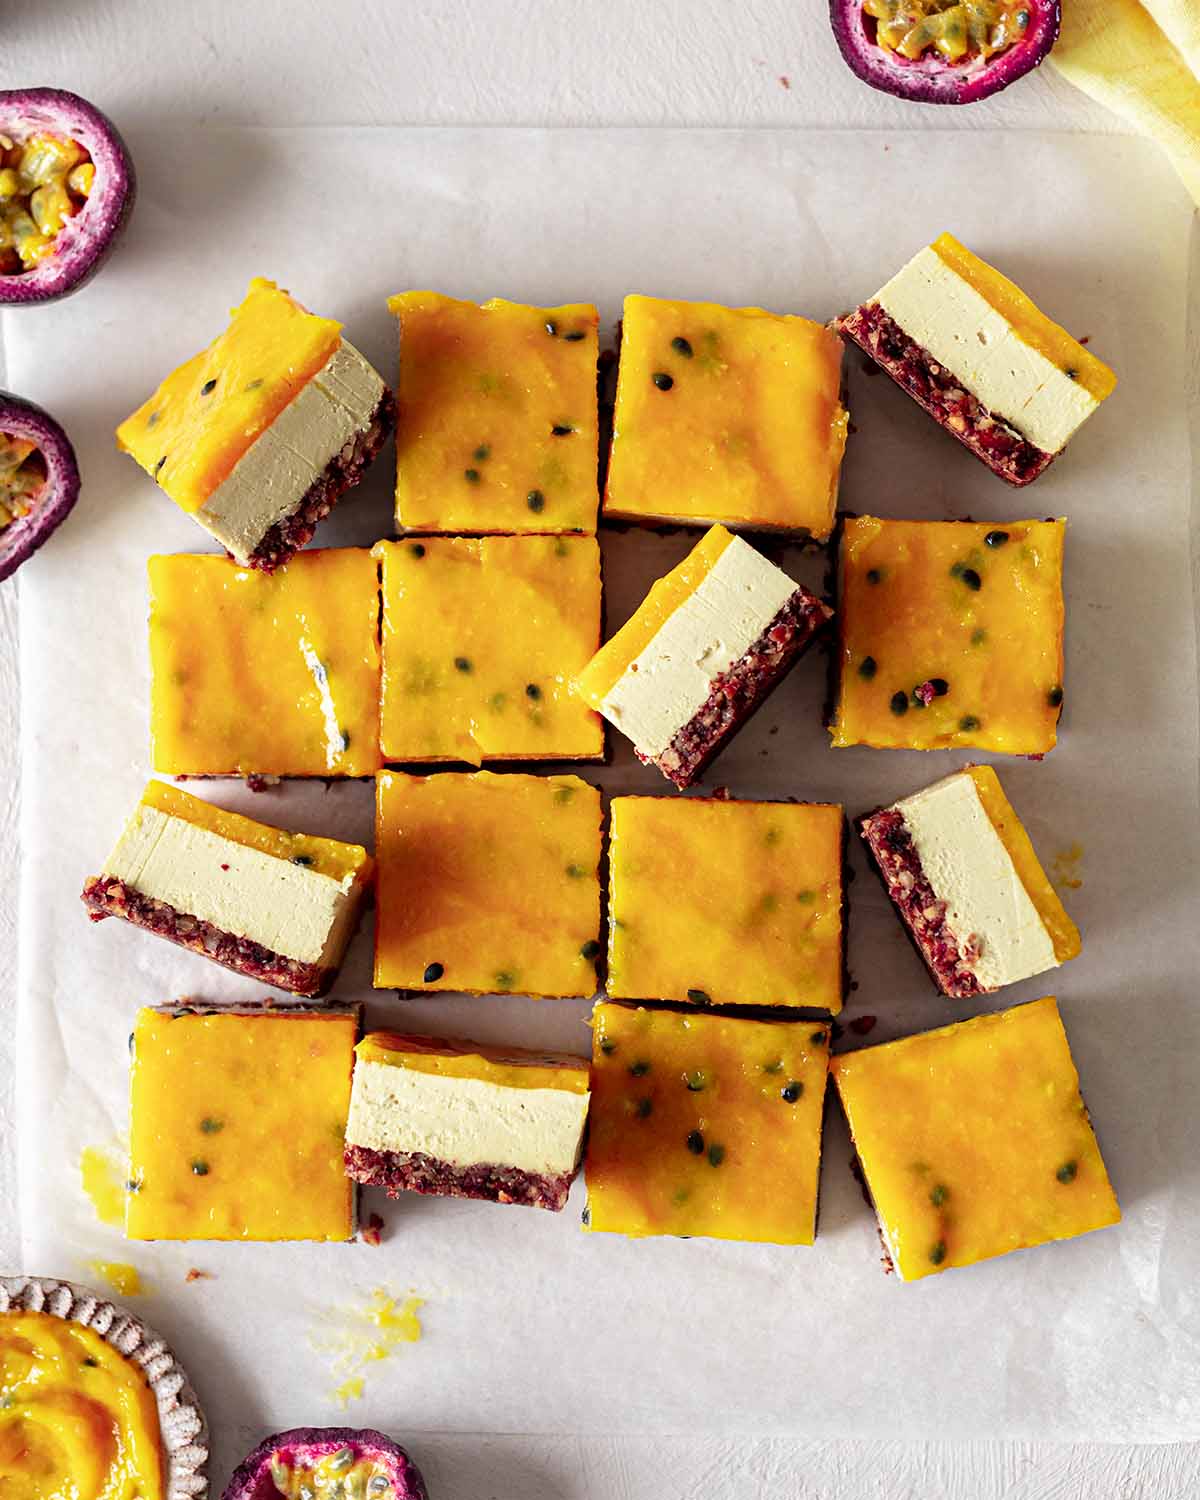
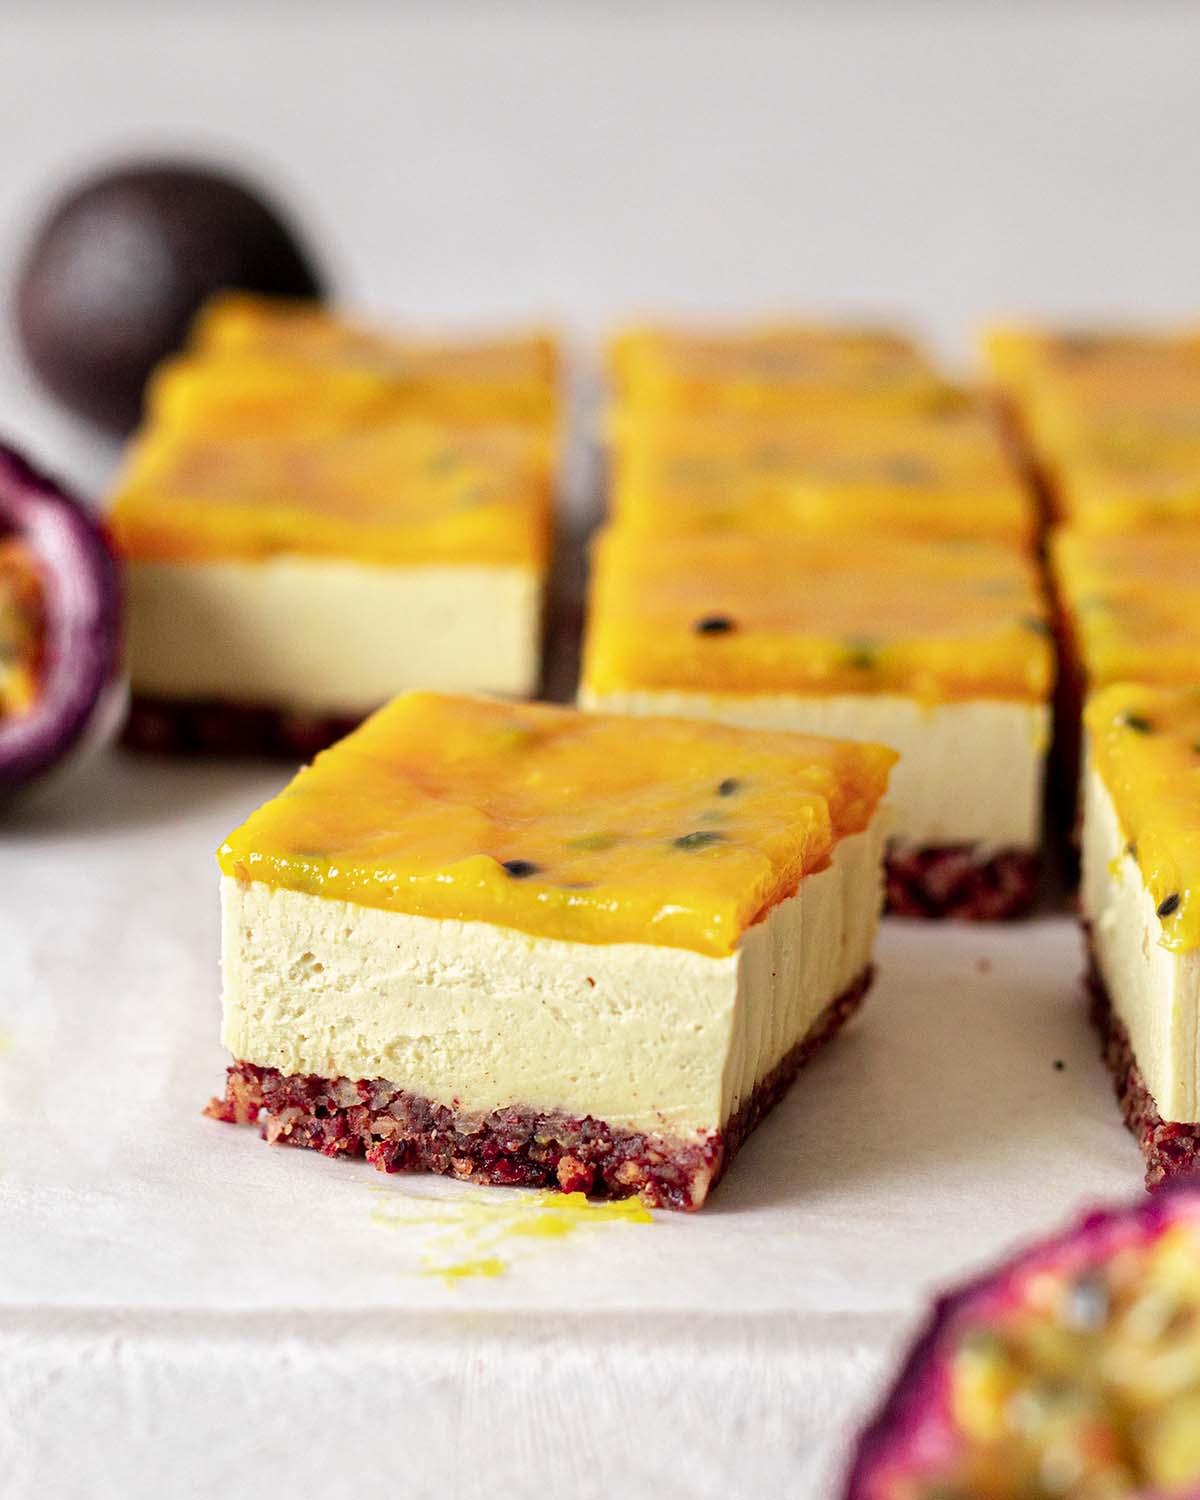
Slicing and serving the cheesecake bars
For extra neat bars, I’d recommend storing the cheesecake in the fridge and slicing them with a sharp knife while they are still chilled. If, for some reason, your bars are sticking to your knife, try running your knife under hot water, and cutting the bars while the knife is still warm.
The vegan mango cheesecake bars keep well in the fridge (without collapsing) and can be kept at room temperature for 1-2 hours, depending on the temperature!
Expert tips
Yes, I’d recommend combining 120g (4 oz) graham cracker crumbs, 55g melted vegan butter or coconut oil and 50g granulated sugar. You can leave the crust unbaked (for a soft crust) or bake it in the oven for 10 minutes at 180°C (355°F).
Alternatively, you can use 170g plain sweet vegan cookies and 55g melted butter or coconut oil.
You may be able to substitute the yogurt and cacao butter with equal amounts of vegan cream cheese but I’m not 100% sure as I haven’t tested it. Alternatively, I’d recommend my baked vegan mango cheesecake recipe.
Yes, I’d recommend using an 8-inch (20cm) cake pan! I’d strongly recommend using use a lose-bottom pan or springform pan otherwise it may be difficult to remove your cheesecake.
More Summery vegan desserts


Follow Rainbow Nourishments on Instagram, Facebook, TikTok and Pinterest, and subscribe via email to receive all of our latest recipes!

Mango and Passionfruit Bars
Ingredients
Base
- 1 cup (160g) roasted or raw almonds, hazelnuts, or any other nut/seed
- ½ cup (100g) pitted dates, soaked in boiling water for 10 minutes (note 1)
Creamy Mango Filling
- 2 cups (260g) raw cashews, soaked in boiling water for 10 minutes
- 150g frozen or fresh mango chunks, (approx 1 1/2 medium-size mangoes)
- ¾ cup (170g) thick dairy-free yogurt, unsweetened
- ⅓ cup (115g) maple syrup, or to taste (note 2)
- ⅓ cup (75g) melted cacao butter, or 115g melted vegan white chocolate (note 3)
- ¼ cup (60g) lemon juice, lime juice or passionfruit pulp (note 4)
- 1 teaspoon vanilla extract, optional
- Pinch of salt
Fruity Topping
- 200g frozen or fresh mango chunks, (approx 2 medium-size mangoes)
- 1 ½ tablespoons (14g) cornstarch / corn flour
- ~1/4 cup (65g) passionfruit pulp, (approx 2 medium-size passionfruit)
- 2 tablespoons (30g) lemon juice, or lime juice, optional
Instructions
- Line an 8-inch (20cm) square cake pan or container with parchment paper overhanging the sides (this will make it easier to remove the cheesecake).
To make the base:
- Add the nuts to a food processor and process until it forms coarse crumbs.
- Drain the dates and discard the water. Add the dates to the food processor and process until the dates have completely broken down and the mixture is just combined. The mixture should stick together if you pinch it between two fingers.
- Scoop the base mixture into your cake pan. Use a spoon or flat measuring cup to firmly press the mixture to form a base.
To prepare the filling:
- Drain the cashews and discard the soaking liquid.
- Add the cashews and rest of the ingredients to a high-speed blender. Blend until the mixture is as smooth as possible and forms a thick cream. Add more sweetener or acidity to the mixture, if needed.
- Pour the filling over the base and smooth the surface with a spoon or spatula. Cover the cake pan and set it aside in the fridge to set for at least 4 hours.
To make the fruity topping:
- Puree the mango using a stand blender or hand blender (note 5).
- Add the mango puree, passionfruit and cornstarch to a small saucepan. Bring the mixture to medium heat and whisk continuously until thickened. Remove from the heat.
- When the bars have set, spread the mango topping on top. Set it aside in the fridge for at least 30 minutes to set further.
- Remove the bars from the tin/container. Use a sharp knife to cut into servings. Enjoy immediately or store in an airtight container in the fridge for up to 5 days (the cheesecake will not 'melt' in the fridge). Alternatively, you can store the bars in the freezer for up to 1 month.
Notes
- Alternatively, you can soak the dates and cashews in room temperature water for 4 hours or overnight.
- This amount of maple syrup creates a mildly sweet bar. If you prefer desserts on the sweeter side, I’d recommend adding more maple syrup, to taste.
- Alternatively, you may use 75g unrefined or refined coconut oil. Coconut oil is a little softer than cacao butter so your bars may be a little softer.
- If you use passionfruit pulp, you may have some seeds in your filling. However, with a high-powered blender, the texture isn’t too noticeable.
- If you only have a stand blender, I’d recommend blending the mango before you make the filling. That way, you’ll do less cleaning up!
This post was originally published in August 2019 and updated in June 2022 with updated pictures.
This post may contain affiliate links. As an Amazon Associate, I may earn a small commission from qualifying purchases at no additional cost to you.

The bars didn’t set for me? Annoying as the Ingredients were expensive. I followed the recipe exactly.
Hi Alison, we are so sorry the bars didn’t set for you, we understand that can be frustrating after buying expensive ingredients. It could be due to the cacao butter you used, or if you used coconut oil or white chocolate, they will be a little softer. The brand of cacao butter I used is linked in the recipe so you can compare to yours. Hope this helps!