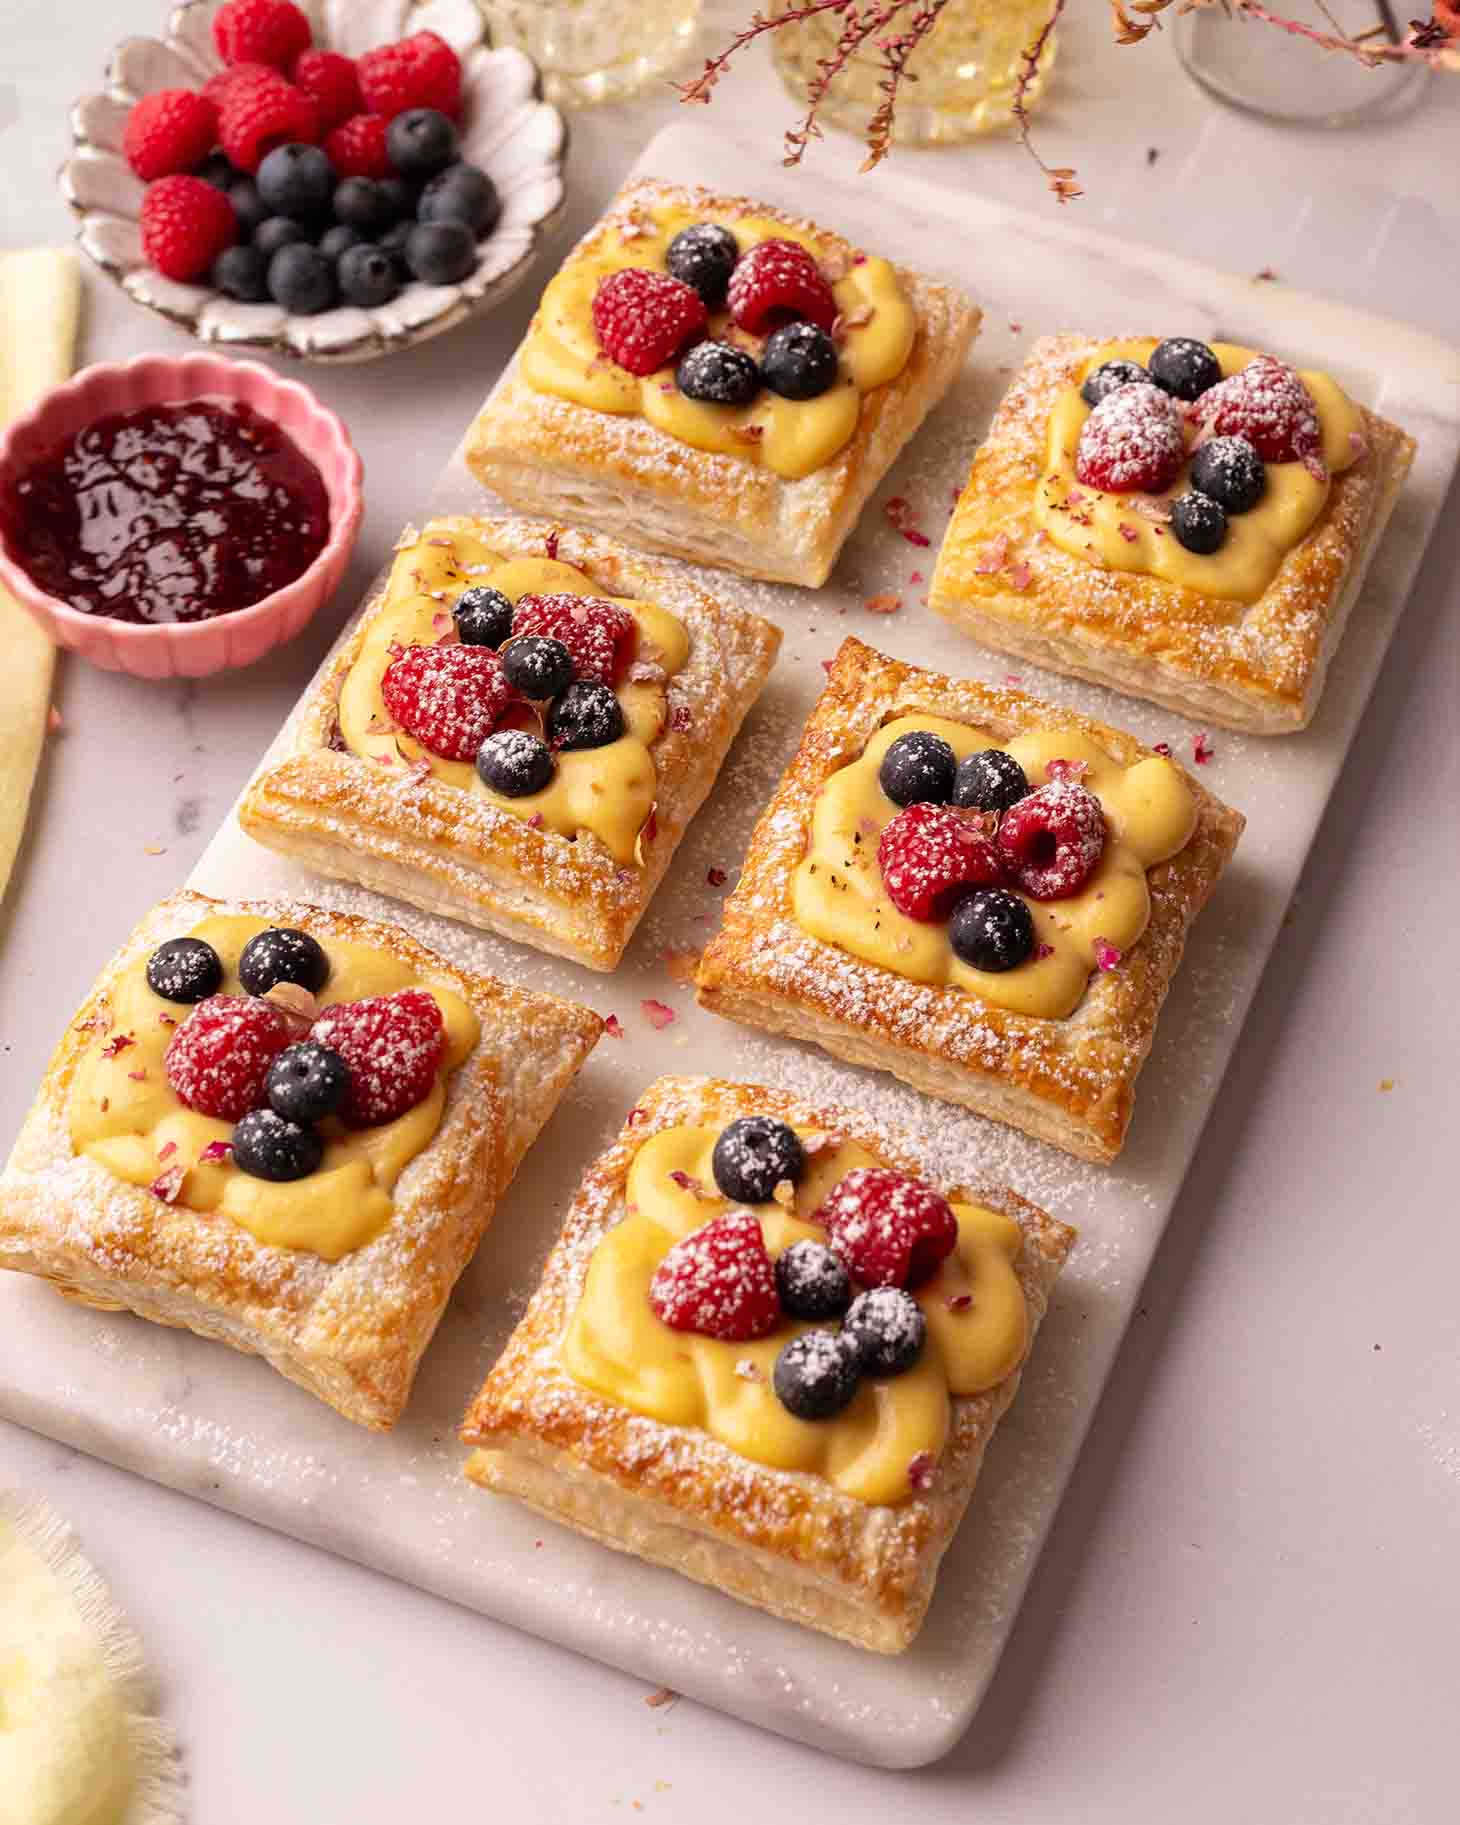
Custard Pastries (vegan & eggless)
These custard pastries combine flaky puff pastry with thick and creamy custard! They’re an easy yet delightful dessert for gatherings or if you just feel like a fancy treat. No eggs, egg yolks or dairy needed!
Ingredients you’ll need
The full list of ingredient quantities and instructions are in the recipe card at the bottom of this post.
Notes about the ingredients
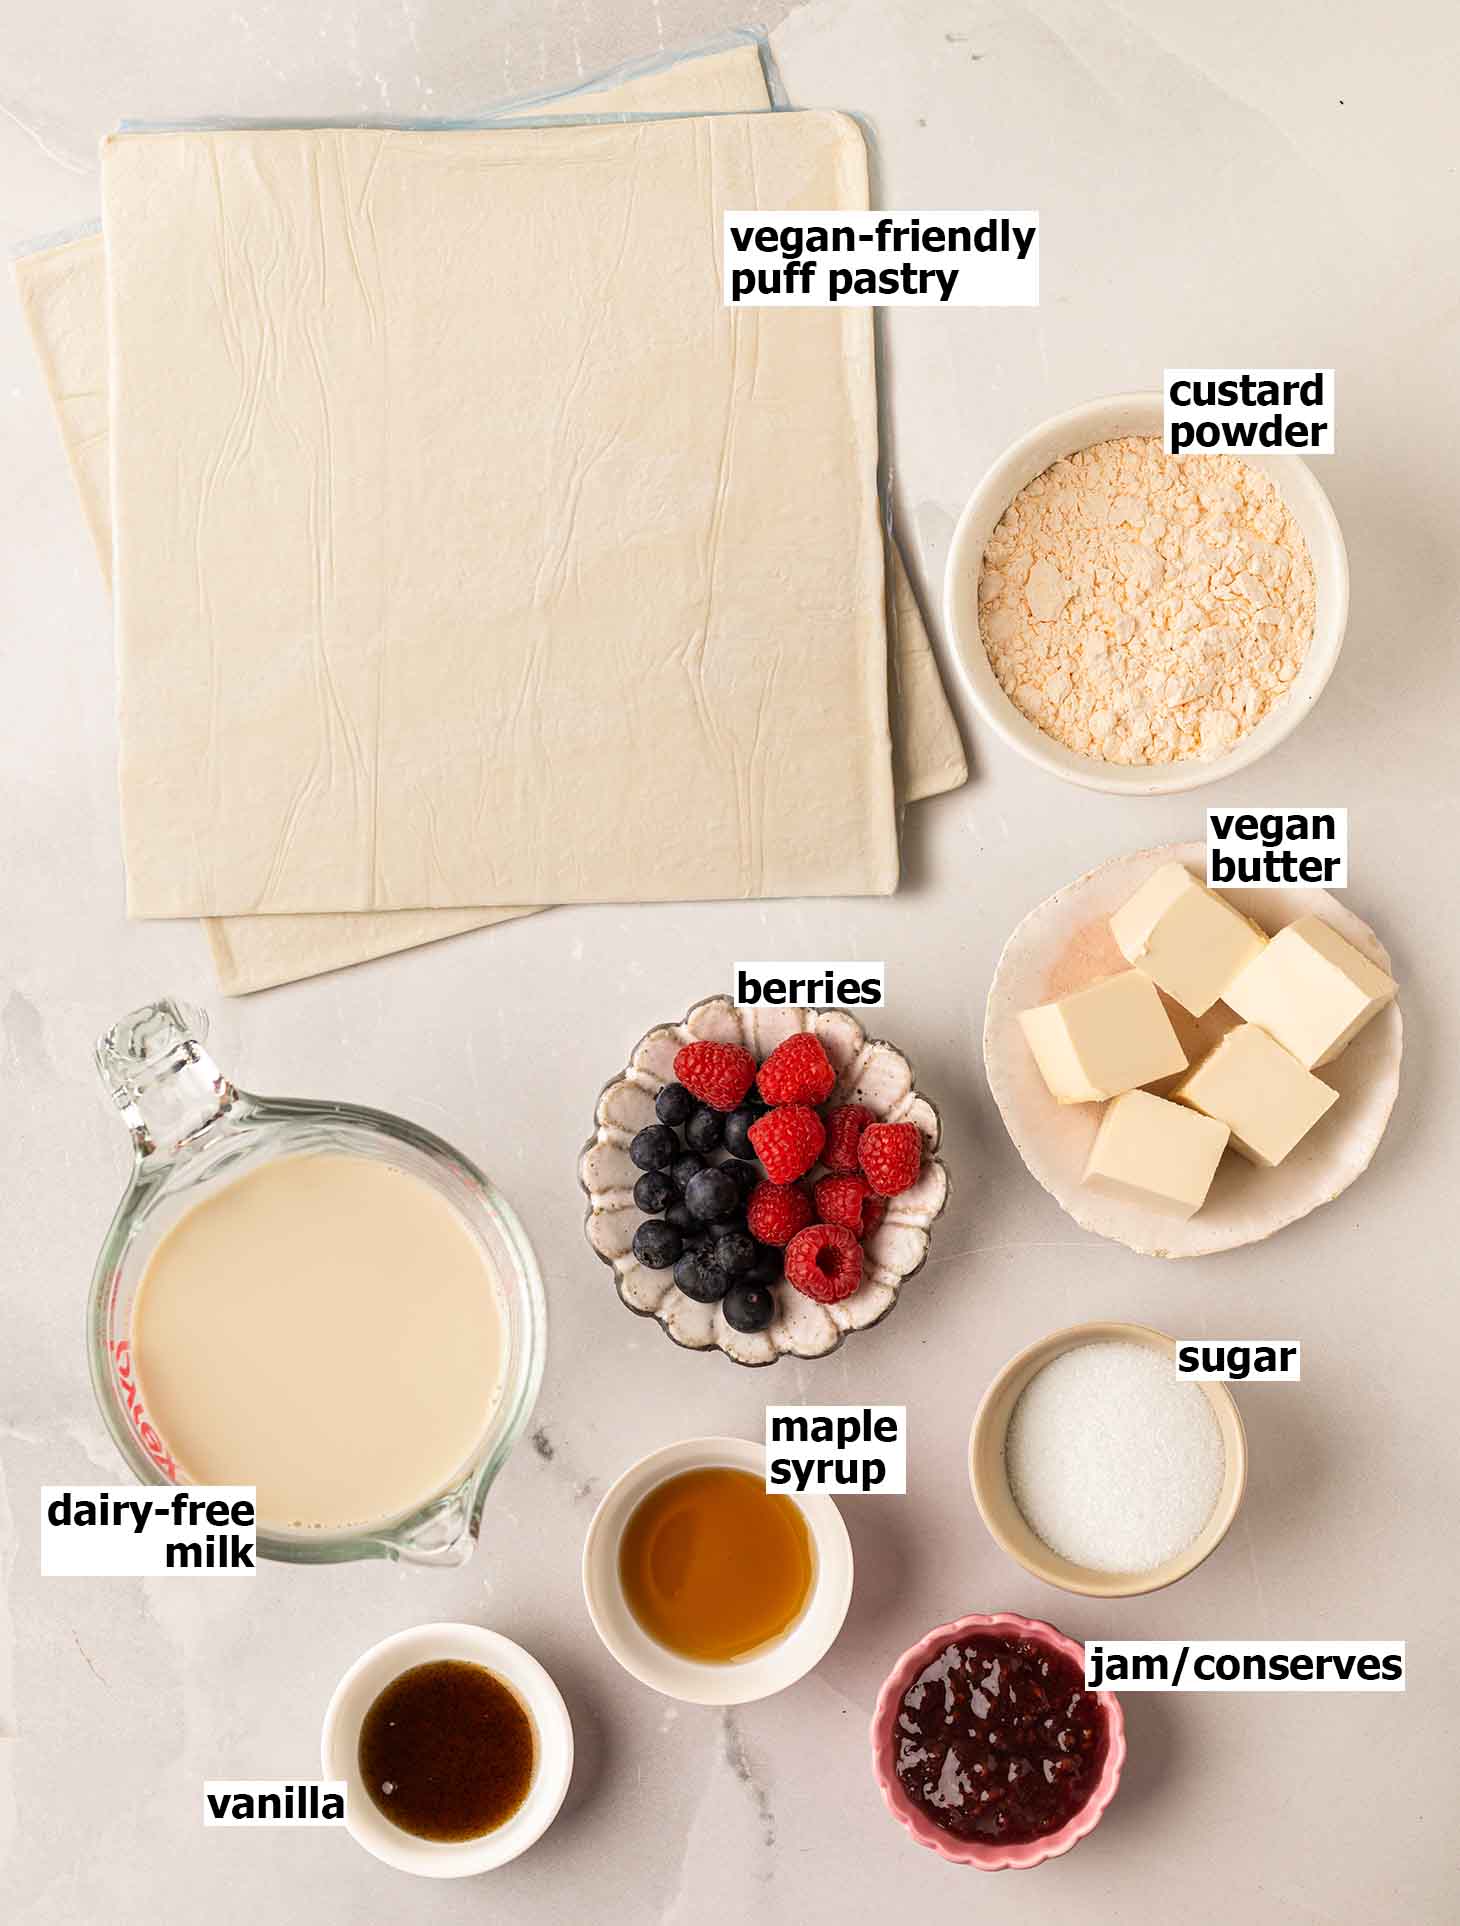
Custard powder for an easy yet flavorful vegan custard. I used Foster Clarks’ custard powder and readers have said Bird’s custard powder works well (both of these brands are egg-free and dairy-free)! If you don’t want to make your own custard, you can use store-bought custard as long as it’s very thick. For alternatives, see the ‘customizing this recipe’ section later in this post.
Store-bought puff pastry sheets. Please use a good-quality puff pastry as it’s half of the recipe!
Dairy-free milk. I prefer using unsweetened soy milk as it’s thick, creamy and full-bodied – this makes a big difference in custard. Alternatively, use any milk that you enjoy or even dairy-free heavy cream!
Vegan block butter adds a rich flavor to the custard. It also makes the custard thicker without extra custard powder or cornstarch.
Maple syrup helps ‘glue’ the 2 puff pastry sheets together. We also brush it on top of the pastry squares so it turns beautifully golden brown in the oven (and it’s tastier than egg wash!)
Prepare the vanilla custard
The custard is easy to make however, it needs at least a few hours to set and thicken – you don’t want it to drip everywhere when you bite into the pastry!
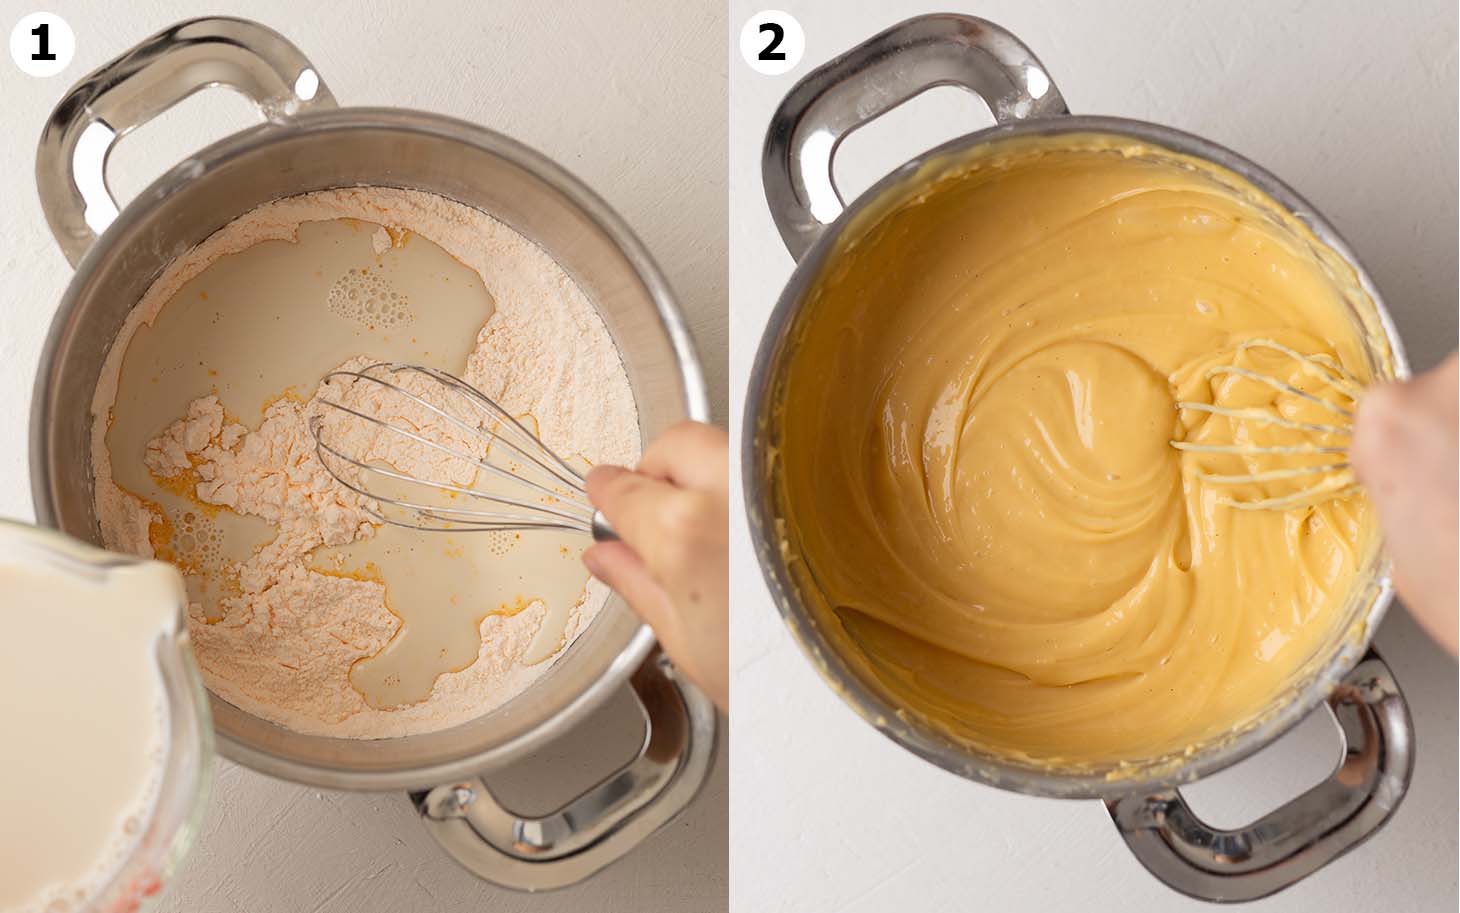
To make the custard, whisk the custard powder, sugar and some of the milk in a large saucepan until smooth. This helps break down the powder so there are no lumps in your final custard! Then, add the remaining milk and mix well.
Place the saucepan over medium-high heat and whisk until the mixture thickens significantly. It’s ok if the mixture bubbles!
Remove from the heat and stir in the cold butter and vanilla. We’re using cold butter to help cool down the custard quicker (an easy time-saving hack)! If your custard is lumpy, press it through a fine-mesh sieve and a lot of arm power 🙂
Allow the custard to cool slightly, transfer it to an airtight glass container or bowl and chill in the fridge for at least 2-4 hours.
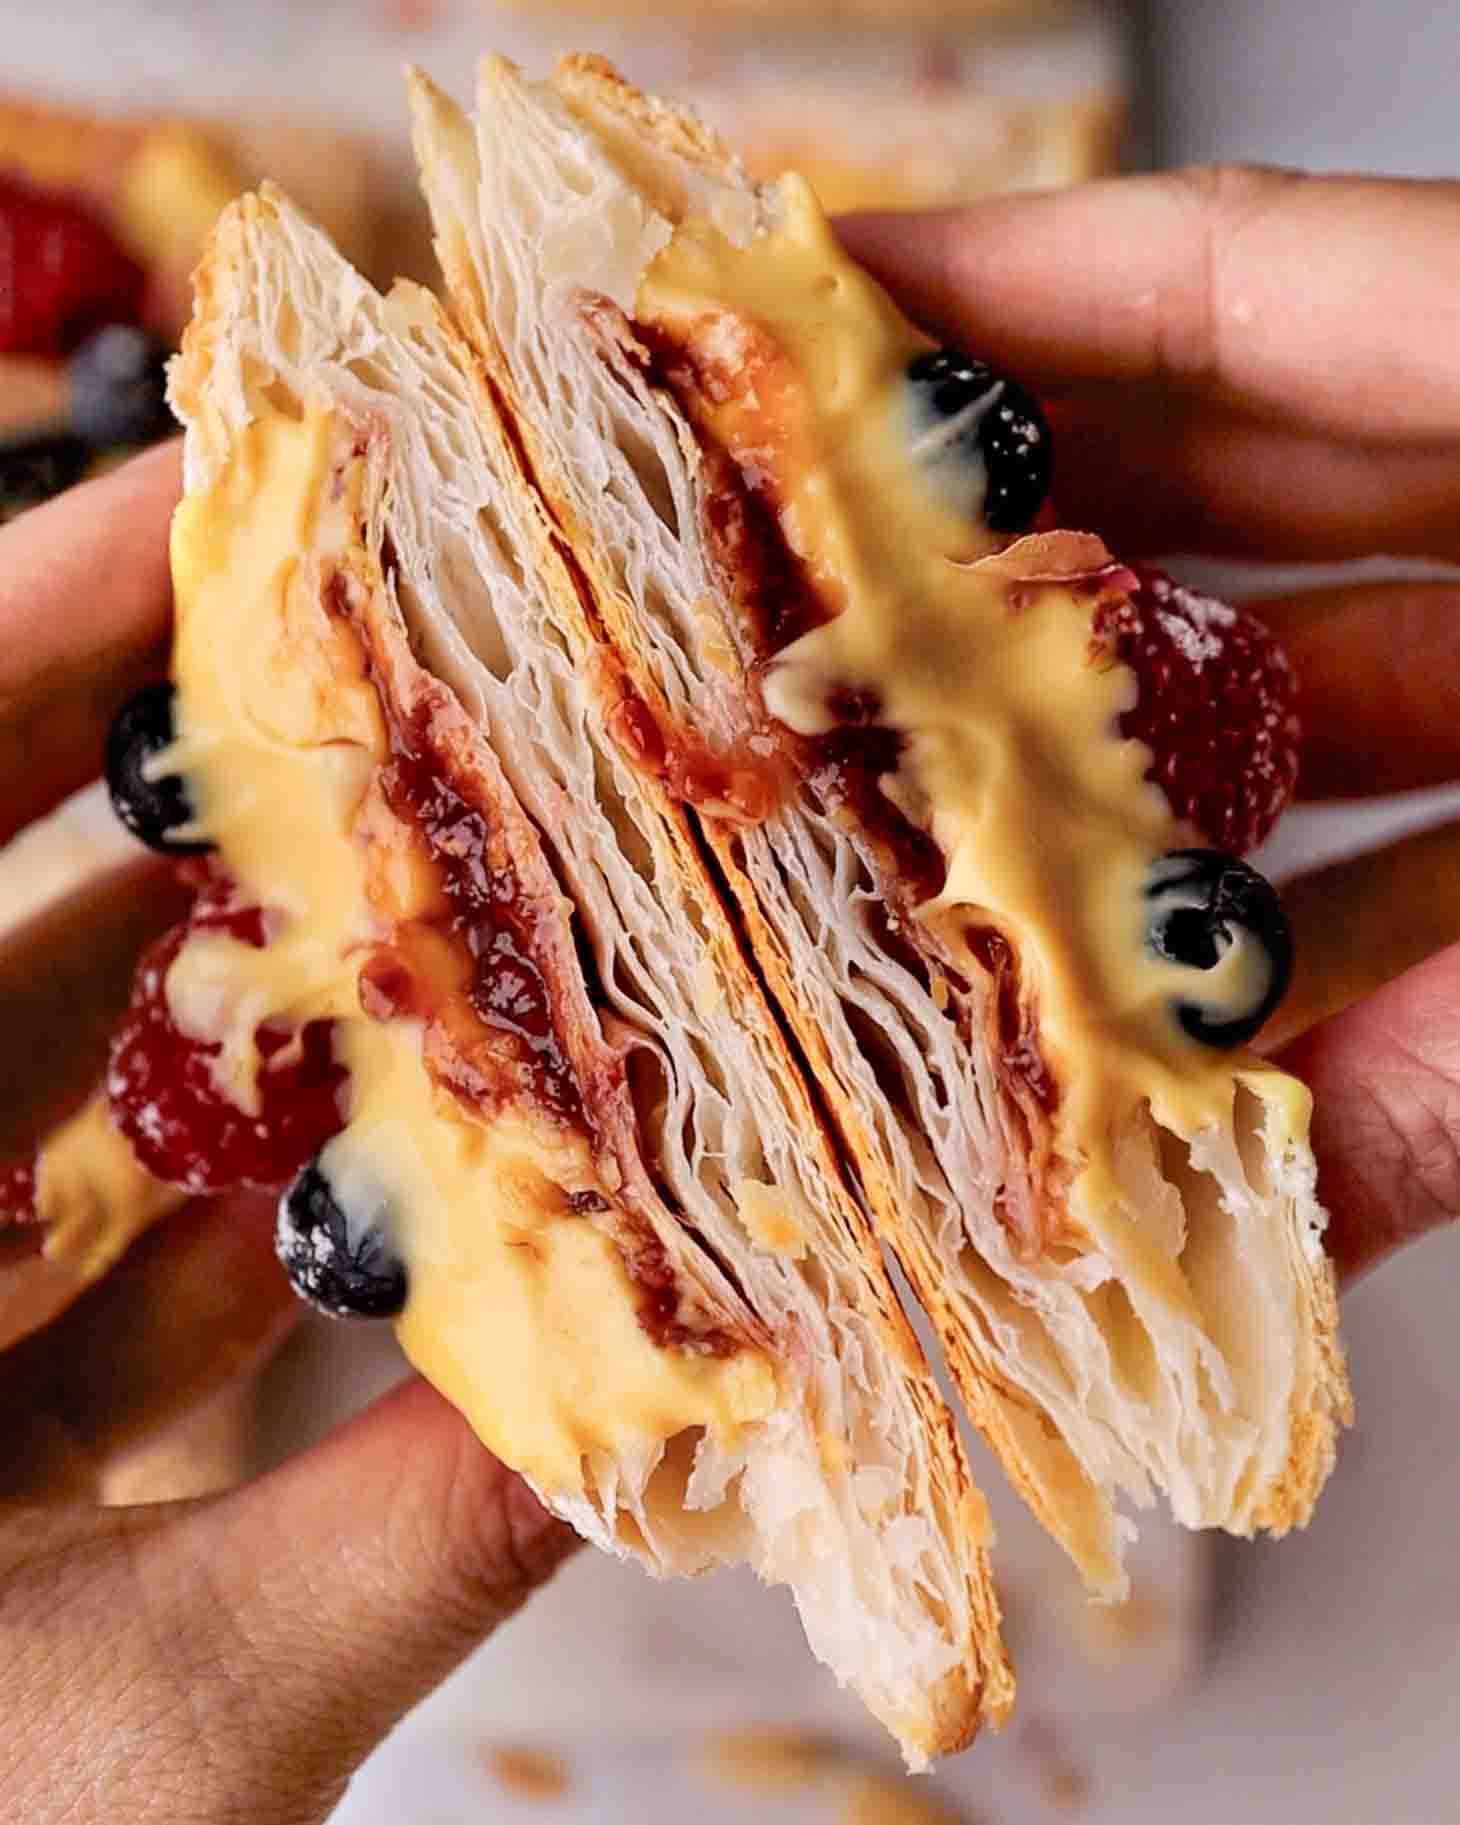
The custard will firm up significantly and have the consistency of pudding or a vanilla slice. To fix this, whisk the custard vigorously or blend it with a hand blender until it’s smooth again – I need to do this most of the time. These pastries need a very thick custard so it doesn’t drip away when you bite into them!
Prepare the puff pastry
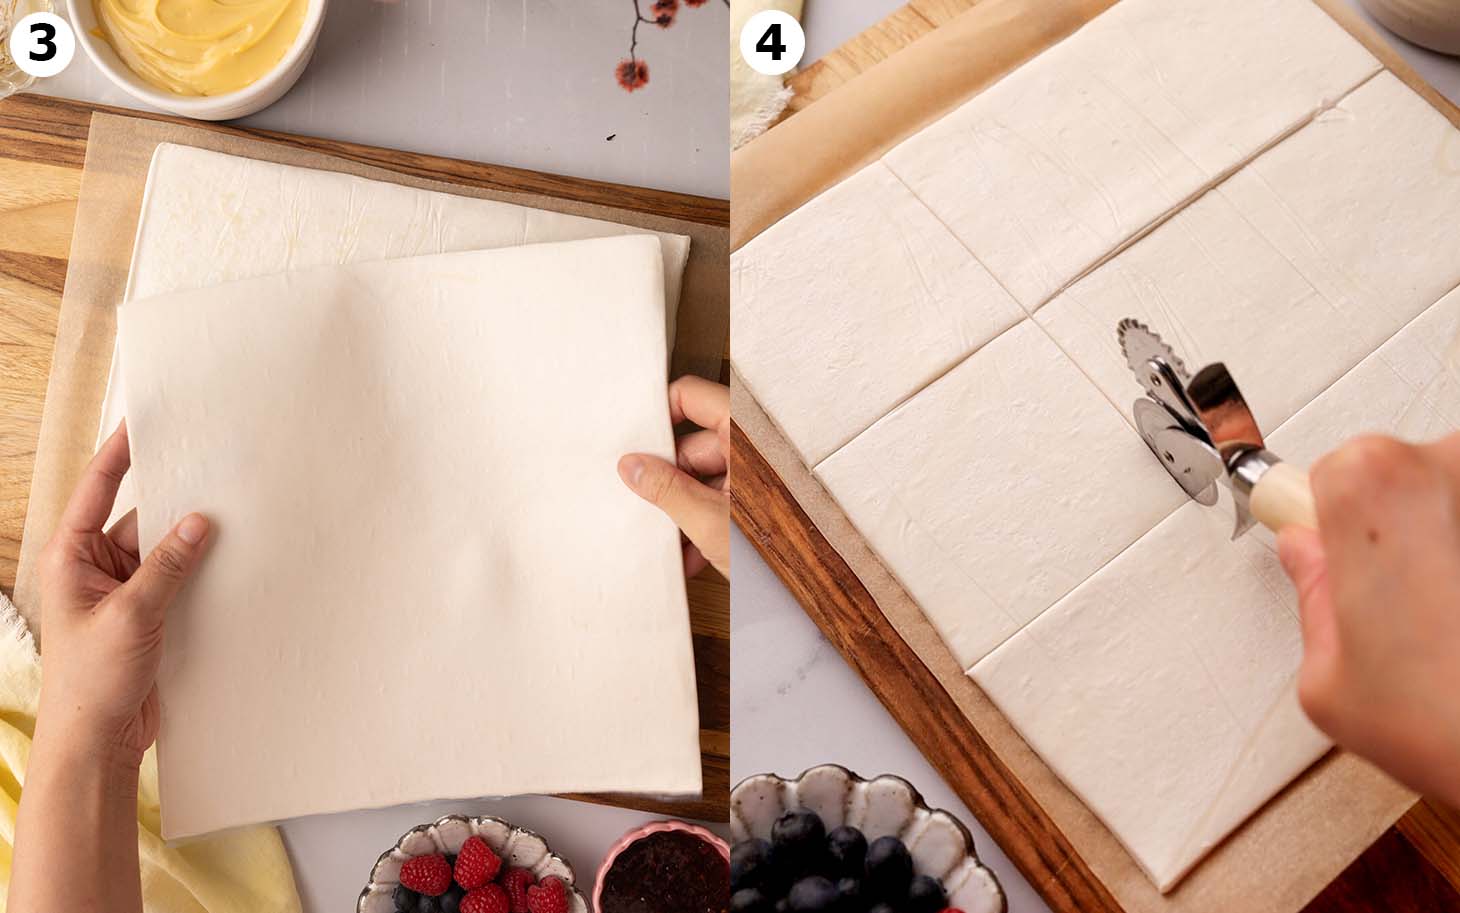
Place a puff pastry sheet on a clean work surface and brush it lightly with maple syrup. Place the second sheet of puff pastry on top and firmly press them together. We’re using 2 layers of puff pastry sheets because they make taller squares which means more custard filling and more flakiness!
Next, use a sharp knife or pastry cutter to cut the pastry into 9 squares (or rectangles) then arrange them on a lined baking tray.
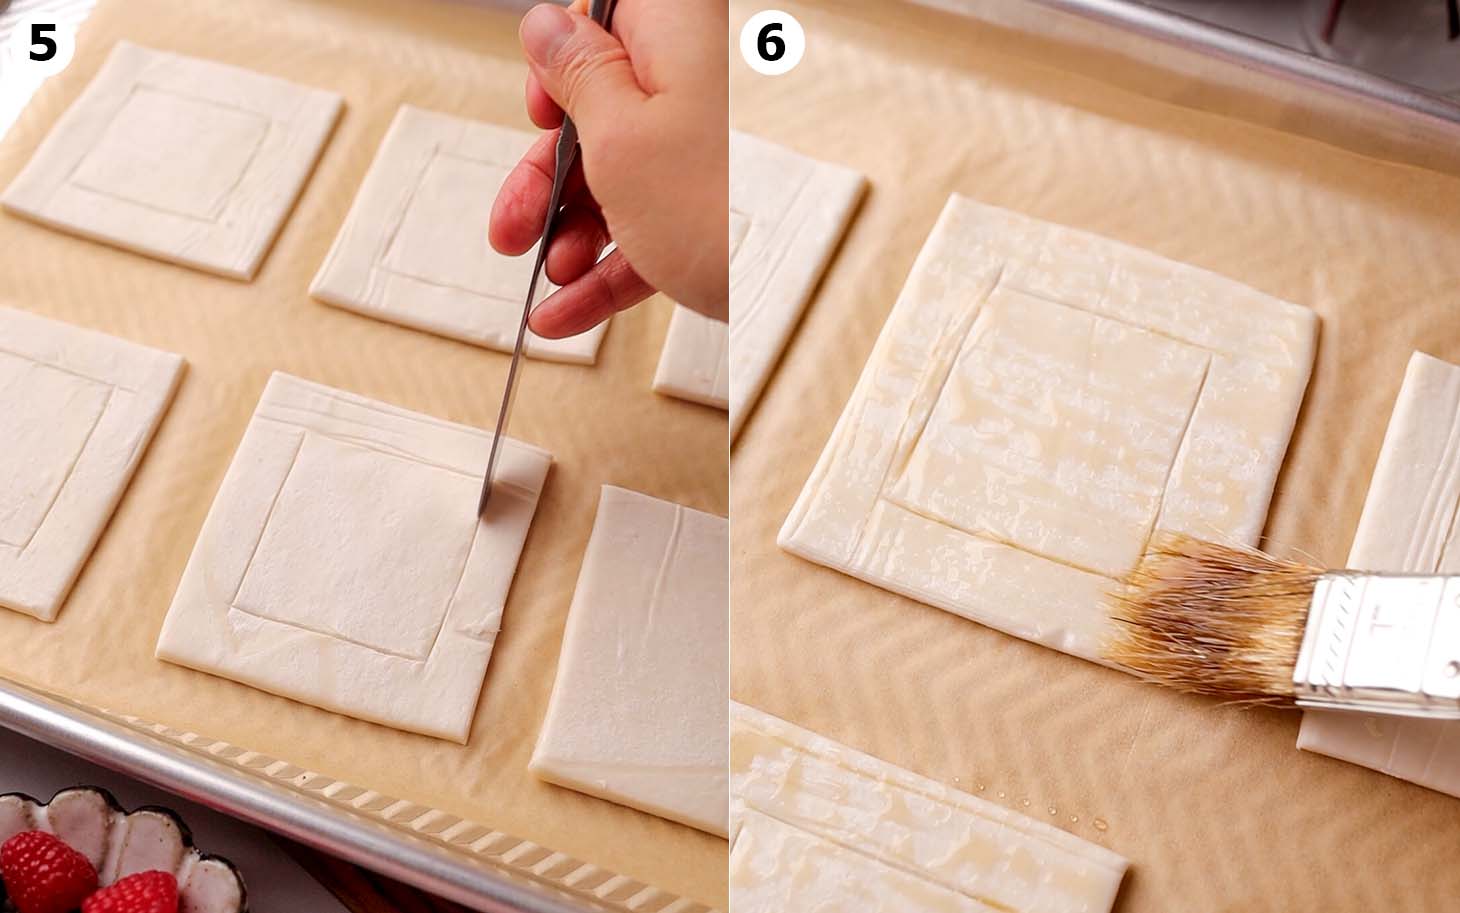
Use a small knife to ‘score’ a smaller square in each pastry piece. Finally, lightly brush the surface with more maple syrup then bake the pastries in a very hot preheated oven.
My top tips for crispy pastry and the flakiest layers:
- Don’t completely soak the pastries in maple syrup as this will weigh them down
- Make sure your oven is hot – the pastries puff up less in a cooler oven
Once the pastries have cooled down, use a small serrated knife to cut along the scored lines and gently press down the middle rectangles.
You can prepare the pastries 1-2 days in advance and store them in an airtight container until you need them.

Assemble the custard pastries
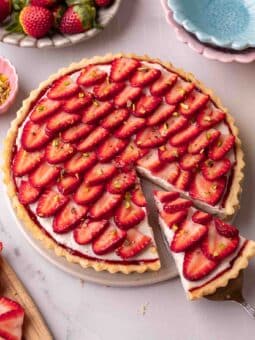
If desired, spread some raspberry or strawberry jam in the middle of the puff pastries. The jam adds a fun burst of flavor and complements the custard perfectly!
Then, use a piping bag or spoon the custard into your pastry squares. Top with fresh berries and powdered sugar and serve! You can also sprinkle the pastries with rose petals, pistachios, toasted almonds or anything similar.
Making these pastries ahead of time
You can make the puff pastries 1-2 days in advance and store them in an airtight container at room temperature. The custard also keeps very well in the fridge for up to 2 days, though you’ll need to mix it before using.
These delicious treats are best assembled 1-2 hours before serving because puff pastry softens once it touches any wet ingredients. After a few hours, the puff pastry will be more soft and chewy rather than crispy.

Customizing this recipe
Custard powder is essentially cornstarch, sugar, vanilla and flavorings. You’re welcome to experiment with ratios to create something that’s to your tastes!
Yes, dairy-free whipped cream or a cheesecake-style filling from my strawberry tart would be lovely!
I haven’t tested these combinations, but here are some possible twists:
– Replace some of the milk with lemon juice for a citrus twist. Don’t forget the lemon zest too!
– Replace some of the butter with chocolate for a chocolate custard! Your custard will be thicker.
More pastry recipes


Follow Rainbow Nourishments on Instagram, Facebook, TikTok and Pinterest, and subscribe via email to receive all of our latest recipes!

Custard Pastries (vegan & eggless)
Ingredients
Custard (or use a thick store-bought custard, note 2)
- ½ cup (60g) custard powder
- ¼ cup (50g) sugar
- 1 ½ cups (360g) dairy-free milk
- ⅓ cup (75g) vegan block or spreadable butter, chilled
- 2 teaspoons vanilla extract, or vanilla bean paste
- ⅛ teaspoon salt, if using unsalted butter
Pastry
- 2 sheets frozen puff pastry, defrosted but cold
- 1 tablespoon (20g) maple syrup, for brushing as needed
To decorate (or as desired)
- ⅓ cup (115g) raspberry jam or preserves, or jam of choice (optional)
- fresh berries, such as raspberries and blueberries, or fresh fruit of choice
- powdered sugar, and dried rose petals (optional)
Instructions
Prepare the custard:
- In a large saucepan, whisk the custard powder and the sugar until combined. Pour in around half of the milk and whisk until smooth. Add the rest of the milk and mix well.
- Over medium-high heat, cook the mixture while whisking constantly. The mixture should thicken up a lot.
- Remove the custard mixture from the heat and stir in the butter and vanilla until smooth. Cool slightly and transfer to a heat-proof container or bowl. Chill in the refrigerator for at least 2 hours to overnight. The mixture will firm up significantly – whisk or blend the custard until it's runny and smooth again.
Prepare the puff pastries:
- Preheat oven to 200°C (390°F) and line 1-2 baking trays with parchment paper.
- Lightly brush one sheet of puff pastry with maple syrup and place the other sheet on top. Cut the pastry into squares (or rectangles) with a sharp knife or pastry cutter.
- Arrange the pastry squares on your baking trays. Using a small knife, gently score a smaller square inside each square to form a border. Brush the tops with maple syrup.
- Bake the puff pastry squares for 15-20 minutes or until puffed and golden. Cool completely.
- Use a small serrated knife to cut along the scored lines and press down the pastry in the middle.
To assemble (1-2 hours before serving):
- Dollop 1-2 teaspoons of jam in the middle of each pastry and spread to fill the middle. Use a piping bag or small spoon to fill each pastry with the cooled custard. Top with fresh berries, a dusting of powdered sugar and sprinkle with rose petals. Enjoy!
Notes
- Make ahead instructions: The custard and pastry can be made 1-2 days in advance. Make the custard following the recipe and store it in the fridge for up to 2 days. The pastry can be fully baked and stored in an airtight container at room temperature for up to 2 days. For extra freshness, carefully wrap the pastry in plastic wrap then store it in your container. The puff pastry softens once it touches the custard so. for the best texture, I recommend assembling them 1-2 hours before serving.
- A thinner store-bought custard won’t work for this recipe as they’ll drip out of the pastries and make them soft very quickly. If you use store-bought custard, ideally it should be a thick spoonable consistency almost like pudding.
This post may contain affiliate links. As an Amazon Associate, I may earn a small commission from qualifying purchases at no additional cost to you.

Thank you this is perfect